Improve
Updates for Rock 5.0
Below is a summary of the updates for this version.
- Added the documentation for the new Event Payment Reminders and Send Group Email jobs.
- Added the documentation for running multipleservers with Redis.
- Documented the Email Exceptions Filter global attribute.
- Described in detail the scoring system for finding duplicate records.
- Described the new Combine Family Members feature in the Merge Documents chapter.
Updates for Rock 1.0
No updates made.Updates for Rock 2.0
Below is a summary of the updates for this version.
- A DISC personality assessment chapter.
- Details on background checks.
- Noted that SmartyStreets is no longer free.
Updates for Rock 3.0
Below is a summary of the updates for this version.
- Added more tips when using international phone numbers.
- Noted that SmartyStreets is no longer free.
- Added information on Rock's new keyboard shortcuts.
- Documented new recommended naming conventions for security roles.
- Noted the change of the Background Check Administrator's application group move to a Security Role.
- Highlighted the move of the content channel pages from the
'Admin Tools > Communications' to 'Admin Tools > CMS Configuration'
- Documented the move of the Photo Request page to 'Admin Tools > Communications'.
- Noted Rock's new custom School Grade feature in the internationalization section.
- Documented the new Org Chart feature in under the Intranet menu.
- Filled in some of the missing jobs.
Updates for Rock 4.0
Below is a summary of the updates for this version.
- Added information on the new jobs Group Sync and Group Leader Pending Notifications
- Included the new PIN Authenication service.
- New Chapter on Merge Documents.
- Added documentation for several new service jobs.
- Documented the location editor under Data Integrity.
- Added information on the new merge request system.
- Added chapter on Note Types.
- Added details on the Google and Twitter authentication services.
- Change the email transport preference to Mailgun from Mandrill.
Updates for Rock 6.0
Below is a summary of the updates for this version.
- Noted the move the 'Entity Attributes' page from 'Security' to 'System Settings'
- Discussed the new 'Category Manager' page (this replaced the 'History Categories'
page. It now allows you to manage categories for any entity type.
- Added the information pulled over from Facebook with authentication.
- Added Signature Documents section to General Settings chapter.
- Added Routes and Themes to the CMS Configuration chapter.
- Removed documentation related to Rock Jobs Scheduler and running Rock as a windows service.
Updates for Rock 7.0
Below is a summary of the updates for this version.
- Added Cloning Security Role Groups to the Security Settings chapter
- Updated SmartyStreets information to reflect free service, API Key housed on Rock servers.
- Added Database Maintenance/Care and Feeding of Rock section to Jobs chapter.
- Updated General Setting screenshot.
- Added Attribute Matrix Template documentation to General Settings chapter.
- Added Index Rock Site to jobs table in Jobs chapter.
- Added Communication Queue documentation and screenshot to Communications chapter.
- Added Person Tokens chapter.
- Updated Jobs List in Jobs chapter.
- Added Signature Documents section to General Settings chapter.
- Added Verify Security block documentation to the Securing Rock chapter.
- Updated CMS Configuration chapter to include Short Links and Lava Shortcodes information.
- Updated Communications chapter screenshot and page explanations.
- Updated Tags section of General Settings chapter to include tag security.
- Updated Security Settings screenshot.
- Updated System Setting descriptions to include Universal Search Index Components and Calendar Dimension Settings information.
- Updated Data Integrity considerations to include suffix matching.
- Updated BI Analytics job info and manual link in Jobs chapter.
- Added Interactions chapter and PBX CDR Records section.
- Added keyboard shortcut info for Mac users in the Getting Comfortable chapter.
- Added Data Integrity Settings section in Data Integrity chapter.
Updates for Rock 8.0
Below is a summary of the updates for this version.
- Added Interactions chapter and PBX CDR Records section.
- Added keyboard shortcut info for Mac users in the Getting Comfortable chapter.
- Added information on the new Auth0 external authentication service.
- Updated Merge Template Detail screenshot in Merge Documents chapter to include security button.
- Added security settings info for Merge Template Detail block in Merge Documents chapter.
- Added Process Adult Children job to list of jobs in Jobs chapter.
- Added Data Integrity Settings section in Data Integrity chapter.
- Added Person Signal Types section to Security Settings chapter.
- Updated Jobs list to include Process Group History.
- Updated the Rock Homepage chapter to include documentation of new homepage layout and sections.
- Added Checkr documentation to Background Checks chapter.
- Added CacheManager documentation to CMS Configuration chapter.
- Added information on how to set up the Google Maps API key.
- Added information about note approvals, replies and watches
Updates for Rock 9.0
Below is a summary of the updates for this version.
- Added Mailgun Configuration Details
- Added Group Member Schedule Templates to General settings
- Added Asset Manager to the CMS Configuration
- Added SMS Pipeline to Communications Page
- Added "time zone" information to the System Settings section.
- Added Asset Storage Provider to the System Setting
- Updated Campus Detail Screen Shot
- Added "time zone" information to campus detail section
- Updated "named location" note when adding a new campus
- Added a Note to the Digital Signatures Chapter
- Updated Checkr step 1 instructions
Updates for Rock 10.0
Below is a summary of the updates for this version.
- Added Status and Type information to the Campuses section
- Added details to describe single-campus behavior
- Added Connection Status Changes tool details
- New chapter with recommendations for 'Things You Should Not Do'
Updates for Rock 11.0
Below is a summary of the updates for this version.
- Added the ability to upload documents for any entity type
- Defined Value attributes can allow adding new values to the list from anywhere the attribute is used
- Added Campus Team feature, which ties people and their role directly to a campus
- Individual parts of a physical address can be made required, optional or hidden
- Added the Phone Number Lookup block, which provides a mobile-friendly alternative to traditional logins for
your external site
- Added more granular controls for File Type caching
- Added options for considering logins when automatically inactivating/activating person records
- Added cookie Persistence Length and Database Performance Counter system options
Updates for Rock 12.0
Below is a summary of the updates for this version.
- Cache Statistics in the Cache Manager are now turned off by default, and can be manually enabled
- Added OpenID Connect server feature, enabling Rock to act as an authorization server for OIDC clients
- Added a new 'Location List' field type for selecting or adding new locations from a configured parent location
- A new Account Registration block setting lets administrators force the use of an email address as a person's Rock username
- Added support for Attributes on Notes
- Businesses can be set to appear in Person Picker search results
- Campuses can now have Schedules associated with them
Updates for Rock 13.0
Below is a summary of the updates for this version.
- A new Group Attendance Reporting job will create and populate person attributes to track group attendance data
- The Send Communications job has a new setting for sending multiple communications in parallel
- Data Automation settings for Reactivate and Inactivate now include a check for event registrations
- New Security Settings restrict merges or other record matching operations in Rock in order to reduce the possibility of an account hijack attempt
- A new Security Change Audit page has been added to assist when troubleshooting security permission changes
Updates for Rock 14.0
Below is a summary of the updates for this version.
- If enabled on the Defined Type, Defined Values can now be assigned categories
- New IP address geocoding features let you see where people who visit your site are coming from
- Rock now ships with electronic signature features for use in workflows or event registrations
- The CSV Import feature lets you import data from an external system into Rock
Updates for Rock 15.0
Below is a summary of the updates for this version.
- The Account Registration block now supports asking for person attributes on the form
- You can securely log in to Rock without a password using Passwordless Authentication
- Rock Captcha distinguishes humans from bots for security purposes
Updates for Rock 16.0
Below is a summary of the updates for this version.
-
Observability gives you system performance insights
-
If a person has a valid signature document on file,
that document will not be shown again in Event
Registration
-
In the Electronic Signature Document workflow action,
the signature document can be set using a workflow
attribute
-
Rock now supports Two-Factor Authentication (2FA)
for enhanced account security
-
Interaction Intents enhance data insights within
Interaction records
-
A new NCOA process which does not use Spark Link
has been implemented
Updates for Rock 17.0
Below is a summary of the updates for this version.
- Admin Bar now supports keyboard shortcuts
- Updated settings layout in Admin Tools for better navigation
- Added IP Address Geocoding capabilities
- Google Map styling creates streamlined map styles
- Added support for multiple electronic signatures on documents
- The v2 API is live
- Entity Search simplifies querying for the v2 API and Entity Commands
Updates for Rock 18.1
Below is a summary of the updates for this version.
- Automations trigger activities when an event occurs, making some common actions autonomous.
- You can now Track Entity Interactions by enabling the setting on an Entity Type to link new records to the page interaction that created them, writing a record to the InteractionEntity table for reporting purposes.
- Track Average Attendance for a campus.
Welcome
We hope that by the time you finish this guide you will not only be able to survive, but
thrive in your role as a Rock administrator. Our goal is to make you the hero of your team,
the one person everyone goes to for answers. So what are we waiting for? Let's get started.
Rock Homepage
The Rock homepage is the first screen most of your staff will see, so use that to your advantage.
This is a great place for you to add organizational announcements, tips for using Rock and links
to common resources. Let's walk through some things you can do to make this page a useful resource.
Rock Homepage
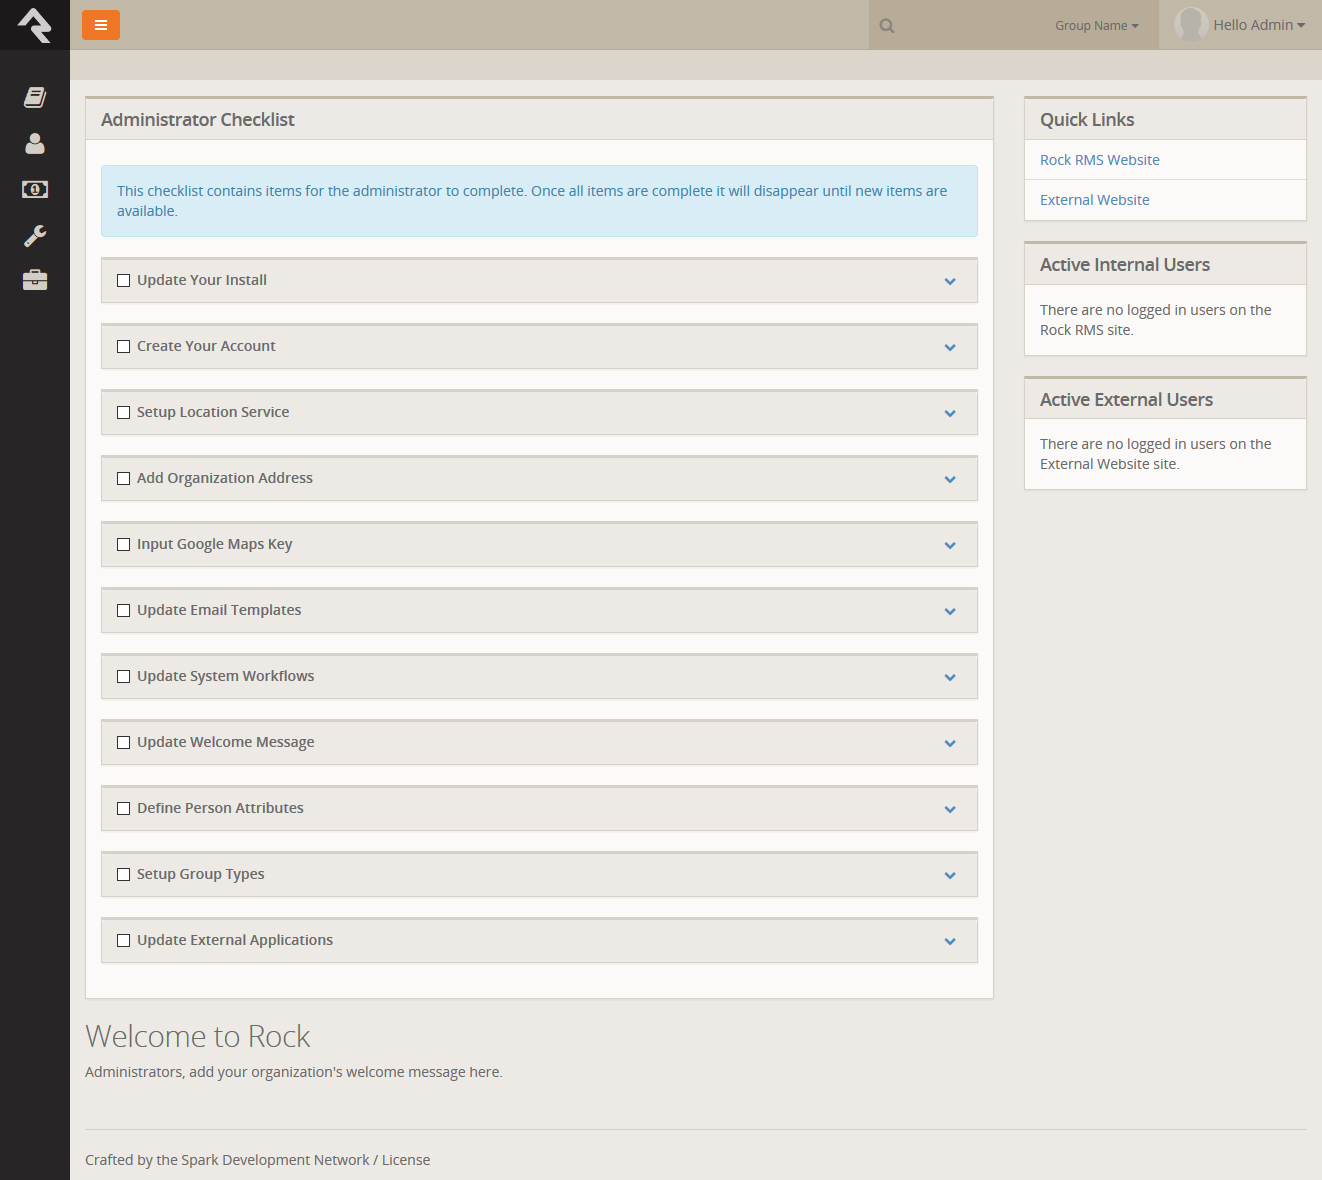
Administrator Checklist
After install you will see an Administrator's Checklist on the homepage. Don't worry; only
administrators will see this block. The welcome block below it will greet a majority of your colleagues.
The Administrator's Checklist block gives you a list of things you'll want to complete before
you get too far along in your deployment of Rock. Once you've checked all of the items off,
this block will disappear, but not forever… After an update there may be additional configuration
steps required before you're able to use a new feature. These steps will show up in this block after
the update. Think of it as an old friend who shows up in your hour of need (not like your old college
roommate who only shows up at the worst possible times.)
Quick Links
You'll see a Quick Links section on the right side of the screen. This is a great place to organize links
that your organization uses most often. Some churches have used this section to provide links to:
- The online catalog for ordering office supplies
- Referral lists for counseling and pastoral needs
- The organization's webmail site
- Project management tools the organization uses like Basecamp or Asana
- Facility management tools like ServiceU
- Common Forms
Tip... Be Careful
When adding these links, be careful with the HTML since its format is fairly specific.
It's best to edit it on the source view. To add a new link, simply copy-paste an
existing list item (<li>) and change its link and name. Don't worry, HTML may look complex
but it’s super easy.
Active Users
Under the quick links section you will see two sections that list active users on the internal and external website. This
allows you to see who is active on the site. Clicking on the name will take you to their
Person Profile page.
Workflow Tasks
Next on the homepage you will find a list of workflows that pertain to the currently logged in user. This is broken down into two areas.
- My Tasks This lists out active workflow tasks that are currently assigned to the currently logged in user.
- My Requests This lists all of the active workflow requests you have launched.
Be Creative
Don't limit yourself to what was provided out of the box. While we'll be providing new blocks
for you to add to your homepage (like staff anniversaries and birthdays), you can get started
today with some simple, but powerful, tools. Below are some ideas to help get the juices flowing.
-
Pastoral Messages: Below the welcome message, add a new HTML block that is
secured so only Pastoral staff can see it. This is a good way to share information without
overloading the screen with content that only a few people need. You can modify the security of
this block to allow an approved group of people to modify it (freeing yourself to work on other
tasks.)
-
Team Messages: Similar in concept to the pastoral messages, you can
secure an HTML block to be seen only by specific teams in your organization.
Intranet
The Intranet tab is one area of Rock that will be unique to every organization. We've
added a couple of items during the install, but we leave it up to you to customize the list.
This is a great place to share information with your staff and key volunteers. Below is
a quick list of ideas you might want to include in your Intranet.
- Office Information
- Holiday Schedule
- Common Links (ordering office supplies, etc.)
- Referral Lists
- Staff Phone Lists
- Human Resources Content
- Payroll Calendars
- Timesheet Templates
- Employee Forms
- Org Charts
- Benefits Information
- Employee Manual
- Finance Information
- Chart of Accounts
- Expense Report Templates
- Forms (W-9, etc)
- IT Resources
- FAQs
- How to set up email on mobile devices
Keeping It Up-To-Date
When setting up the Intranet, be sure to define who will be responsible for keeping each
area up-to-date. It's much easier to add the information than it is to keep up with
it over time. But obviously, there's no point in adding it if you don't plan
to keep it up-to-date.
Org Chart
Under the Intranet section you will also find a page for configuring an Org Chart. This is simply a group viewer that is specifically configured
for helping you develop an organization chart. It's often helpful to have an org chart in Rock that you can use to configure access to parts of the
application or for use in configuration. If you don't think you'll need this you can simply hide it from the navigation by setting the
Display When setting to Never
on under Page Properties.
Going Deeper
The group type for the Org Chart areas/departments are Organization Unit.
Feel free to add additional attributes to groups of these types if it makes sense to you in your organization.
Getting Comfortable
Hopefully by now you've had some time to poke around Rock - window shopping at all the features. Let's discuss a
couple of tips and tricks that will make you feel more at home.
Keyboard Shortcuts
In at effort to speed up your interaction with Rock, we've added several keyboard shortcuts. Let's take a look
at what's available:
Alt + Q Quick Search: Sets focus to the search box at the top of the page.
Alt + S Save: Presses the save button on the given page.
Alt + M Edit: Presses the edit button on the given page (think M for modify).
Alt + C Cancel: Presses the cancel button on the given page.
Alt + N New: Presses the add button on any grid on the page.
Alt + I Edit Individual: On the Person Profile page this allows you to edit the individual's information.
Alt + O Edit Family On the Person Profile page this allows you to edit the family's information.
Learn the Lingo
Why do tech guys always seem to speak another language? We’ve worked hard to
limit the tech babble, but there are a few words we’d like to discuss to help
build a shared vocabulary.
Entities
The word "entities" is used to describe the classification unit of different
types of data in Rock. For instance
People,
Groups,
Financial Transactions,
Locations,
Pages
are all different entities in Rock. If you’re familiar with databases,
entities are very similar to tables. In fact, most entities in Rock have an
associated table in the database.
You might be asking, "Why do I need to know this?" For the most part, you
don’t have to know a thing about entities to successfully use Rock. But,
you will see the term in many of the configuration screens so it’s
good to know what it is.
Defined Types / Defined Values
Many of the configuration items in Rock are made up of a list of valid values.
Think about the Marital Status
of a person. While we could have made this a textbox where anyone could type
in the marital status of a couple, in today’s world, that could be a
disaster. You’d probably get a million different answers to that question.
Instead, it's better to provide a list to limit the options to those that
make sense to the organization.
The "valid value" concept is prevalent in numerous areas
(Record Status,
Phone Types,
etc). Instead of creating separate screens and logic for each of these, we
came up with the concept of Defined Lists.
These lists are made up of values (Defined Values)
that you get to configure to match your organization.
My Settings
Rock offers several types of personal settings for each logged in user. To help manage this Rock has
a My Settings page which lives under the
Login Status
dropdown in the upper right of the internal pages. This page will be people's one stop shop for all of their personal settings and
configurations.
My Settings Page
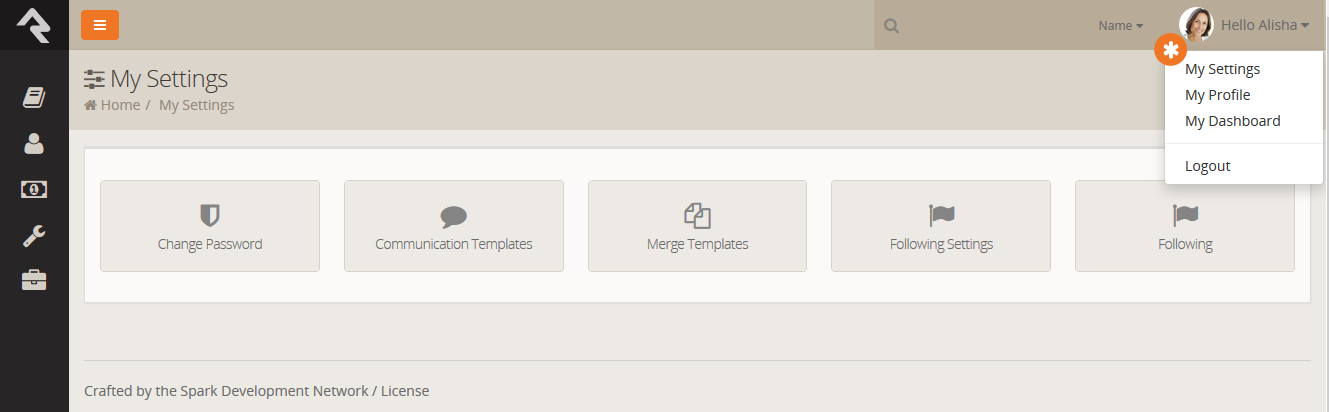
Change Password
This is where the logged in user can change their password.
Communication Templates
This page allows the current user to create personal communication templates.
Background Checks
Background checks are an unfortunate requirement for most organizations these
days. They involve the coordinated efforts of lots of different people –
staff, security teams, service providers. Because of all these points of
contact, it can take quite awhile for background checks to process.
Using workflows to expedite the process helps prevent delays and keep your
organization moving.
Configuring Protect My Ministry
Rock ships with a seamless integration with Protect My Ministry for background checks. Below is a series of steps to
get you up and running in no time.
Step 1: Sign-up
The first step in the process is to sign up for the Protect My Ministry service. To do this, start at the
Protect My Ministry page under
Admin Tools > System Settings > Protect My Ministry.
Protect My Ministry Start Page
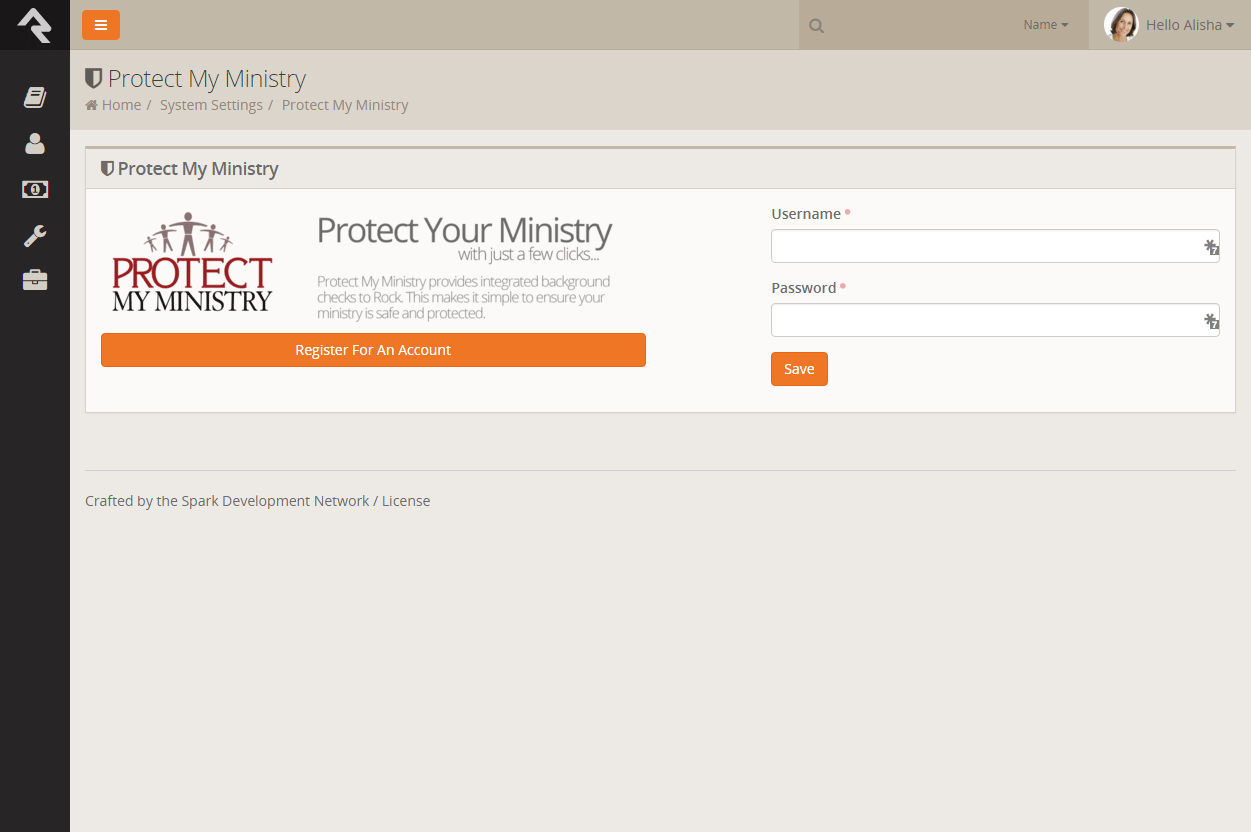
Should you choose to register for a new account by clicking the Register For An Account
Protect My Ministry Registration Page
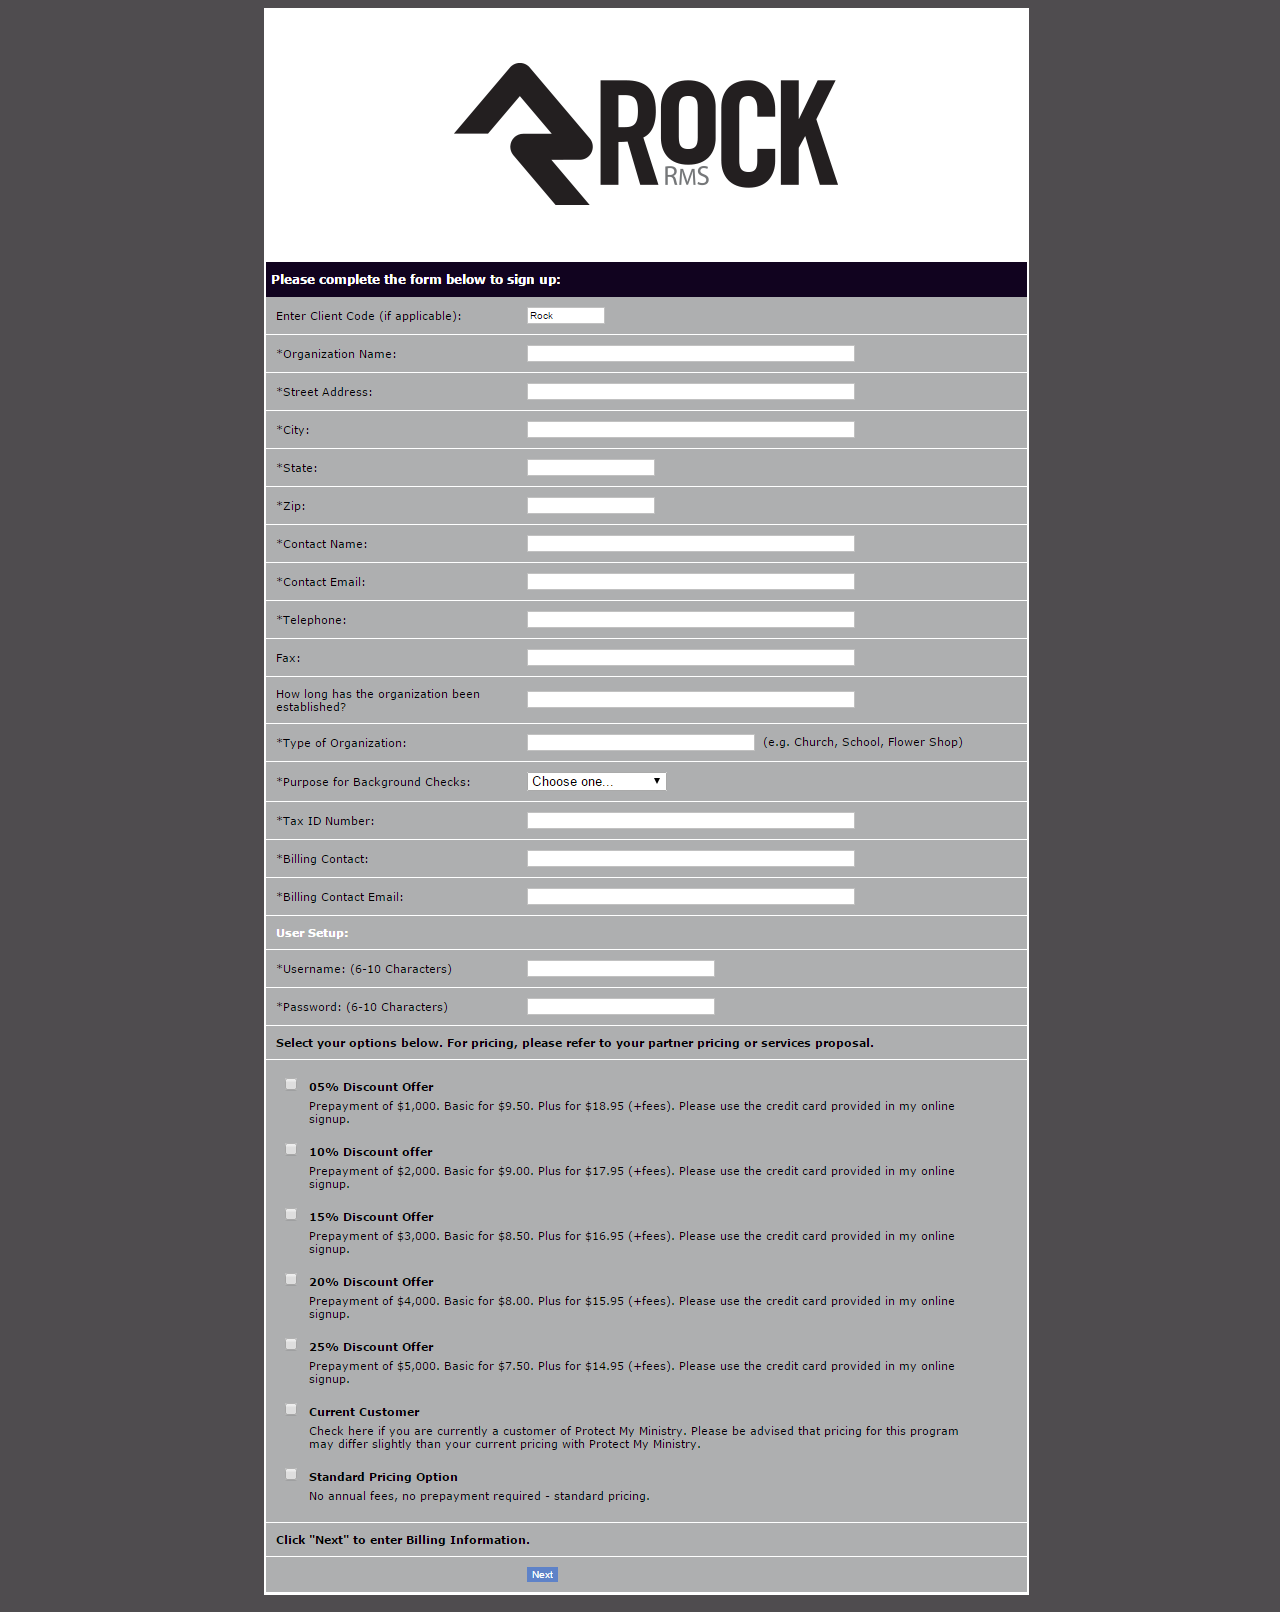
After completing the registration, come back to the Rock PMM page and enter in the username and password you created. You will then
be taken to the Protect My Ministry Detail Page.
Step 2: Configuration
Once you've entered your PMM account information, you will see the details of your account.
Protect My Ministry Registration Page
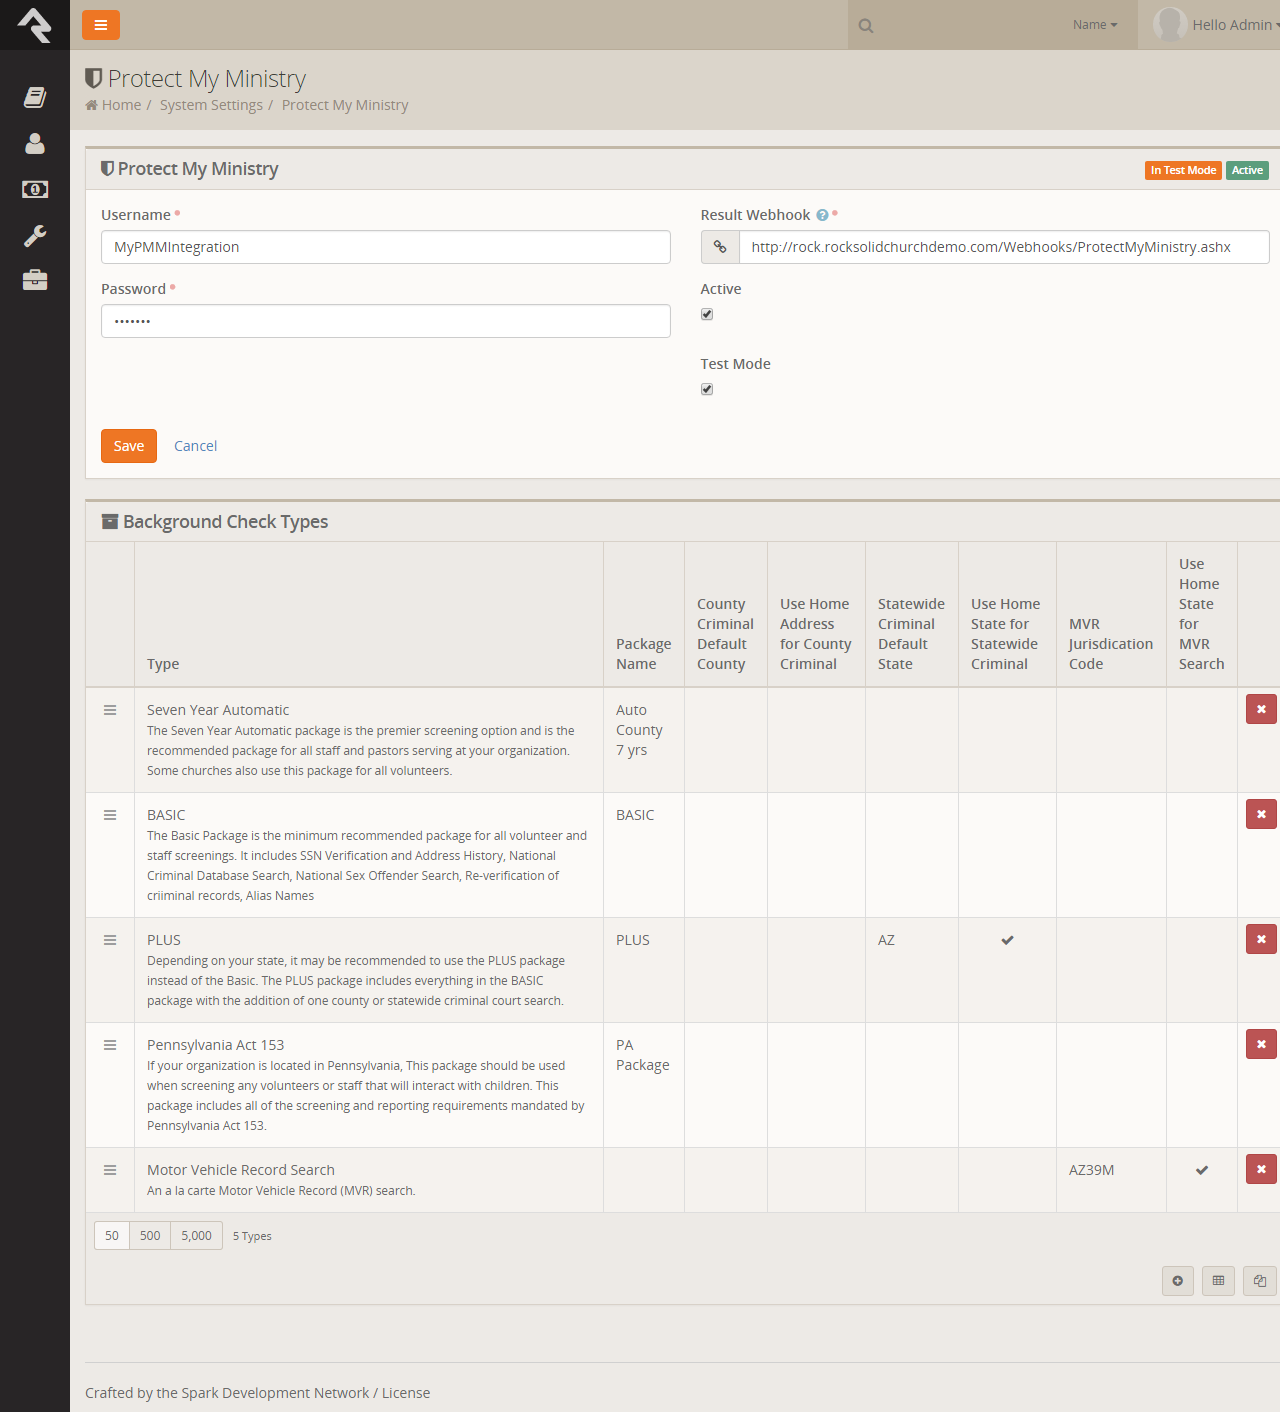
You'll now want to configure the packages that are tied to your account. The most popular packages
have already been made available to you through the integration. Each package has a brief description
that outlines its specific merits.
There are several configuration settings for each package. Let's look at each setting and what it means.
- Package Name This is the PMM name for the package. It must be an exact match to what's in their system, so please don't
change it unless instructed to.
- County Criminal Default County Depending on your state it may be recommend that you provide a county on your request. If so this will be
the default county to use if one is not present on the address of the person you're checking. You can find out if your state needs this county
using this map from PMM.
- Use Home Address for County Criminal Again this will depend on the state you live in. If your state is recommended for the county
search, you will want to enable this option.
- State Criminal Default State This is the default state to use when doing a state criminal request. This option is defaulted to
the state that is most common in your database, but feel free to change it.
- Use Home State for Statewide Criminal This setting determines if the state from the address should be sent.
- MVR Jurisdiction Code This setting determines jurisdiction to use for MVR (Motor Vehicle Records) searches. You can select your area from the list provided.
(this is only needed for MVR type searches).
- Use Home State for MVR Search This determines if the state from the home address should be sent for the MVR search.
(this is only needed for MVR type searches).
While you can add new packages using the settings above for the most part, the packages provided should meet all your needs. You may need to edit some of the configurations to
meet the recommendations for your state. This decision centers around whether you should be doing a state or county search. PMM
provides a map to help you determine what is
best for your area.
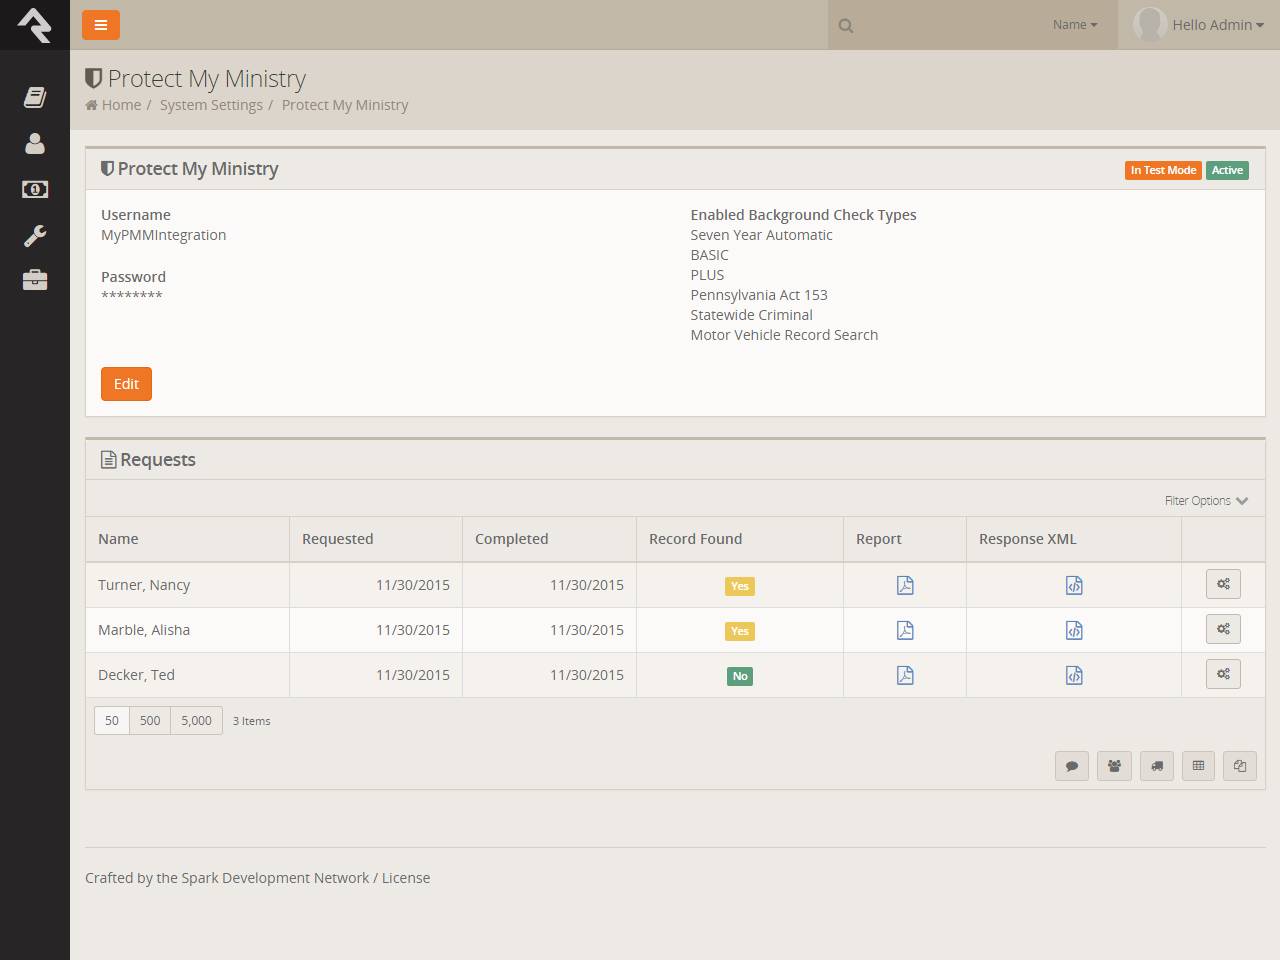
Viewing Requests
From this same screen you can also view all of the requests that have been processed. This list is provided to help you
see what's being processed from a high level. As you'll see soon, it's much easier to see the results of a specific
background check request from the workflow and Person Profile
pages.
Protect My Ministry Requests
Background Check Administrators
Background Check Admins have access to complete details of
background checks and the ability to approve or deny them at
several points in the process.
Before you get started, you'll want to configure the person or
people who will be included in this security role under
Admin Tools > Security > Security Roles > RSR - Background Check Administration.
Processing Requests
Several different organizational needs kick off a background request
workflow. For instance, you may be looking to hire a new staff member,
complete the screening of a potential volunteer, update existing
person profile records or transfer a staff member or volunteer into a
new position. At any rate, whatever the reason, it is usually a staff
member who first needs to start the request for a background check.
To see if an individual has had a background check done, go to the
Person Profile
page and look under the Extended Attributes tab.
Every logged in user will be able to see either a
Yes or
No
in the Background Checked
field. Background Check Admins can also see three additional fields,
and have editing privileges.
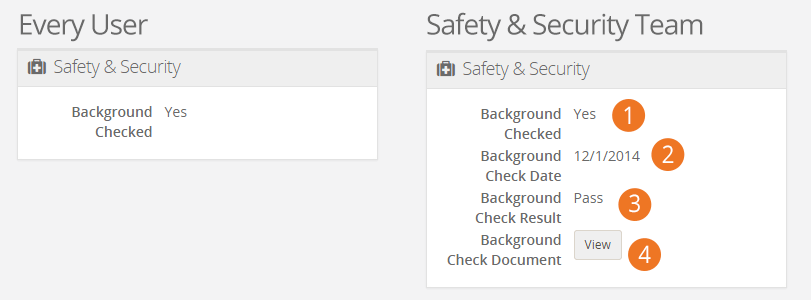
- 1 Background Checked:
- Will have the checkbox either checked or empty.
- 2 Background Check Date:
- Will have the date the check was completed, if applicable.
- 3 Background Check Result:
- Will show either Pass
or Fail.
- 4 Background Check Document:
- Will have a complete PDF of the background check results, if a check has been completed.
Make It Quick:
If you want greater visibility for Background Checks on your
Person Profile
page, consider adding a badge to the
Badge Bar.
How It Works
Initiating A Request
Background checks can be initiated from an individual’s
Person Profile
page. In the upper right corner is a drop down menu called
Actions.
Click on the Background Check
option. The initial request will save both the person and the requestor,
while prompting the requestor to provide any key missing details
such as social security number, campus, type, etc.
Just A Double Check:
Rock will automatically look for previous background checks for
that individual within the last year. If it finds another check
within that timeframe, it will notify the requester, who will have
to confirm that they want to request another background check
before proceeding.
The Lifecycle Of A Request
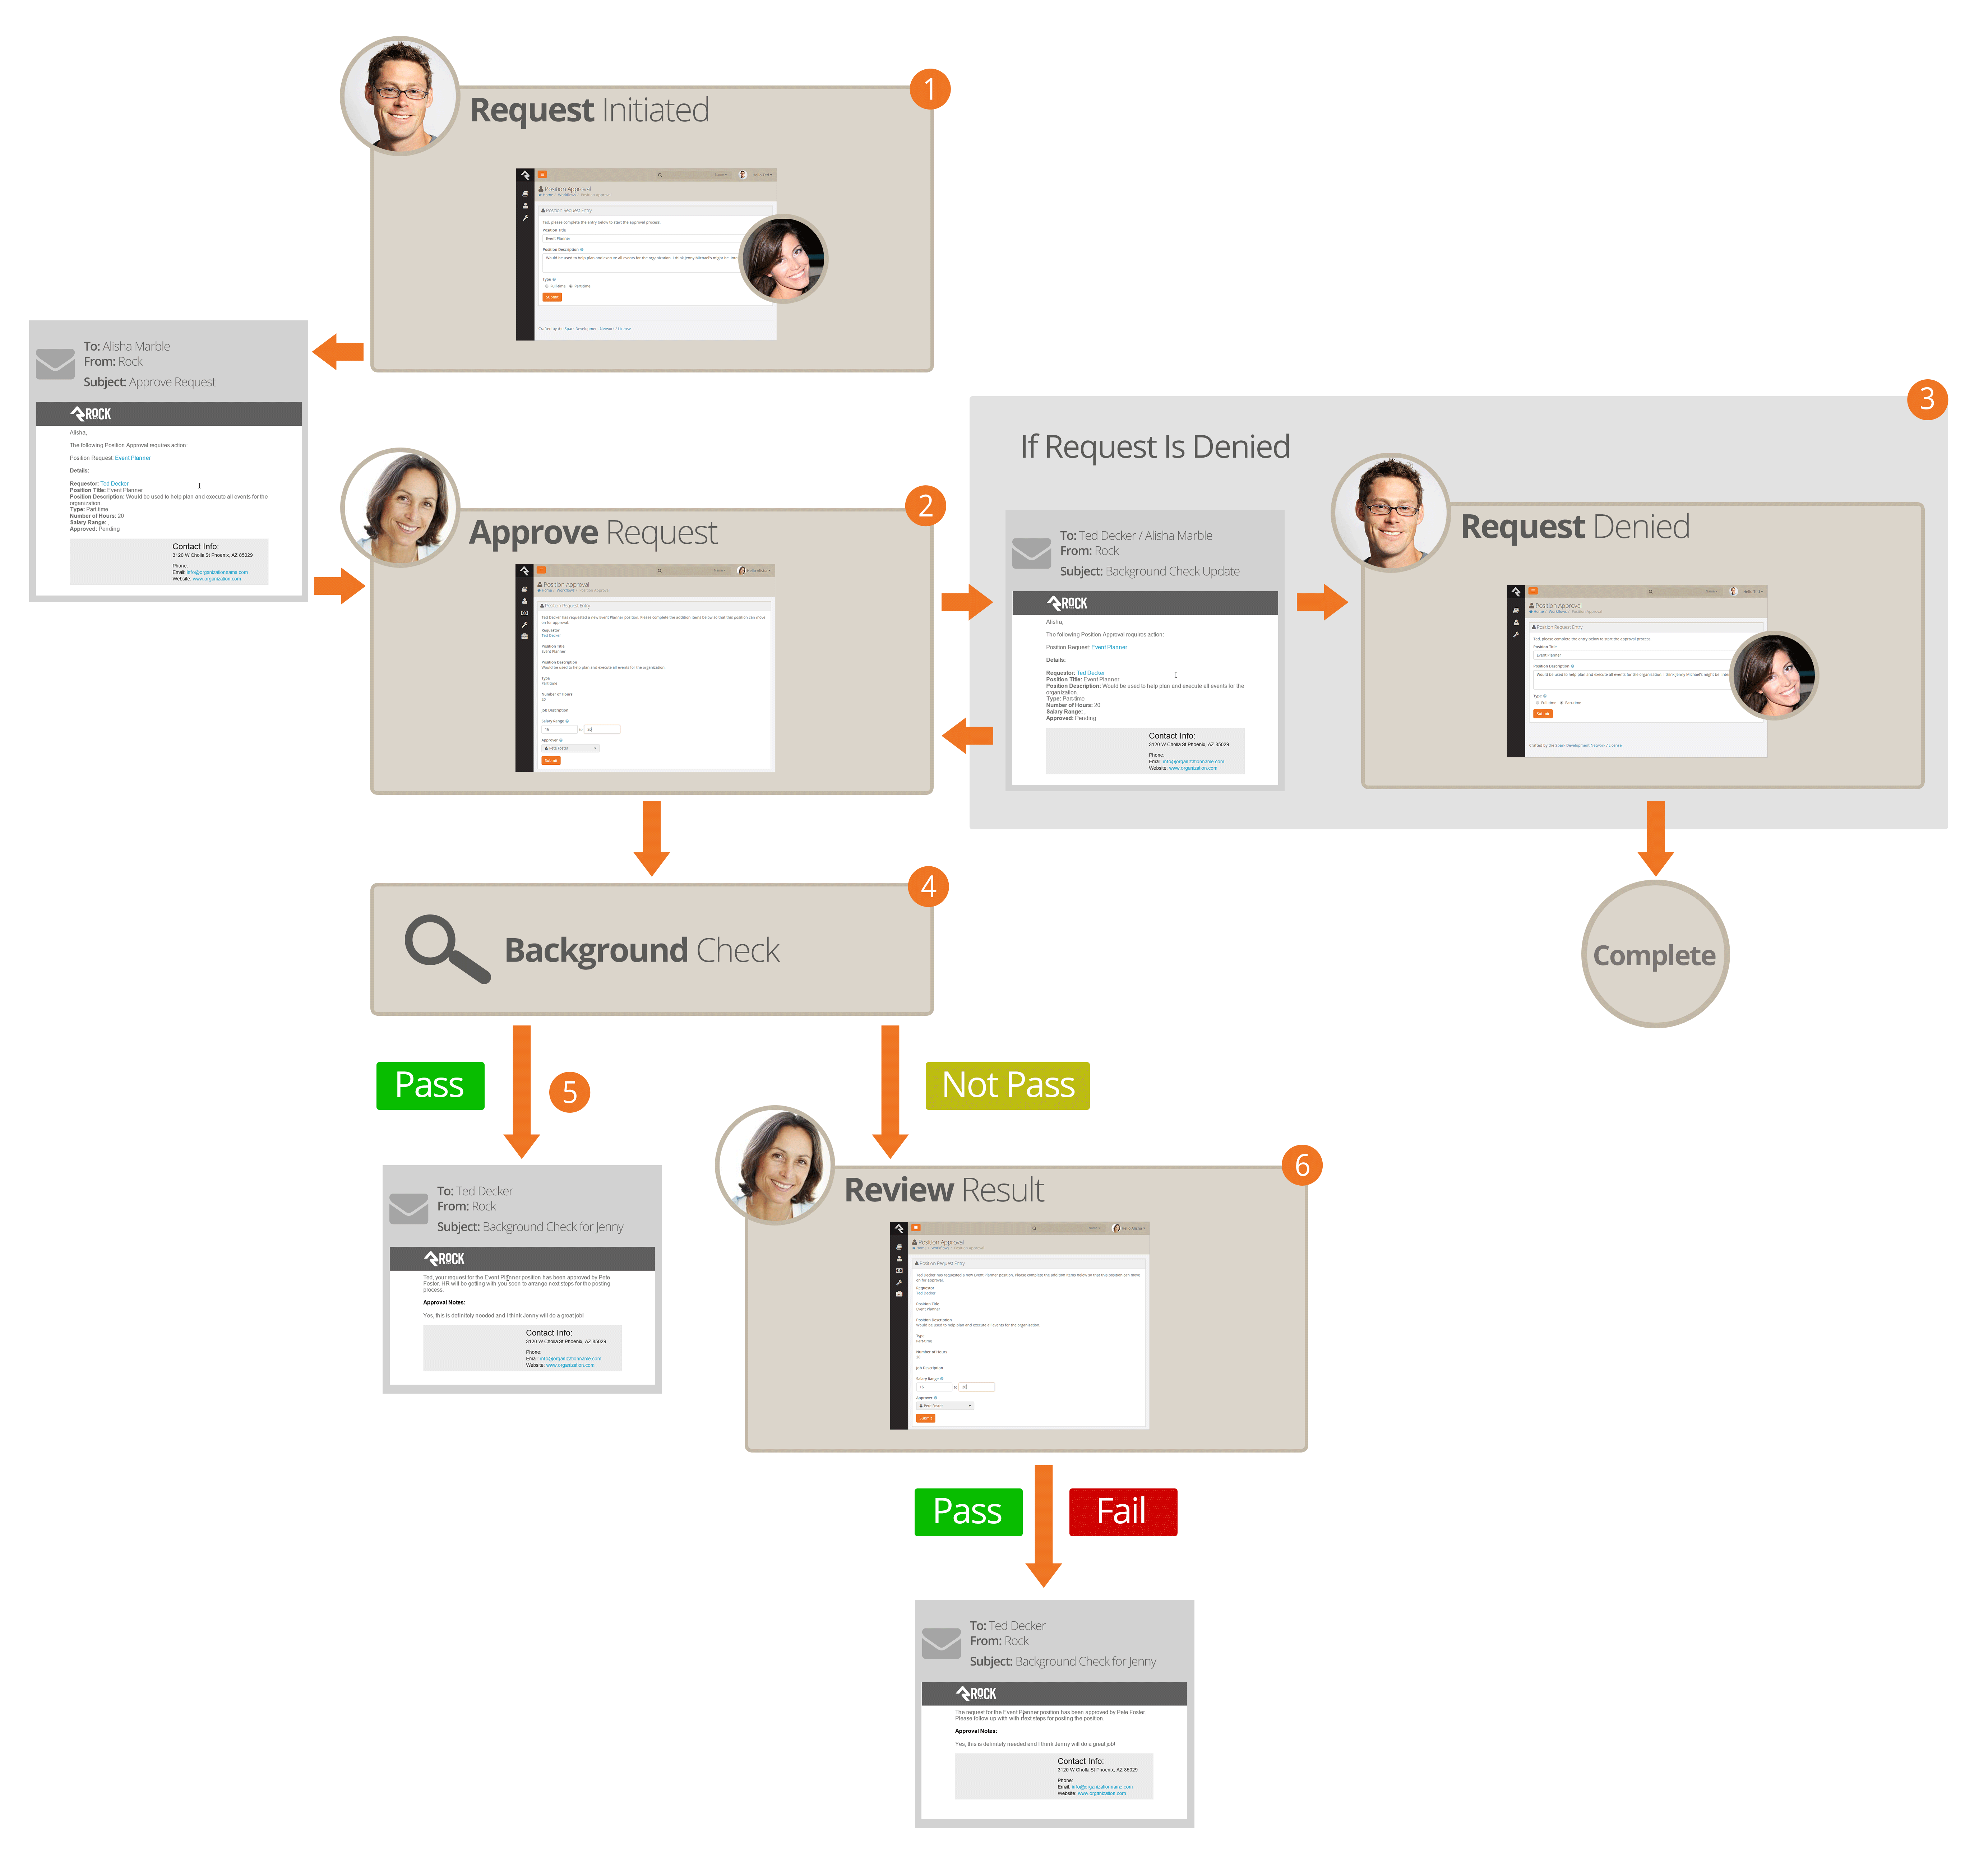
- 1
- A staff member will initiate a request.
- 2
- The request will be sent to notify the
individuals in the 'Background Check Administrators' security role.
- 3
- If the request is denied, a notification will be sent to the requestor,
who can then update the request and resubmit it or cancel the request.
- 4
- If the request is approved, it will be submitted to your organization's
background check provider to be processed.
- 5
- If the background check comes back as 'Pass', Rock will update the
Person Profile
page with pass/fail results and a PDF copy of the full report. The requester will also
be emailed an update of the completion.
- 6
- If the check comes back with a status other than 'Pass' the workflow will notify the
individuals in the 'Background Check Administrators' application group to review the
results and determine if the background check should be passed or failed. The results
will then be emailed to the requester.
Workflow
The background check workflow has eight possible activities. And like
many other aspects of Rock, it's customizable. You may find that you'd
like to configure your background checks a little differently for your
organization. For instance, you could add a step to the process after
a staff requests a background check that notifies a volunteer to
provide their own social security number.
To review or modify the workflow configuration, go to
Admin Tools > General Settings > Workflow Configuration > Safety & Security > Background Check.
For more details on workflows in Rock, see Blasting Off With Workflows.
Locations
With the development of mapping technologies, location has taken on a new
importance in our lives. Concepts like proximity, distance and location are
common in our everyday lives and our interaction with others. Rock has a very
robust location strategy. It’s important that you understand all of the
possibilities as you set out to implement it in your organization.
Location Descriptors
When you create a location, you can define several location descriptors:
street address, latitude/longitude point and geo-fence.
-
Street Address: This is pretty obvious, the street
address of the location.
-
Latitude / Longitude Point: The lat/long point is simply the
latitude/longitude of the location on the map. You can set this by
either providing an address and allowing Rock to convert it to a
lat/long (assuming a Geocoding Service is configured) or you can
reference the point using Rock’s location picker.
-
Geo-fence: A geo-fence is a virtual perimeter for a real-world
geographic area or boundary. Geo-fences are used by Rock to define
things like regions for groups and to power future mobile applications
like check-in.
Types of Locations
There are two types of locations in Rock. Let’s take a look at each and see how they are used by Rock.
Positional Locations
Positional locations describe places you could point to on a map. By themselves they
don’t tell you anything about the point, just its placement on the map.
They only find meaning when they are used by features like
Families
(to describe where they live) or
Groups
(where they meet).
Named Locations
Named locations have position and meaning. The meaning comes from
giving the position a name. For instance, after install there is a
Main Campus
location that describes your church’s campus.
Named locations can have hierarchy. Think again to your church’s campus.
The campus itself is a location, but it’s also made up of sub-locations
like buildings. Buildings have locations too - rooms. Having hierarchy
allows Rock to build rich location contexts into applications like
check-in.
Named locations must be setup under
General Settings > Named Locations
before they can be used in the application.
Address Standardization and Geocoding
Your attendees' addresses are very valuable, so it's important that they are formatted correctly and validated
through the USPS database. Also, in order for these addresses to be used with the latest mapping technologies
it's important to convert them into latitude and longitude points through a process called geocoding. Fortunately,
Rock makes both of these tasks simple.
As addresses are entered into the system, Rock can send them to one of many online services to standardize and geocode
them. These services will ensure that:
- Addresses are formatted correctly (e.g. fix upper / lower case issues)
- Items like Streets, Avenues, West and East are abbreviated correctly
- Zip+4 is researched and added
- Latitude and longitude are added to your addresses
You can set up these services under Admin Tools > System Settings > Location Services.
There you will see a list of services that Rock supports. Not every service supports both standardization and geocoding.
| Service Name |
Description |
Service Type |
Cost |
| SmartyStreets |
SmartyStreets is a highly recommended solution because of their high quality results and
low-cost pricing. See more about our recommendation below.
Find out more on their website.
|
Address Standardization & Geocoding |
Plans start at $20/m for 500 lookups |
| Bing |
Microsoft's Bing mapping service provides a free geocoding service. The service does have
a few limitations. You can only make a maximum of 5,000 requests a day and 125,000 in a 12-month
period. For most churches, this will be more than enough. We've even built in a daily transaction
limit so you won't have to worry about going over in any given day.
This service does require a key to use it. To get your free key, follow these simple steps:
- Go to the Bing Maps Portal.
- Sign in using a Microsoft Account or create a new account.
- Select "Create or View Keys" from the menu on the left side of the page. You will be asked
for the following information:
- Application Name: Rock RMS
- Application URL (optional): your organization's Rock URL
- Key Type: choose "Basic" from the dropdown menu
- Application Type: choose either "Public Website" or "Non-Profit" from the
dropdown menu, depending on which better fits your organization.
- Input your key under Admin Tools > System
Settings > Location Services > Bing.
While the Bing service provider is not a true address standardization component it will do some format
cleaning of the addresses you provide. For instance it will put your addresses in the proper case and fix
any minor missing elements. It won't however add zip+4 information.
|
Geocoding |
Free |
| Service Objects |
Service Objects is another paid option for geocoding data. You can find out more about their service on the
Geocoding Product website.
|
Geocoding |
$120/m for 5,000 transactions |
| StrikeIron |
Like ServiceObjects, StrikeIron provides a paid option for geocoding data. You can find more
information on their website.
|
Geocoding |
Must request a quote |
| Melissa Data |
Find out more about Melissa Data's address standardization service on
their
website.
|
Address Standardization |
Must request a quote |
Want Even More Options?
If you have a developer handy, you can even write your own location service provider to add to the list.
SmartyStreets
We highly recommend the usage of SmartyStreets. Their excellent service acts as both an address standardization
and a geocoding service, and their data has proven very accurate in our testing. SmartyStreets is also church-friendly.
To sign up, follow these simple steps.
- Start by filling out the donation request form.
You should receive an email back in a day or two announcing that you have a nonprofit account.
- Login to your SmartyStreets account and in the API Keys section, generate a new Secret Key (not a Website Key). This will create an Auth ID and Auth Token.
- Enter these auth values under
Admin Tools > System Settings > Location Services > SmartyStreets.
Don't forget to check the box to activate this location service.
There are a couple of settings options you should be aware of
when configuring the SmartyStreets location service:
- Acceptable DPV Code - This setting determines the acceptable quality match for standardizing
the address. You can find all of the options on the
SmartyStreets documentation site. The default settings is 'Y,S,D' which is a full or partial match.
- Acceptable Precisions - This setting is similar to the DPV code but is related to
the required percision of the geocoding in order for it to be considered a successful match.
You can find more information on the
SmartyStreets documentation site. The default settings is 'Zip7,Zip8,Zip9' determines a successful match
if the address is matched at Zip+2 (e.g. 85383.23__) or better.
Free Smarty Streets Account Update
SmartyStreets has generously offered the Rock community a single unlimited account for address standardization. Implementing
this is a secure and automated fashion will take some integration code. This will be made available in Rock v7. If you are in
need of a free SmartyStreets API key in the meantime you can request a key from
info@sparkdevnetwork.org.
What About Google?
Rock is more than code. We've also put in a lot of effort to make technology simple and approachable for people of
all backgrounds. One facet of this is ensuring that we bring the highest level of integrity possible to our use
of data and software licenses. We’ve even gone to the length of working with a top software attorney to review our
licensing, especially when licenses are unclear. His review of Google's free geocoding service determined that it
was not a fit for Rock. This was based on Google's limitation that their data could only be used in conjunction with
their maps. While we do use their excellent mapping technology for Rock, we also use the geocoding data internal to the
application to determine distances between points and which points are within geofences. Because of this, his recommendation
was that we would not be within Google license requirements. His determination was that we meet all of Bing’s definitions
in their license as it stands today. While the language of software licenses always lends itself to some grayness, we have
struggled to understand and stay within the boundaries as much as we can.
Email Configuration
While the initial email configuration was handled during the install, we wanted to spend a bit more time
reviewing how email is configured in Rock. And, since email is such an important tool for communications, we also
want to discuss some best practices to ensure that your emails reach their intended recipients.
Email Settings
The configuration items you provided during the install can be updated under
Admin Tools > Communications > Communication Transports > SMTP.
Email is sent from Rock using a communication transport. Think of this as a delivery service.
Just as you might pick between sending your package via UPS or FedEx, Rock gives you options when sending
out your emails. Currently, the only transport that is complete is the SMTP component (more to come soon).
SMTP Transport
SMTP (Simple Mail Transport Protocol) is the most common way to send email. Below are the
configuration items that are needed to enable SMTP emails to work. If you are unsure of what these
values should be, consult with your ISP or church IT support.
| Setting |
Description |
| Server |
This will be the SMTP email server that Rock should use to send the emails through.
|
| Port |
The port on the server that should be used for communications. Typically this will be
port 25 but often times port 587 is used, especially if you are encrypting the sending.
|
| Username |
If your email server requires you to authenticate to relay email, this is where you will
provide the username.
|
| Password |
When enabling authentication, this will be where you set the password.
|
| Use SSL |
Check this box if your mail server supports sending emails via an encrypted SSL session.
|
Most organizations will set these values to their established email server, but some very small
organizations might not have a central or common server. For example, some might run completely off of
personal Gmail accounts. Here is what you would enter for each of these settings.
Warning
Using personal Gmail settings is not a recommended configuration for organizations sending out
large bulk emails. We are providing these settings only as a service for small organizations.
- Server: smtp.gmail.com
- Port: 587
- Username: (your Gmail username "xxxx@gmail.com")
- Password: (your Gmail password)
- Use SSL: True (checked)
Sending bulk email is difficult in today’s age of spam and spam filters. Simply configuring an ISP or
Internal Exchange Server is not enough if you want to be sure that all of your messages will make it to
their intended recipients. To do that, you need to make sure your DNS has proper SPF and Domain Key
records and monitor that you are not on any blacklists. Even for the largest organizations, this can be
an overwhelming task.
Wherever a problem exists, a new service will be created to help solve it and that has certainly been
the case in the area of email deliverability. With the importance of email and the complexity of getting
your environment right, it makes sense for most organizations to outsource the sending of their emails.
These services specialize in getting it right and the pricing is fairly reasonable. Rock ships with the
Mailgun transport, but you can check the Rock Shop for integrations with other transports such as SendGrid.
Tip:
Some of these vendors even have free accounts that would suffice for many small organizations.
Mailgun, for instance, allows you to send 10,000 emails a month for free.
Note:
We realize that a list of recommended vendors is helpful, but sometimes it can also be overwhelming.
If you’re looking for a single recommendation, we’d say start with Mailgun. We use them ourselves
for the Rock site and have been very happy with the setup and deliverability to-date.
These services do require some minor changes to your organization’s DNS settings, but they walk you
through the process online to make it easier.
Configuring Deliverability Services
While each of the vendors listed above have their own custom API for sending emails, they also allow
you to send via SMTP using their servers. Once you get set up they will provide you with the values
for the SMTP settings above.
Currently, the only email transport provided by Spark that supports these features is the Mandrill transport.
For more information on configuring this transport see the
Communicating Using Rock guide.
Securing Rock
Many items in Rock can be secured to protect access to sensitive information. While we hope that you find
the default security settings and roles to be a good start, it’s important that you understand how security
works so that you’re able to configure it in a way that makes sense for you.
Security Roles
The basic access control unit is the Security Role.
While you can provide security specific to an individual, it's often overly tedious and problematic to
define security access down to the individual. Using Security Roles
is much more flexible and less prone to error.
Having a well thought out strategy for security roles is critical. Too simple and your users might have more rights than they
need; too complex and security will be difficult to maintain. We've worked hard to build a foundation for you to build from
in this area. Below is a list of security roles that come with Rock with a description of their usage. We strongly recommend
looking over these roles and reading their descriptions before you start setting up your staff and users. You can find
these roles under Admin Tools > Security > Security Roles.
Tip:
Do you have an existing group whose members also need access to a particular page or item? You can
enable any group to also act as a security role. In the group viewer, simply check the group's
Security Role property and it
will show up in the security role lists.
Permissions
Wherever you see the you can manage the security of the item being displayed.
This will bring up the Security Editor show below.
Security Editor
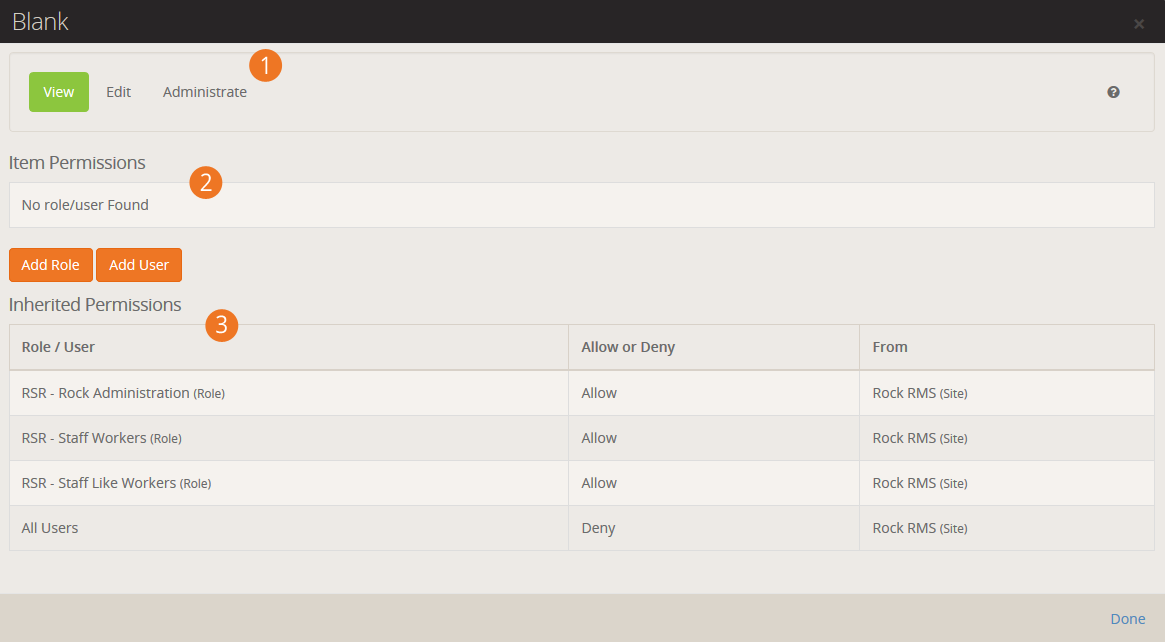
- 1Actions
- The first thing you’ll see is a tabbed list of the security actions available for the item. Normally
these will be View,
Edit and
Administrate. You will set
permissions for each of these actions.
- 2Item Permisstions
- The Item Permissions list the
specific permissions defined for the item. If there are no specific permissions set for this
particular item, the permissions will be blank. Instead, security is being inherited from its parent.
But now we’re jumping ahead...
- 3Inherited Permissions
- Most items don’t have permissions of their own. They inherit their permissions from their parents.
For the most part, you’ll only add Item Permissions
when you want to increase the security of the item. This is a very powerful concept. It keeps you
from having to constantly and consistently tweak the security of each item. It also allows you to
change the security of an item and let the change trickle down to all of its children.
Note:
The permissions list here tells you which parent item has set the security. This allows you to
find the parent and fix any incorrect security.
Setting Permissions
When setting permissions you will add either an individual, or more commonly a security role, to the
permissions list to either Allow
them access or Deny rights. The order of
these permissions is VERY important. The way the system works is that it starts at the top and works
its way down the list looking for a specific matching rule. The first rule that matches the logged in
individual will be implemented either granting or denying access. Crafting the order of these
permissions is important. Let’s look at an example.
Example:
Securing a page so that only a staff member can view it.
Incorrect Permissions:
| Name |
Allow / Deny |
| All Users |
Deny |
| All Staff |
Allow |
At first this might look correct as both roles exist with the proper access. But if we walk down
the order we find that the logged in staff person is by default a part of
All Users and therefore
will be denied. Remember that once a rule is true, the action is taken and subsequent rules are ignored.
Correct Permissions:
| Name |
Allow / Deny |
| All Staff |
Allow |
| All Users |
Deny |
Now we can see that the logged in staff person will match the first rule and be granted access.
Processing of the subsequent rule will not occur so even though the staff person is also in
All Users, they will still be
granted access.
Updating Rock
We plan to be very responsive to bug fixes and plan to release new features quickly and often. To help you
keep your system up-to-date, we have built a sophisticated yet simple update process.
The update screen can be found under Admin Tools > General Settings > Rock Update.
From this screen your server will make a quick check to Rock’s server to see if there are any new updates
available. If there are, the updates will be displayed with information about the changes included. Once you
decide you’re ready, simply click the Install
button next to Update and Rock will do the rest.
Warning:
It is important that you have a backup of your database before you install an update because that update
cannot be undone.
Rock Updates

Questions About Updating
- Do I have to update to the latest version?
-
Depending how often you update, you may see several updates available. You don’t necessarily need to
update to the latest and greatest version. You can update to any version you wish. Doing so will install
all of the previous updates to that point.
- Can I skip a specific update?
-
No, updates are cumulative so you cannot skip over a specific update or patch.
Data Integrity
With data being entered into Rock from all directions, it can be a real
challenge to keep it all clean, consistent and accurate. We've built tools
to help you spot and fix issues as they arise. You'll find these tools
under Tools > Data Integrity.
Only individuals in the Data Integrity User
security role will have access to them.
Let's look at each one in detail.
Duplicate Finder
The duplicate finder routinely goes through your database looking for
records that could be duplicates. When it finds possible matches, it
scores them and lists them for you under
Tools > Data Integrity > Duplicate Finder.
Duplicate List
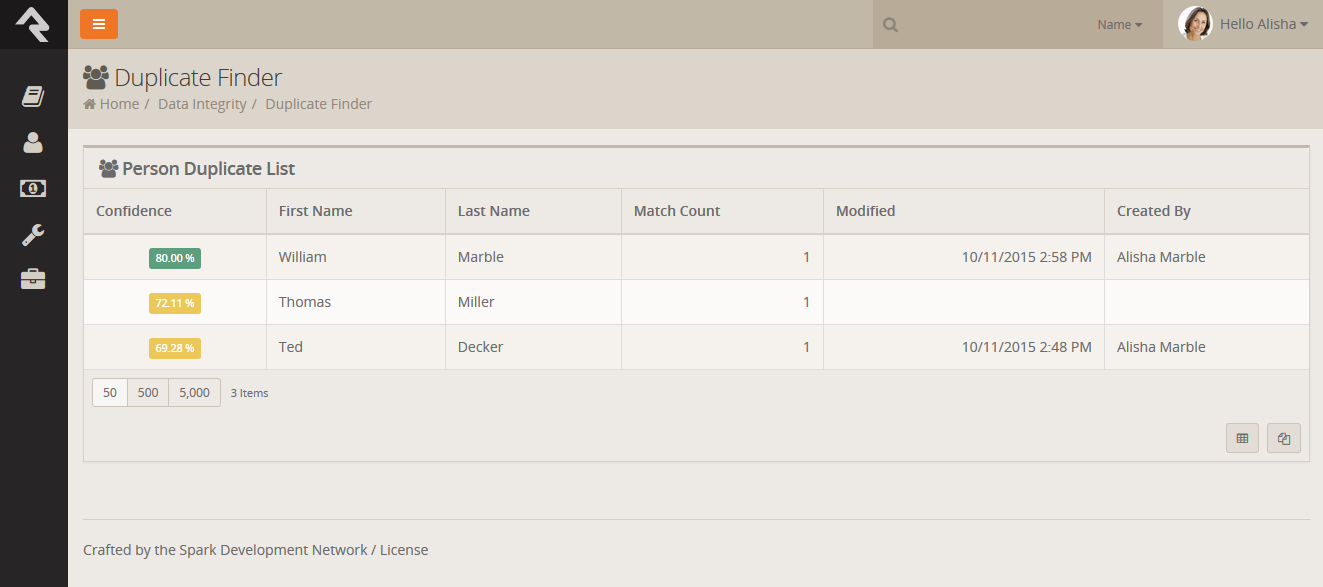
- 1 Confidence:
- Indicates the likelihood that this is a duplicate record.
- 2 Name:
- The first and last name of the individual.
- 3 Record Count:
- The number of possible duplicate records for this person.
- 4 Modified:
- The date and time the duplication record was modified. This is
another data point to help you determine if a record is a duplicate.
- 5 Created By:
- The person (or possibly application) that created the duplicate
record. This helps determine how the duplicate may have come into
existence and which data point might be more accurate.
Clicking on a row will take you to the duplicate detail screen.
Duplicate Detail
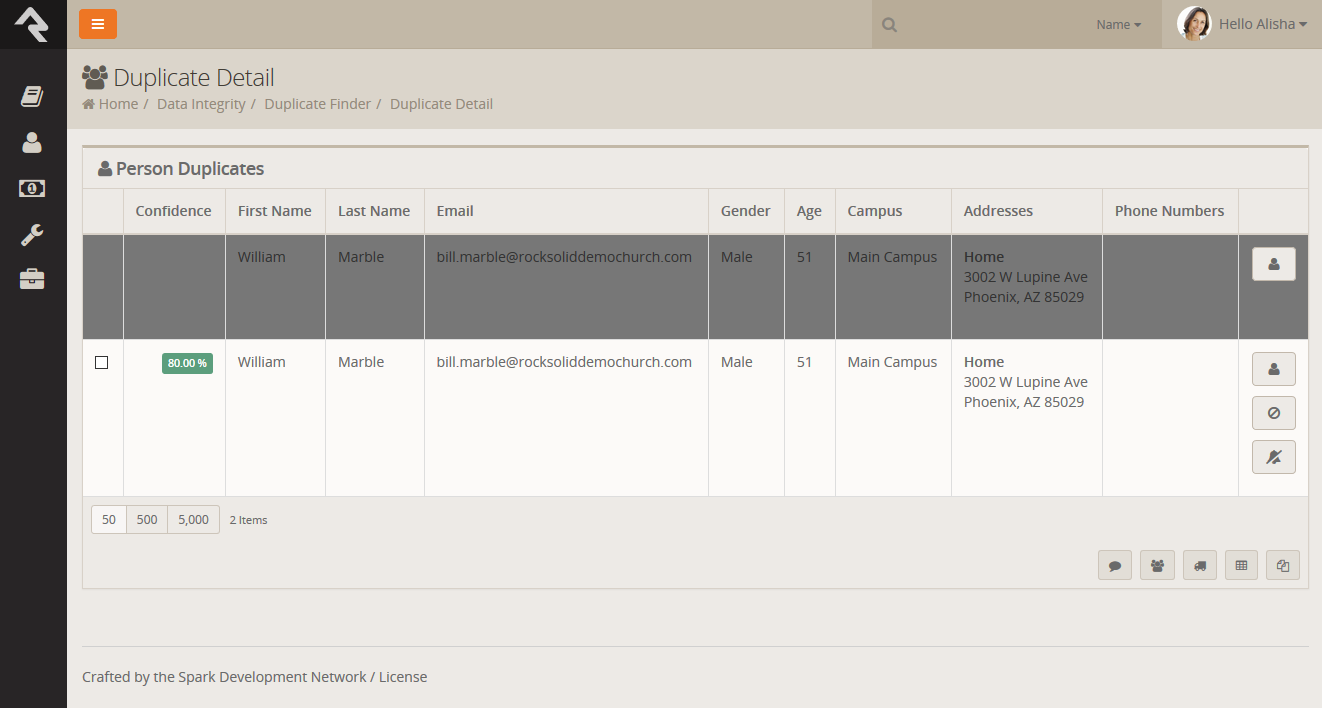
The top row represents the source record and the rows below represent
possible duplicate records. If any of these rows are duplicates, you
can select them and select the fa fa-users
in the grid footer to merge them. Each record has a series of buttons
to the right. These buttons perform the actions defined below.
-
Will open the person profile page for this individual in a new window.
-
Tells Rock that this record is definitely not a duplicate to the record above.
-
Tells Rock that there is
currently no way to be sure if this record is a duplicate of
the one above. This will keep Rock from showing it as a possible
duplicate until more information is available to help determine
its true status.
If you're uncertain whether two records are duplicates or not, you can
simply decide not to do anything yet. As more data is added to the
records, Rock will update the match scores to reflect a more accurate
prediction.
Detail minded folks might be interested on how the percentages are calculated for
duplicate records. The out of the box logic compares two records based on a points system.
Points are awarded based on the following factors:
- Email Matches (4pts)
- Partial Name Match (First 2 characters of the first name plus full last name) (1pt)
- Full First Name Match (3pts)
- Full Last Name Match (3pts)
- Cell Phone Match (4pts)
- Non-Cell Phone Match (2pts)
- Address Match (2pts)
- Birthday Match (3pts)
- Gender Match (1pt)
- Campus Match (1pt)
- Marital Status (1pt)
A percentage is the calculated by comparing the number of points scored by the total possible points.
Reports
There are several clean up
reports that have been created to help you identify records that need
your attention. Feel free to add your own reports here. Each of the
reports that ship with Rock are documented below.
| Report Name |
Description |
| Self-Inactivated Individuals |
This report lists individuals who have inactivated
themselves from the database. This usually comes from
using the unsubscribe link at the bottom of bulk emails.
You'll want to go through this list occasionally to
inactivate the other individuals in their families. You'll
also want to read through the inactive reasons to get a
pulse on why individuals are leaving the organization. |
| Pending Individuals |
When someone registers on the website, their individual
record status is set to Pending.
This allows you to view the record and determine if it is
a duplicate record. Once you go through them all, you'll
want to bulk update their statuses to active. |
Workflows
Workflows can be set up to help automate the process of data integrity.
Feel free to add your own. We've outlined the ones that come with Rock
below.
| Workflow Name |
Description |
| Person Data Error |
This is the workflow that is configured on the
Actions
list of the Person Profile page. |
| Photo Request |
The workflow that drives the photo request workflow. |
Location Editor
The location editor allows you to edit and clean locations in your database. Because there are so many locations
in your database (think every address) the list will only show items that match the filters you provide. A common
use for this page is to edit the geocoding for a specific address. There is a filter to show you addresses that
are not geocoded.
Location List
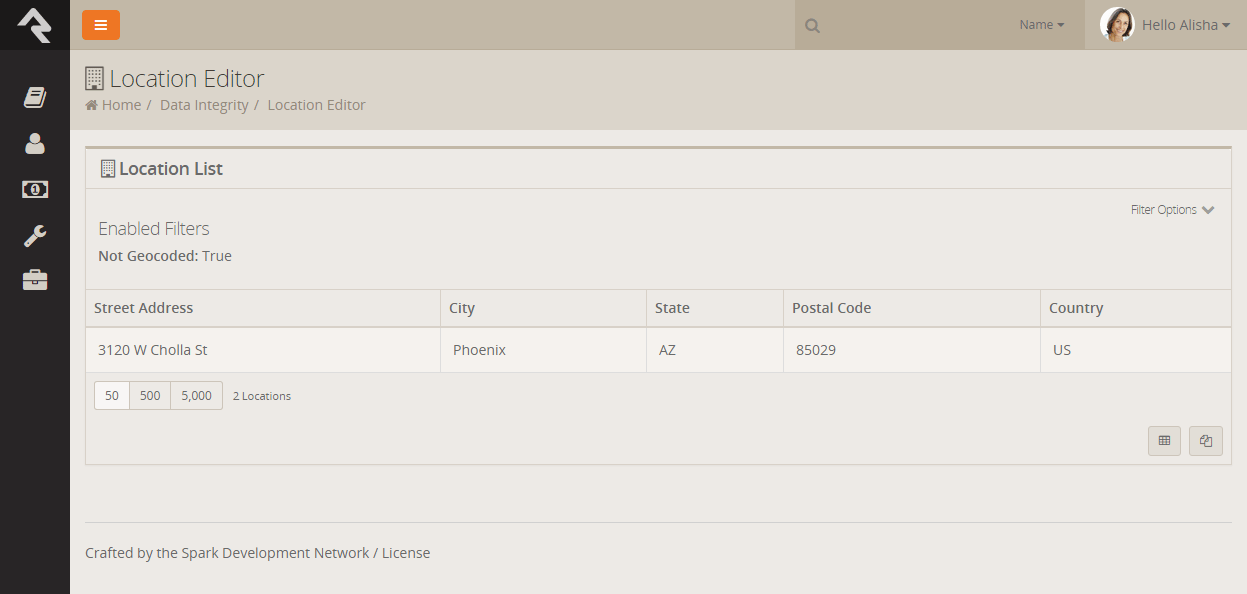
Once you select an address you can chose to view it's details and edit it. Below is a view of the edit screen.
Location Editor
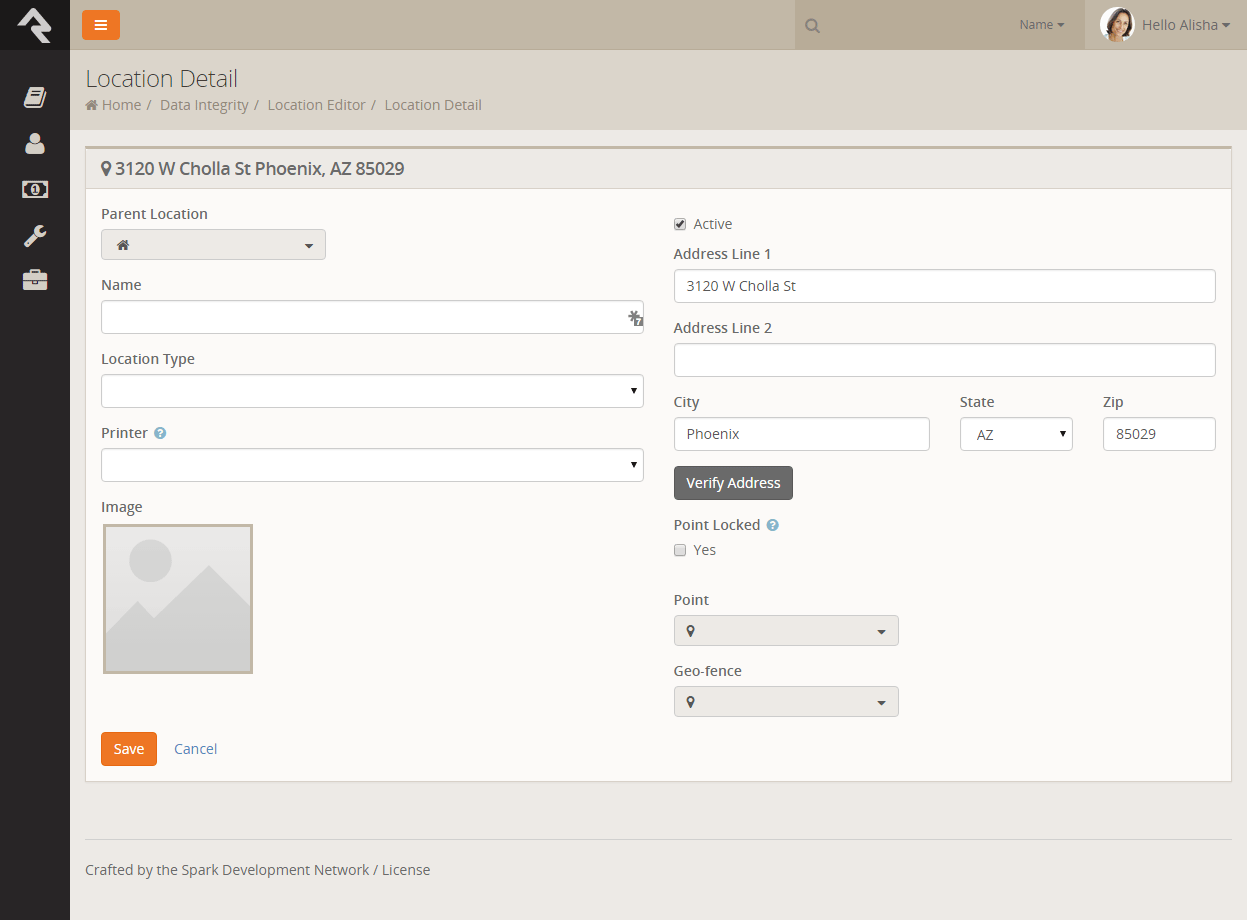
Photo Requests
When new photos are submitted by the organization's members they will be displayed here to ensure that they are appropriate.
You can read more about the photo request in the
Person & Family Field Guide.
Merge Requests
If a person selects people (person records) to be merged but they do not have security access to complete the merge a merge request will be
created and listed here. By default, you will not have security access until you are listed on the
Merge People page with read rights.
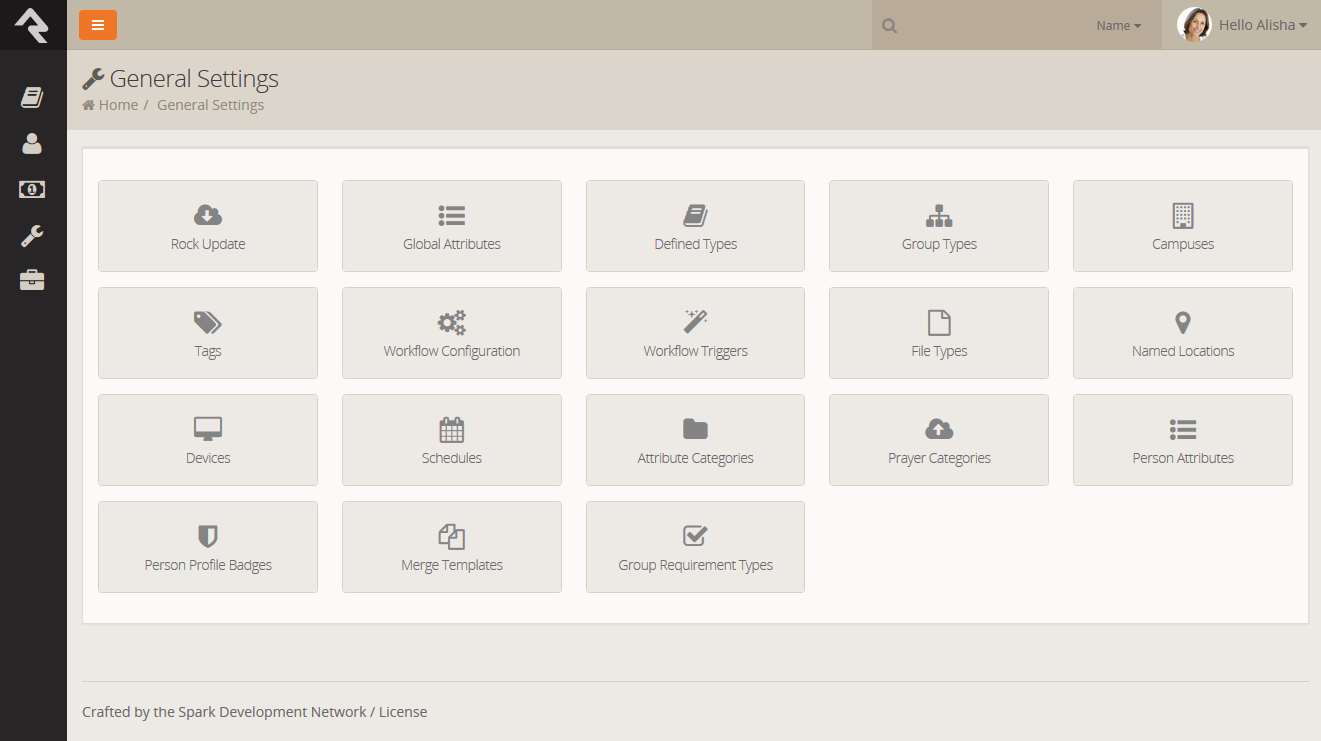
General Settings
To make Rock a configurable and flexible tool, we’ve added a lot of settings you can tweak to make it work
for your organization. While these settings may seem intimidating at first, once you learn more about them
you’ll become more and more comfortable. Let’s look at each of the major configuration sections and we’ll
briefly explain what each one does. All of these areas can be found under the
Admin Tools menu item.
General Settings
Rock Update
Updates are one of Rock’s best features. Many systems require tedious updates. And many times only the
vendor can complete them. Not so with Rock. When an update is made available, all you need to do is visit
this screen. Details will be provided about the updates available. When you’re ready, you simply click
the Install button. Rock will then
download and install the updates for you. How easy is that?!
Global Attributes
Global attributes are the basic configuration settings that are used to customize Rock. Each has a
default value that you can override. Many of these were set for you during the installation process.
Below is a list of the core settings and descriptions.
| Setting |
Description |
| Organization Name |
The name of the organization that is running Rock. This was set for you during
the install, but you can modify it at any time.
|
| Organization Abbreviation |
There will be times when you want to refer to your organization in a less formal manner.
Enter in a Organization Abbreviation
to provide this value.
|
| Organization Address |
The primary address of the organization. If you are a multi-site church, this
should be the address of your central team location. Each of your campuses will have
its own address.
|
| Organization Email |
The default email bucket for the organization. This will be the default address used
in the From field of bulk emails. This is commonly info@organizationdomain.com
|
| Organization Phone |
The primary phone number for the organization.
|
| Organization Website |
The primary website for the organization.
|
| Public Application Root |
Many times this will be the address of your external website, if it is hosted on Rock.
It is the address that will be used in links that are sent out to the public, such as
www.organizationname.com. If you organization's primary website is not hosted on Rock it's
important that this setting remain the public address of the Rock server not your organization's
primary website as this setting is used for providing link backs for things like images and webhooks.
|
| Internal Application Root |
Similar to the Public Application Root setting above, this is the address of the internal
Rock website. It will be used to construct links on the internal site. Many organizations
configure their DNS to be rock.organizationdomain.com.
|
| Update Server URL |
This is the address that Rock uses to look for updates. It should not be changed.
|
| Google API Key |
Rock uses Google Maps for many of its features. This requires what is known as an API key
to use the maps. While there was a setup step in the post-install checklist, you can change
this key at any time.
|
| Email Exceptions List |
Exceptions are a technical term for errors. This setting is a list of email addresses that
should receive an email when these errors occur. Keep in mind that errors do happen, and
don’t worry if you get a notification email occasionally. Rock also keeps a list of every
exception in the database, so you don’t need to keep these emails. Just think of them as an FYI.
|
| Email Exceptions Filter |
Often times exceptions will occur when search indexes (like Google or Bing) scan your site
and reference pages incorrectly. While these exceptions will always get logged, you can use
this setting to prevent a notification email from being sent for these (and any other) types of
exceptions. When any exception occurs, Rock will evaluate the client's HTTP Server variables for
any variable you specify in the Key. If that server variable exists, and it's value contains what
you entered in the Value, the notification will not be sent. In addition to server variable names,
if you use a key of 'Type', 'Source', 'Message' or 'StackTrace', Rock will check to see if the
current exception's values for those keys contain what you entered for the value and if so, the
notification will not be sent.
|
| Grade Transition Date |
The date your organization uses to promote kids to the next grade level. Grades are calculated
in Rock based on the future graduation date from the 12th grade. This date is used to update
the grade each year. While the default date of 6/1 will probably work for most organizations,
you can modify it to match the needs of your community.
|
| Email Header / Email Footer |
The HTML that makes up the header and footer for emails that are sent from Rock. These settings
are only used for system emails. You can create multiple different email templates to use in Rock.
See the
Communicating With Rock
guide for more information on best practices in email templates.
|
| Email Header Logo |
This is the logo that should be used in the email header. If the logo displays as a broken link,
be sure to check that your Public Application Root setting is correct since this is used to help
generate the link to the logo.
|
| Enable Page View Tracking |
Enables or disables the tracking of every page that is viewed in Rock. This can provide you
with analytics for how Rock is being used. The default value is enabled.
|
| Password Regular Expression |
A secure password means different things to different people. By default, Rock requires all
passwords to be longer than six characters. If you like to require passwords to include numbers,
special characters and/or mixed case letters, you can provide a regular expression that all
passwords are required to match.
|
| Password Rules Friendly Description |
When you change the regular expression required for passwords, you’ll want to change the
description of the password requirements that people see on the website. Use this setting
to describe what a valid password must contain. Default: "Password must be at least six characters long."
|
| Job Pulse |
This is not as much of a setting. It continuously updates the date and time that jobs last ran.
You can use this to confirm that jobs are running correctly.
|
| Log 404s As Exceptions |
This tells Rock whether File Not Found (404s) should be treated as exceptions. You will, for
the most part, want to leave this off. You can enable it if you’d like to find all of the
broken links on your website.
|
| ×Preferred Email Link Type |
This setting is used to configure the type of email links you'd like to Rock to use. 'New Communication' will cause rock to link to the New Communication page, while 'Mailto' will configure Rock to use a mailto tag which will take the user to their configured mail client. |
| Lava Supprt Level |
This setting allows you to choose your support level for old Lava syntax. There are three levels: supporting legacy Lava code, supporting legacy Lava code but logging its usage, and ignoring Legacy lava code. |
Editing A Global Attribute
While on the Global Attributes page Admin Tools > General Settings > Global Attributes,
you can click the row to edit the attributes value.
Helpful Info
You will also notice that there is an Edit
button on the grid. This will actually edit the configuration of the attribute. Typically,
you won’t want to do this. Instead you’ll want to just click the row to edit the value.
Defined Types
Defined Types are settings that are
specific to a certain feature. In the list, you’ll find settings for Check-in,
Giving,
Marketing Campaigns,
Metrics and
People. Each of these will be
discussed more in sections relevant to each feature, but let’s look quickly at how you can edit these
settings.
Each Defined Type
can have multiple values (cleverly called Defined Values).
To edit the values for a Defined Type,
simply click on the item in the grid you want to edit. You will then be taken to a new screen where you
can edit its values.
Group Types
The Group Types screen is used to
add new types of groups and modify those that already exist. These settings are discussed in detail in
the
Rock Your Groups guide.
Campuses
If your organization has several sites you can manage them here. See the chapter 'Campuses' to see
the various options available to you.
Tags
Tags allow you to categorize people into groupings based on a descriptive label.
Tags are discussed in detail in the
Person and Family Field Manual.
As an administrator, you will be responsible for the classification of organizational
and personal tags. Only administrators can create an organizational tag or convert
a personal tag to an organizational tag.
Create A New Organizational Tag
To create a new organizational tag, first be sure that your filter settings are
set to view only organizational tags. Once this is set, simply click the
Add button
in the footer of the grid.
Converting A Personal Tag to An Organizational Tag
Before converting the tag, be sure that the filter for the tag list is set
to show only personal tags. Next, find the tag you want to convert and click
its row on the grid. You will then be taken to the edit screen where you can
convert it to an organizational tag.
Workflow Configuration
Rock is built on top of a powerful workflow engine. These workflows can be
configured using the screens found in this section. Creating and configuring
workflows is covered in the
Working With Workflows guide.
Workflow Triggers
You can configure a workflow to be launched whenever an entity record is changed
or deleted. See the
Working With Workflow
guide for more information on configuring these triggers.
File Types
Rock can be made to store and manage several different types of files. These include
things like images for marketing campaigns, label templates for check-in and the
pictures of individuals that display on the
Person Profile page.
These files can be saved in different storage types. The two main storage types are:
-
Database: The files are stored as BLOBs (Binary Large OBjects)
in the database. Database storage is a good solution for items that you’d
like backed-up with your data. Database storage is also a bit more secure
since the files are stored in an additional layer of security in the database.
-
File System: Files using this storage type are stored
on the webserver’s file system. They are securely stored in a directory
that cannot be directly linked to. This storage type is best for large
files that might eat up your valuable database storage space.
Each file type can select which storage type to use. You can also specify if
you would like to cache the file type to improve speed. Caching is especially
useful when using storage types other than the file system since they tend
to be a bit slower. Enabling the cache will store a cached version on the
server to improve speed. Caching is also very useful when working with images.
Rock has the ability to size images on the fly. While this is very powerful,
it can impact performance, especially with large source images. When caching
is enabled though, the resized image is cached, so the resize is not required
in the future until the image is updated.
Named Locations
This configuration screen allows you to define specific locations with a name. You
will want to use this to define your campuses, buildings and rooms. These
Named Locations
can then be used with configuring groups, check-in, etc.
Devices
The devices screens are used to manage devices that interact with Rock in some
way. Today this is primarily used to help manage check-in kiosks but in the
future we hope to add support for all types of devices.
Schedules
Several features require the configuration of repeating schedules. For instance,
check-in needs to know your church’s service times to be able to configure
the time check-in should start. These screens allow you to create these schedules.
Attribute Categories
Everything stored in Rock can have attributes added to it. For example, we can
add numerous attributes to a person that match what is important to your
organization. In an effort to keep this from becoming unmanageable, you can
group your attributes into categories. These screens help define these categories
and provide some basic configuration for each.
The first step in adding a category is to filter by the data entity you wish to
work with. The default, and most often used, is Person. For each category you
can provide a description and also give it an icon to use on the Rock screens.
Prayer Categories
The prayer features use categories to help organize and classify prayer requests.
See the
Raising Up Prayer
guide for more information on configuring prayer features.
Person Attributes
This screen allows you to manage the person attributes you have configured in the system.
Person Profile Badges
Badges are simple icons that express details about a person’s involvement or activity
with your organization. An example of a badge would be baptism or attendance rate.
Merge Templates
This is where you will managed the system wide merge templates. You can find out more about
merge themplates in the
Merge Documents chapter of this guide.
Group Requirement Types
This page allows you to managed the group requirements for your organization. You can learn more about
group requirements in the
Rock Your Groups guide.
CMS Configuration
Rock is built on top of a very powerful Content Management System (CMS). While discussing
all of the features of this CMS is outside of the scope of this guide, below is a high-level
overview of the tools in the CMS configuration section.
CMS Settings
Sites
The sites section lists all of the websites that are running off of your set-up of Rock.
Rock initially comes configured with three different sites:
-
Rock Internal: The internal site used by the organization’s staff
to manage people and groups, and to manage the system in general.
-
External Website: The primary portal for those outside the organization.
-
Check-in: The site that is used for the check-in system.
You can add as many sites as you wish. For instance, the site that
Spark Development Network uses to manage Rock has all of the sites above
plus two additional ones. One hosts the Spark site (sparkdevnetwork.org)
and the other hosts the Rock site (rockrms.com). Notice that each site
looks different and unique from the outside, but shares a common set of
data and configuration.
See the
Designing and Building Websites Using Rock
guide for more information on configuring new sites in Rock.
Block Types
Every page in Rock is made up of several blocks. These blocks are the core unit of functionality.
You might be familiar with the HTML block on the homepage, for example. For the most part,
everything on the screen is a part of one block or another. These screens list all of the
various types of block available.
Page Map
While most of the configuration of a page can be completed right on that page, there are times when
it’s difficult to navigate to a supporting page if it isn’t shown in the main navigation. This
screen lists all of the pages defined in Rock in a simple tree display to help you get where you’re going.
Content Channel Types
Rock's dynamic content capabilties are a cornerstone of its content management system (CMS) feature set. The
Content Channel Types helps to define the
data structures for dynamic content. You can read more about these tools in the
Communicating With Rock guide.
Content Channels
The Content Channels represent the actual
data that is defined for use by the CMS tools. Again much more information on these tools can be found in the
Communicating With Rock guide.
File Manager
The File Manager allows users to upload files and manage directories to the server that Rock is hosted on. More information on this tool can be found in the
Designing and Building Websites Using Rock
guide.
Security Settings
Due to the sensitive nature of the data in Rock, it is important that you secure it
wisely. This next section displays configurations specific to customizing the security
of Rock.
Security Settings
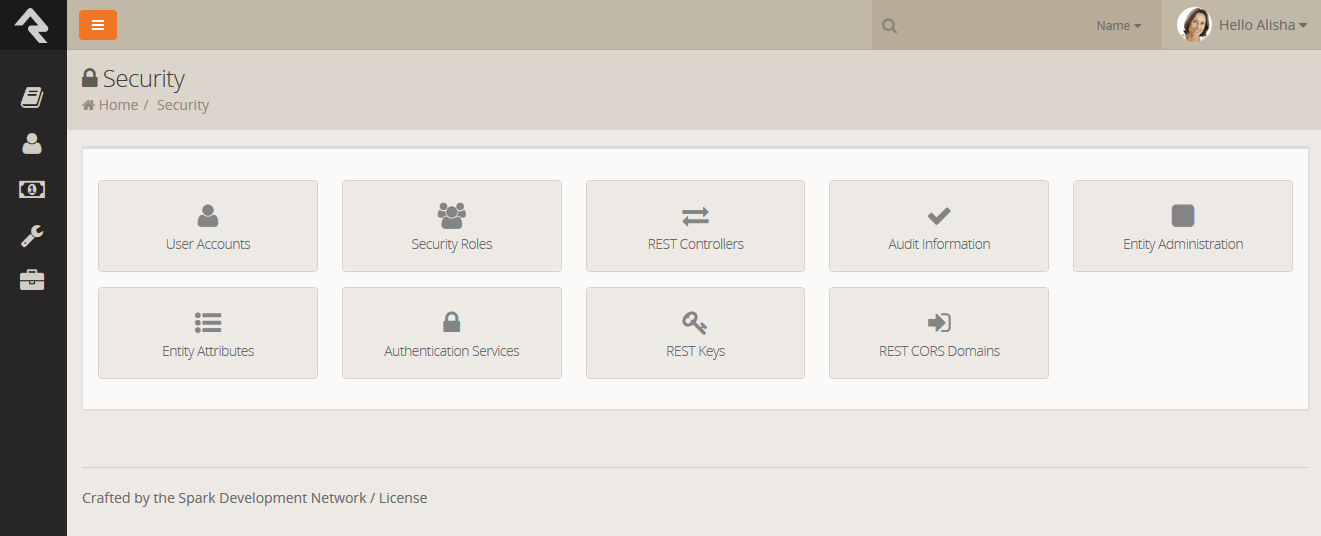
User Accounts
While you can find a specific user’s accounts on their
Person Profile page,
you can see a list of all user accounts on these screens. This helps determine which
person is tied to a specific account and see the general login activity.
Security Roles
Security roles are used to lock down features and data in Rock. While you can configure
Rock at the user-level (allow and deny specific users), it's much easier to assign people
to roles and then base your security off of these groups. This adds consistency to your
security model, which leads to fewer mistakes. The security role screens allow you to
manage your roles and add individuals to them.
It's important that you think strategically as you create security roles for your organization. A little planning in
the beginning can prevent a jumbled mess of roles in the end. Besides what roles you’ll need you will also want to think
about a naming scheme for your roles. While it sounds trivial, a good naming convention and help reduce confusion. To help you
we’ve created a naming template for you to use. We suggest using a naming convention of:
prefix – area action (RSR – Prayer Administration)
We've added helpful prefixes for you to use.
- RSR – This stands for 'Resource Role'. Roles with this prefix are used to secure various 'Resources' in Rock.
- APP – These roles are used to secure various applications that use Rock. For instance Rock ships with a role of 'APP – Check-in Devices'
that is used to provide security to the check-in site.
- WEB – You'll quickly find the need to add several new roles to allow your staff and volunteers to edit parts of the website. Adding the 'WEB' prefix
to these roles allows you to group these roles together.
- GROUP – While not technically a prefix, Rock will dynamically add this prefix for you when it lists groups that while not a 'Security Role'
group type are marked to be considered a 'Security Role'.
Feel free to add new prefixes that make sense in your organizations.
REST Controllers
One way you can build applications that extend Rock is through a technology called REST
(REpresentational State Transfer, http://en.wikipedia.org/wiki/Representational_state_transfer).
If this seems Greek to you, don’t worry. Most developers are familiar with it. The screens
in this area help document all of the REST APIs that are available to you. From these
screens you can also secure the REST API to ensure only authorized applications can
access the data.
Audit Information
Most changes to the Rock database are tracked in a special audit table. The information
in these tables is presented in the screens of this section. This is a helpful tool for
you to see what changes are being made and by whom. You can also use these logs to write
custom SQL reports or create custom jobs that take action after certain changes.
Entity Attributes
This configuration section can help you define additional
Organizational Attributes.
For the most part, you should not need to do this unless you are writing your own code to
run inside Rock. To add an Organizational Attribute,
simply create a new attribute that is not tied to an entity. (This really is what an organizational
attribute is.)
By now you know about attributes and the power they bring to Rock. In fact, they are more powerful than you realize.
We’ve already discussed how attributes can be attached to any type of entity (person, group, etc.) In more complex
scenarios, you can actually attach them to an entity with certain criteria. Say you only wanted an attribute to
be on a group if it is of the type Serving Team;
you could configure that using these screens. Most organizations will never need to get this advanced with their
configurations, but it’s good to know that it can be done, if needed.
Entity Administration
Entities are specific types of data. A person is a type of entity. So are a group, an email communication and a
financial transaction. For those of you familiar with databases, an entity is like a table in your database.
(In fact most, but not all, entities do have a corresponding table in the database.) These sets of screens
allow you to view and configure all of the entities in Rock.
There are only two configuration items that you need to worry about. The first is whether the entity is "common."
Common entities are shown at the top of the list when you need to select from a list of entities. Rock has
preconfigured Groups and People
to be common, but you may wish to add more (especially if you start adding custom entities of your own).
You can also add security to entities to help protect the data they contain. For instance, we have configured the Financial Transactions
entity to only be viewable by those in the finance security roles. This is especially useful when it comes to
using the reporting features of Rock. The security you define here will be used by the reporting engine to
ensure that only authorized individuals are allowed to access sensitive data.
Authentication Services
Rock can be configured to allow several types of authentication during the login process.
Let’s look at them more closely.
-
Database: This is the most common authentication type for most organizations.
This stores the user's username and password in the database. The user's password is stored
in a one-way encrypted format so it cannot be retrieved by any means.
-
Active Directory: If your organization uses a Microsoft Active Directory
for network logins, Rock can use it to authenticate your staff. To enable this service,
you will first need to activate it and provide the address of a Domain Controller server
along with the Domain Name of your network. Then, you'll then be able to configure
Active Directory logins for your staff under the Security
tab on their Person Profile pages.
-
PIN Authentication: This authentication service is primarily used in the Check-in Manager
to provide a quick way to authenicate on touch devices. This authentication provide only requires a username
made up of numbers.
-
Facebook: You can also enable the use of an individual's Facebook account as
authentication to Rock. This makes their life a little easier when they have one less
password to remember. In order to enable this, you will need to configure a Facebook application.
-
Google: This authentication provide allows guests to use their Google account with Rock.
-
Twitter: As you can probably guess... yes, you can use Twitter as an authentication source.
Implementing Authentication
Once you implement a new authentication service you'll need to enable it on each login page where you want it used.
REST Keys
When writing applications that use Rock's REST API you will need to use keys for authentication. These keys
can be setup and configured here. See Rock's developer documentation for more information on using REST keys
in your applications.
REST CORS Domains
Writing secure web applications requires that all domains that use your server's REST API be authorized
using Cross-Origin Resource Sharing (CORS). You can define these allowed domains here.
Communications
These settings help Rock use powerful tools to communicate with your attendees. While each tool
is covered below, additional information can be found in the
Communicating With Rock guide.
Communications

Communication Templates
You'll find over time that you often send the same types of emails and SMS messages over and over. When
you see this pattern consider making a communication template to help simplify these tasks and improve
consistency.
System Emails
Rock defines several email templates that are used by the system for specific needs.
Some examples are the emails that are sent when someone forgets a password or a confirmation
message when an account is created. You may want to change the look or wording of the emails
to better match the brand and voice of your organization. This is the place to do so.
Communication Mediums
When you send a new communication from Tools > New Communication
or from the bottom of any grid that contains a list of people, you can select to send either
an SMS message or an email. Each of these are communication mediums. You can configure the
settings for each medium from these screens. This is where you can set the
Email transport to
use normal SMTP or a bulk delivery service like SendGrid. This is also where you can
configure the SMS channel to use Twillio to send the messages.
Rock is powerful because of its customization possibilities. Here, you can add additional communication mediums.
For example, it’s possible that in the future a new medium might be created to push content through an
organization's mobile app. Once this new medium is written (by either a third-party or the core team),
it can be simply dropped into Rock and worked by using configuration from these screens.
Communication Transports
We mentioned services like SendGrid, Twillio and SMTP above in the Communications Mediums section.
These delivery options are called Transports. They are what take the message contents and make sure that
they get to the recipients. Each has a set of configuration options specific to its needs. For example,
the Twillio transport requires an account SID and a token to tie into your account. These settings can be
provided using these screens.
Don't Forget...
If you activate a new transport you need to set it as as the default transport for a Communications
Channel Admin Tools > Communications Settings > Communication Channels
Like channels, new transports can easily be added over time, from either the core Rock team or third parties.
SMS From Values
This menu item is a hotlink to the SMS From Values
defined type. This defined type helps you configure the SMS environment. See the
Communicating With Rock guide for more information on SMS.
Safe Sender Domains
This menu item is a hotlink to the Safe Sender Domains
defined type. This defined type defines the domains that can be used to send emails. If an Email communication is created
with a From Address that is not from one of these domains, the Organization Email global attribute value will
be used instead for the From Address and the original value will be used as the Reply To address. This is to help
reduce the likelihood of communications being rejected by the receiving email servers.
Photo Request
These pages allow you to send and administrate requests for photos from your community. You can find detailed
instructions for these tools in the
Person & Family Field Guide.
System Email Categories
This page allows you to create and manage categories for your system emails.
Check-in
Rock's check-in system is very powerful. With that power comes several configuration options. This section
of the administrative tools groups all of the check-in configuration into one place.
Check-in
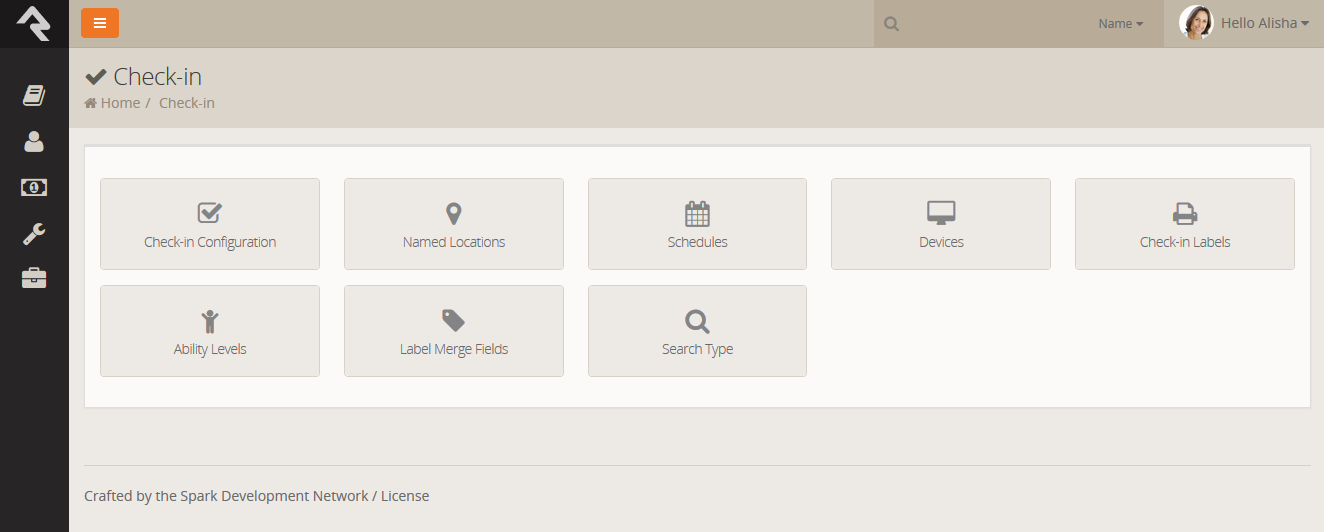
Check-in Configuration
These screens help manage the setup of your check-in configurations. These
settings are discussed in detail in the
Checking-out Check-in guide.
Named Locations
This configuration screen allows you to define specific locations with a name. You
will want to use this to define your campuses, buildings and rooms. These
Named Locations
can then be used with configuring groups, check-in, etc.
Also available under
Admin Tools > General Settings > Named Locations
Schedules
Several features require the configuration of repeating schedules. For instance,
check-in needs to know your church’s service times to be able to configure
the time check-in should start. These screens allow you to create these schedules.
Also available under
Admin Tools > General Settings > Schedules
Devices
The devices screens are used to manage devices that interact with Rock in some
way. Today this is primarily used to help manage check-in kiosks but in the
future we hope to add support for all types of devices.
Also available under
Admin Tools > General Settings > Devices
Check-in Labels
The check-in process can be configured to use several formats of printed labels.
These labels and their configuration are managed using these screens. The
Checking-Out Check-in
guide also covers the creation and configuration of these labels.
Ability Levels
This is a short-cut link to the
Ability Levels defined type. Also available under
Admin Tools > General Settings > Defined Types > Ability Levels
Label Merge Fields
This is a short-cut link to the
Label Merge Fields defined type. Also available under
Admin Tools > General Settings > Defined Types > Label Merge Fields
Search Types
This is a short-cut link to the
Search Types defined type. Also available under
Admin Tools > General Settings > Defined Types > Search Types
Merge Documents
Hopefully by now you've had a chance to play with Rock's templating engine called Lava. To know Lava is to love Lava. Much of the time Lava is
used to format many of the pages in Rock. But what if you wanted to use Lava to format documents? Well that's exactly what merge documents do.
Rock ships with two different merge document formats: Word and HTML. The HTML format is pretty simple - just create a new HTML file
and embed Lava much like you do elsewhere in Rock. The Word format on the other hand is new, exciting and super simple to achieve amazing
results. Let's take a look at the output from a few sample documents to see what's possible.
Here Are Your Tools
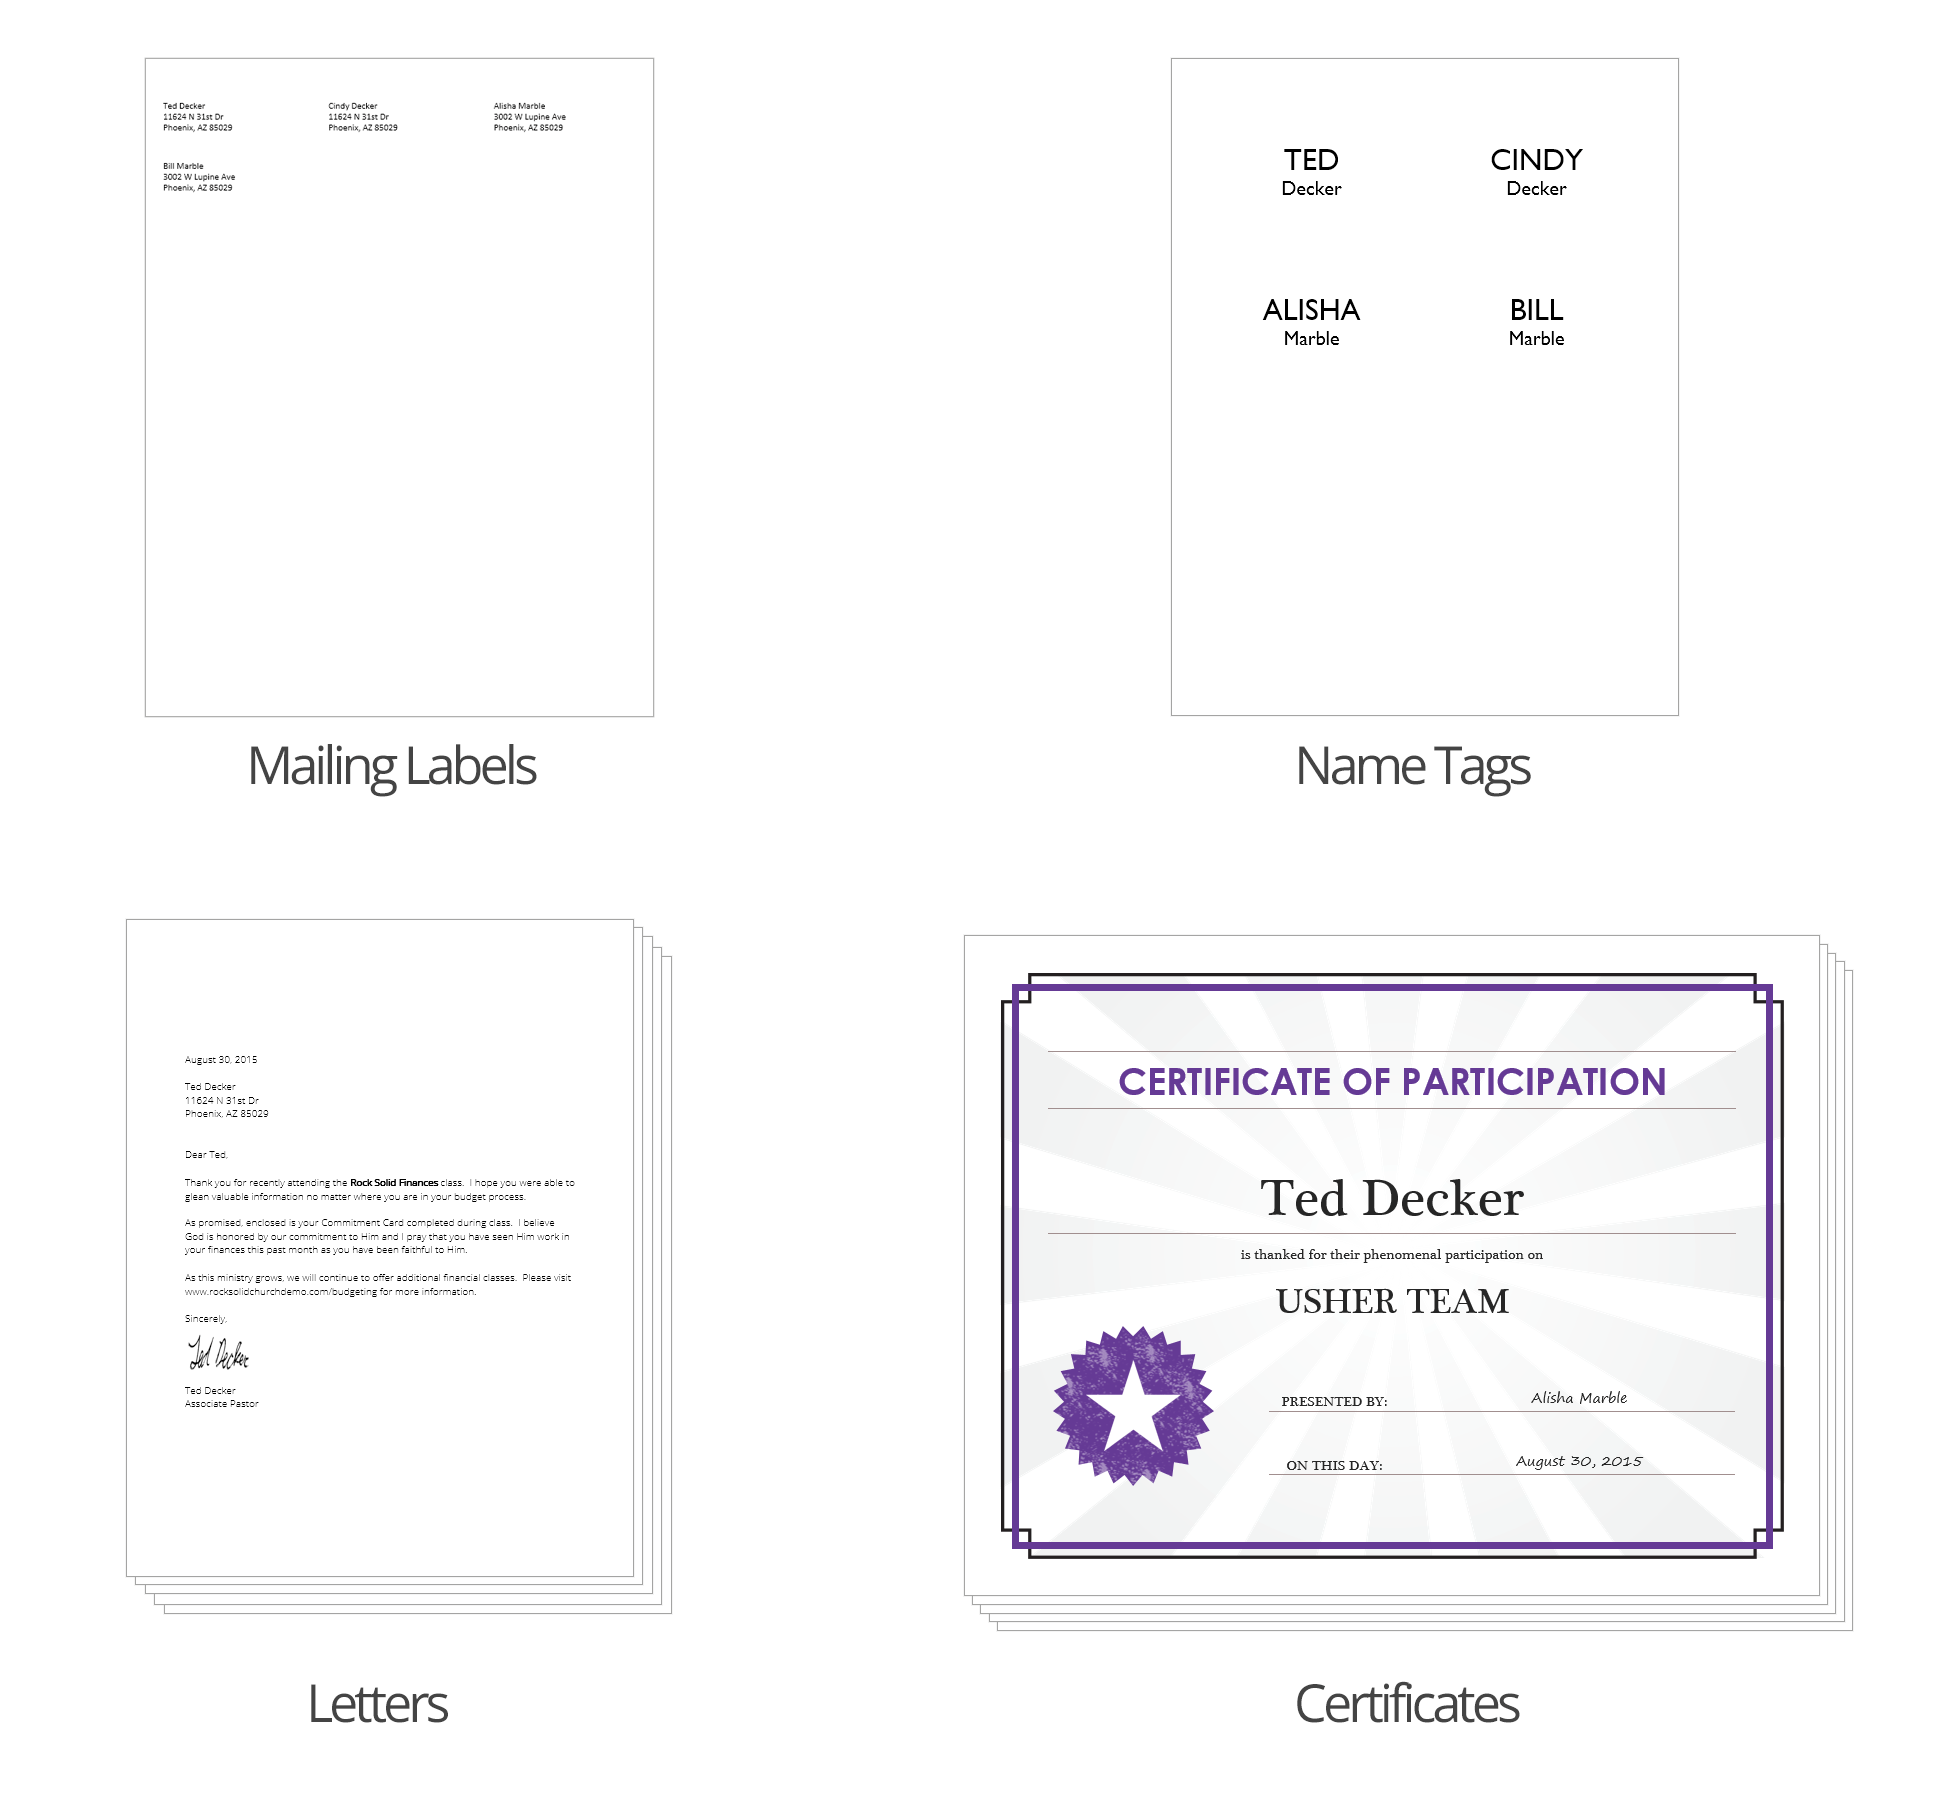
Let's now take a look at how you manage and use merge docs and then we'll dive deep into how to create and format them.
Using a Merge Document
You'll notice at the bottom of most grids there's a button that looks similar to
. Pressing this button will take the contents
of the grid and make it available to import into a merge document.
Merge Document Page
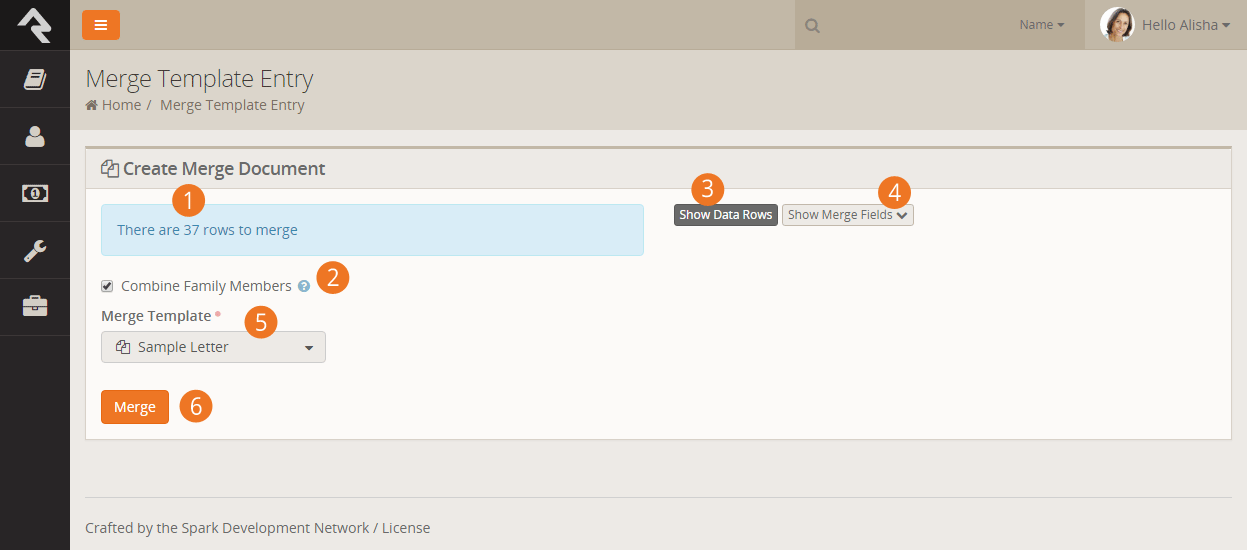
- 1 Count
- Shows you how many records will be merged into the document.
- 2 Combine Family Members
- When checked family members will be combined into a single row.
For example, when using {{ Row.NickName }} Ted Decker and Cindy Decker would be combined into 'Ted & Cindy'.
NOTE: Design your template to use {{ Row.FullName }} instead of {{ Row.NickName }} {{ Row.LastName }}
to help in situations where family members might have different last names.
- 3 Show Data Rows
- Shows the first 15 records that will be used for the merge.
- 4 Show Merge Fields
- This is a cheat sheet of sorts to help you create a merge document for the data provided.
- 5 Merge Template
- The template to use for the merge document.
- 6 Merge
- This button will initiate the merge process.
That’s it! Pretty easy, no?
Administrating Merge Templates
Merge documents are created from templates. Some merge templates will be used by everyone, others though can be limited to a
specific role or person. To help keep the list of merge documents from getting out of hand, we’ve created the ability
to define global templates and personal templates.
Global Merge Templates
You can set up a list of merge templates that are accessible to everyone in the database under
Admin Tools > General Settings > Merge Templates.
Global Templates
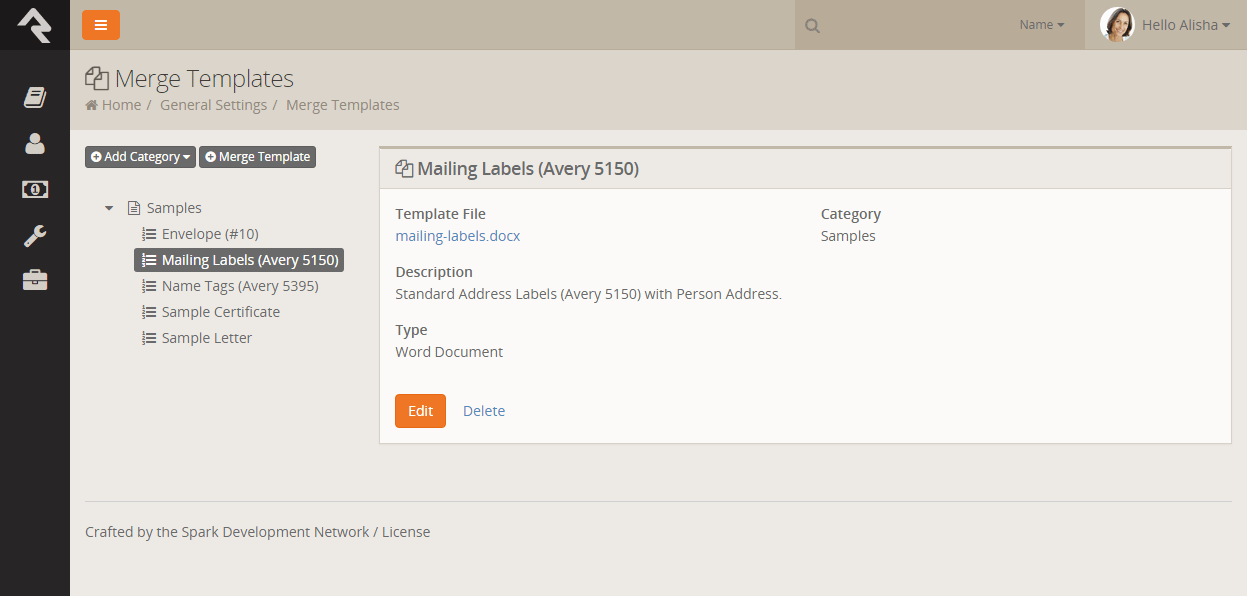
Personal Merge Templates
You can set up a merge document for your personal usage under on your
My Settings page
(this is found under the dropdown in the upper-right corner of the screen).
Personal Templates
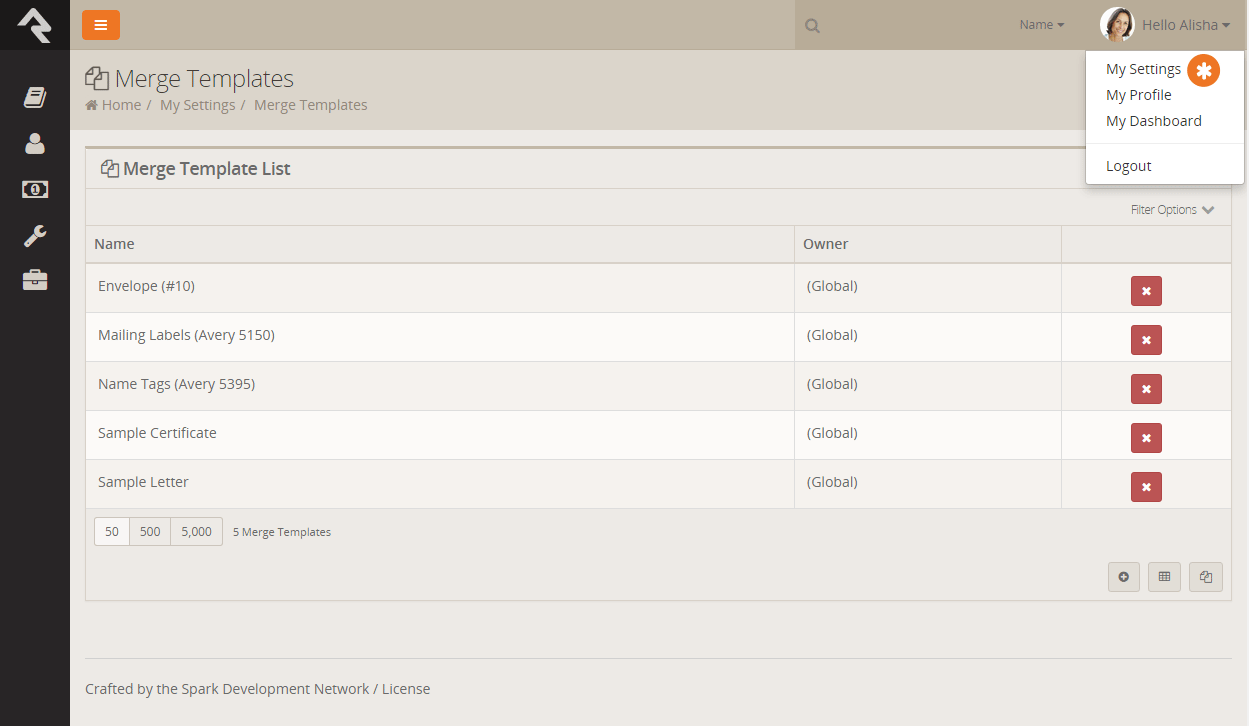
Creating a Merge Document
Rock currently supports two different merge document formats: HTML and Word. Below we cover how to create a merge document for each format.
Word
The most common document format is Word. Creating these documents is actually pretty simple. Before we jump in it's
important to talk about the two strategies for merging using Word.
The first strategy is to create a Word document where the whole document acts as a template for each
record. This is most common for things like letters.
Sample Merge Letter Template
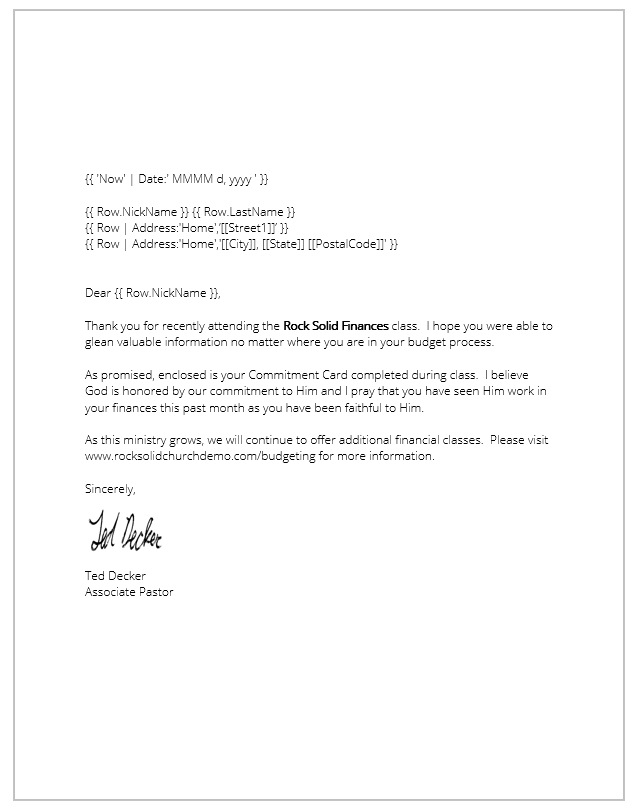
With this type of document you can simply open Word, type your letter and then add in the Lava where you want the dynamic
text to show. Note that you have access to most of Lava's capabilities in Word. So things like
{{ 'Now' | Date:' MMMM d, yyyy ' }} will place in the current data time.
The second merge document strategy is for occasions where you want more than one record to be displayed on a
single page. This is often the case for tasks like creating mailing labels. When creating these types of documents
you add a {%Next%} code when you’re ready to move to the next record in the list.
Sample Merge Label Template

Rock will automatically figure out what strategy your document is using so there is no extra configuration.
HTML
You might be wondering, "Why would I ever want to use HTML for a merge document?" At first blush it does seem a little odd. HTML
however is a great tool for incorporating rich media into a format that can easily be printed. It’s often the best
choice when you need to print a report that requires showing maps (easy to display using Google's static map API) or
person photos (links to their photo in Rock).
Creating an HTML merge document is simple. Let's take a quick look. Below is a quick example of some HTML/Lava that will present
a list of people with their photos (this assumes that the merge document is passed a list of people).
Output of HTML Template
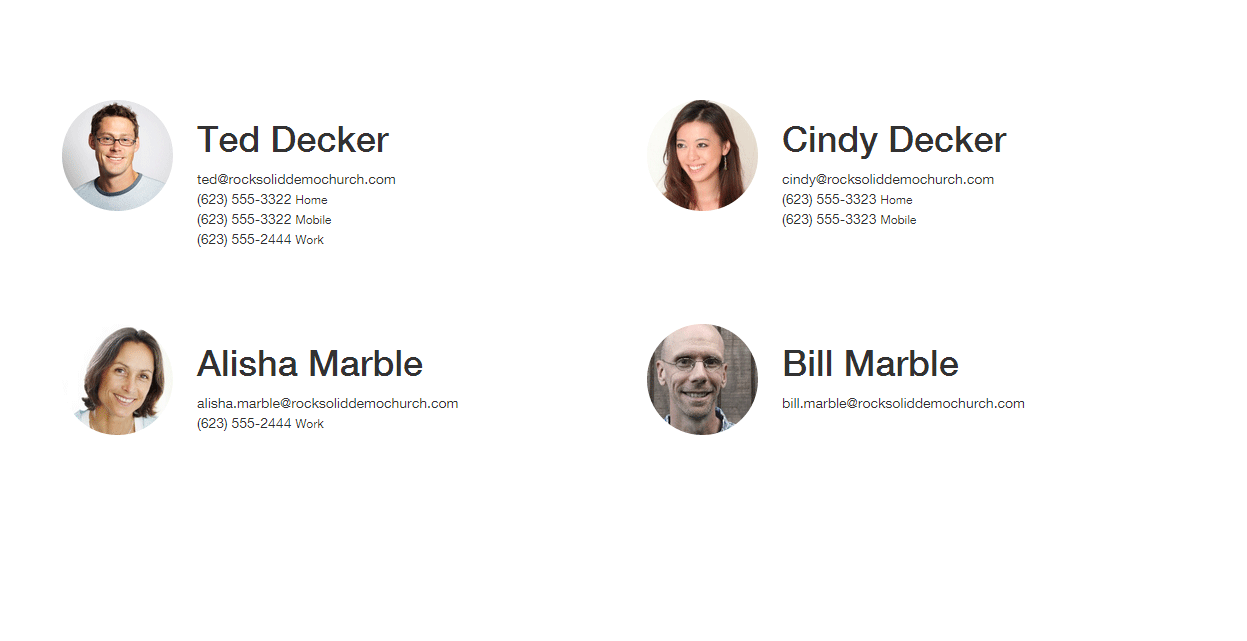
<html>
    <head>
		<title>Group Roster</title>
		<link rel="stylesheet" href="https://maxcdn.bootstrapcdn.com/bootstrap/3.3.5/css/bootstrap.min.css">
	</head>

	<body>
	    <div class="container" style="margin-top: 100px">
			<div class="row">

				{% for row in Rows %}
					<div class="col-xs-6 clearfix" style="margin-bottom: 24px; min-height: 200px;">
						<div class="pull-left" style="margin-right: 24px; width:20%;">
							<img src="{{ 'Global' | Attribute:'PublicApplicationRoot' }}{{ row.PhotoUrl }}" style="width: 100%; border-radius: 100px;" />
						</div>
						<div class="pull-left">
							<h1>{{ row.FullName }}</h1>
							{{ row.Email }} <br />
							{% for phone in row.PhoneNumbers %}
								{{ phone.NumberFormatted }} <small>{{ phone.NumberTypeValue.Value }}</small> <br />
							{% endfor %}
						</div>
					</div>
				{% endfor %}

			</div>
		</div>
	</body>
</html>
Note a few things in the code.
- Line 4: We link out to a hosted version of the Bootstrap CSS file. This provides an easy way to get a default set of styles.
- Line 11: Now we simply run through each of the rows that were passed to us.
- Line 14: Inserting a photo is simple! The PhotoUrl
property for a person even returns a blank image if the person doesn’t have a photo.
As you can see, creating HTML merge documents is easy. Here are a few additional tips:
- Adding map images to your merge documents is also fairly simple. Use the following links for more information:
- HTML merge documents are usually printed. While most people think of HTML as an online-only file
format, it actually does have several print capabilities like page-breaks. Here are a few links to point you in the right direction:
Lava Tips With Merge Documents
For the most part your mad Lava skills will all work with Merge Templates. There are a couple of new tricks though that we'll outline below.
-
While merge templates can be used on any entity type they'll most often be used on people. To help make your templates work
with as many 'grids' of people data as possible we convert group members entities to people.
-
Should you need access to the group member data (e.g. group member attributes) you can use the GroupMember property on the person like:
{{ Row.GroupMember | Attribute:'attributekey' }}
System Settings
While system settings are rarely modified, understanding them will give you a better
understanding into how Rock works and what is possible.
System Settings
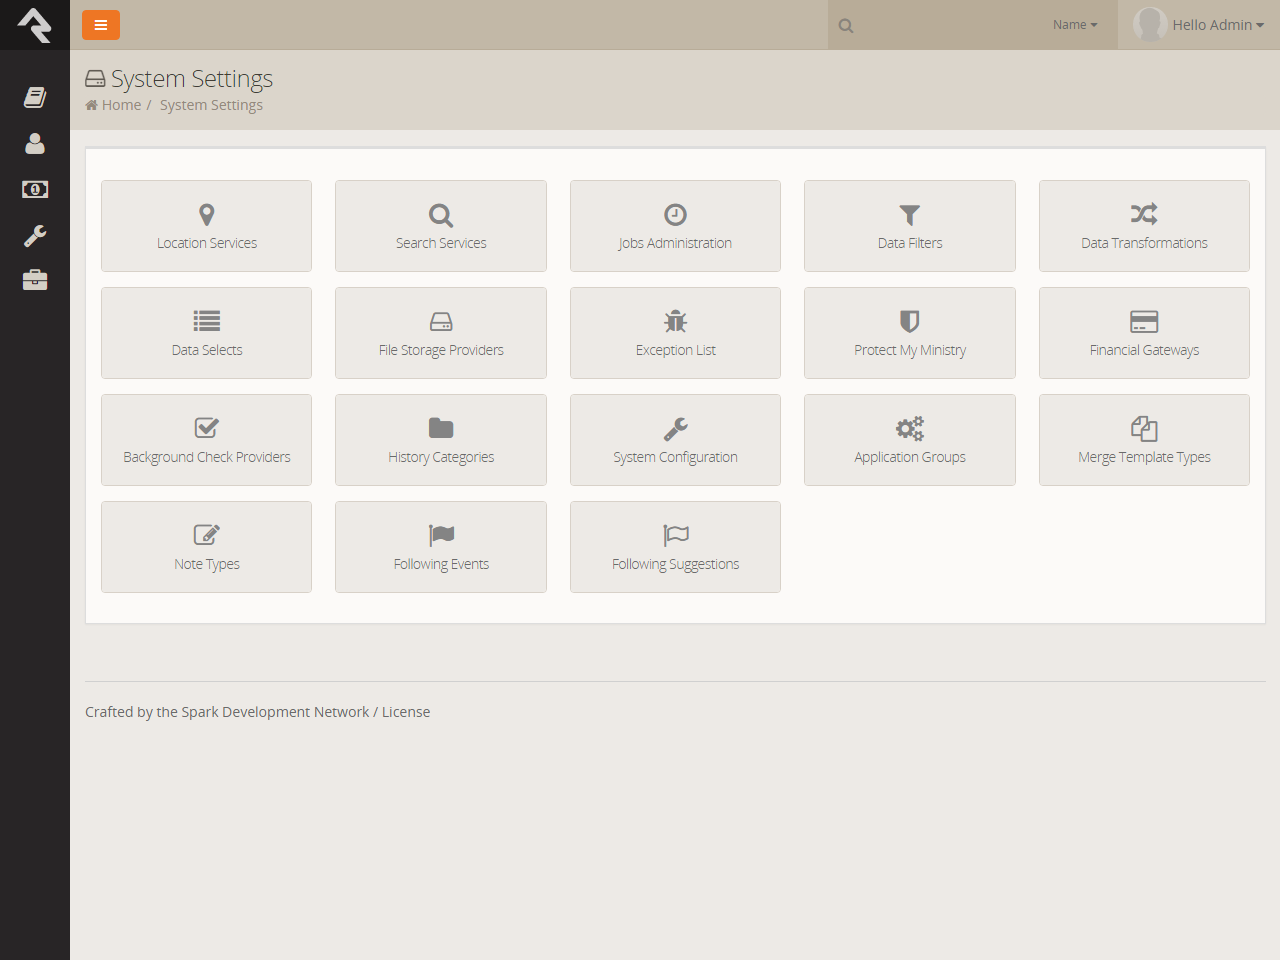
Geocoding Services
Knowing the location of those who attend your church can be very powerful.
In order to do this, you need to be able to convert an attendee's address
(3120 W Cholla St Phoenix, AZ 85029) to a latitude / longitude point
(33.590795 , -112.126459). To do this you’ll need to run your addresses
through a geocoding process. Rock will handle all of the work. All you
need to do is provide a geocoding service to handle the requests. Rock has
a couple of services for you to pick from. More information on geocoding can
be found in the Locations Section of this document.
Standardization Services
Similar to the geocoding services, you can also send your addresses through a
standardization process. These processes can fix the following for your addresses:
-
Fill in any missing items (555 W Main to 555 W Main St)
-
Fix any case issues (555 w main st to 555 W Main St)
-
Standardize elements (555 West Main Street to 555 W Main St)
-
Append Zip+4 info (85383 to 85383-3622)
The standardization process helps increase the quality of the addresses in your database.
More information on address standardization can be found in the
Locations Section of this document.
Search Services
Rock’s Smart Search
box at the top of every page allows you to search for people and groups using various
criteria like name, phone and email. These screens allow you to manage these search types.
For the most part you’ll want to leave them set as-is but you can inactivate one if you
find it is not helpful in your situation. A key concept is that you can write your
own search services with some custom coding. If you do, they will appear on this list
for you to enable and configure.
Jobs Administration
While much of Rock works through the interaction of individuals within the system,
there are times when you’ll want to run functionality in the background. Examples of
this might be some clean-up of the database or updating of data in the database.
These background tasks are called Jobs
and can be managed and scheduled through the screens in this area. More details on jobs can be found below.
Data Filters
Data Filters
are an integral part of Rock’s reporting strategy. Hopefully you’ve already read about
them in the
Taking Off With Reporting
guide. At a high level, data filters allow you to narrow down your view of data by providing
specific criteria. These filters can be enabled, disabled and secured in this set of screens.
Like many things in Rock, you can develop your own Data Filters
that can be managed here.
Data Transformations
Once you’ve filtered your data, you can add a transformation to it before it is displayed.
Say you filtered to see only children who have attended twice in the last two months,
but you really want to display information about the parents of these children.
A transformation (in this case the Person Parent Transformation)
would convert the child data to parent data. You can manage these
transformations here. Just like with filters, you can also develop your own transformations.
Data Selects
Data selects are used in reporting. When you create a report, you provide it with a data
view to act as a filter. You also add columns to your report. Many of these columns will
be attributes of the person or group. You can also choose to add some powerful dynamic
columns. These dynamic columns are managed and secured from this screen.
Exception List
Errors are a fact of life. Some errors are the result of bugs in the software. Despite
all of our work to eliminate bugs, some will sneak by us. Exceptions can also occur
when blocks and pages are misconfigured. While you can set these errors to be emailed
to you under the General Settings > Global Settings > Email Exceptions List,
you can also view the history of these errors here.
Exceptions are shown in the order they occur. Instead of showing you every error in a large list, we have grouped them by type.
This helps you determine how often an error is occurring.
Protect My Ministry
Rock provides a seamless integration with Protect My Ministry to provide reliable background checks for your organization.
See the
Background Checks chapter below for specifics on this integration.
File Storage Providers
Under the Admin Tools > General Settings > File Types
section we discussed file storage providers. These providers help Rock manage the saving and retrieving of
files to different storage mediums. The two default storage types are
Database and
File System.
Under the File System
configuration you can change the default location for files storage. For the most part,
you can leave these settings as you found them.
Financial Gateways
Financial gateways allow Rock to move money from individuals’ accounts to the organization.
Information on these gateways and their configuration are discussed in detail in the
Rock Solid Finances guide.
History Categories
Similar to the audit functionality, is the concept of History.
While the audit feature shows nearly every change made in the system, History
only shows certain changes that we’ve determined are important.
Example:
Changes made to individuals. While any change made will be shown in the audit table, it will also be noted in history.
You’ll find the history information quite a bit more useful since it’s been specially formatted for changes to a person.
Audits, on the other hand, have no special knowledge of the specific entity, and are therefore more generic in nature.
This section of the System Configuration allows you to
create categories for history types. This helps coordinate history changes into related groups. For the most part, you will not
need to change these categories.
System Configuration
This screen allows you to change some technical configuration settings of Rock. For the most part you should never
need to worry about these settings, but we have provided this screen to help you change these settings if needed.
Each of the settings is discussed below.
Warning:
Changing these settings will cause Rock to restart. This means that all sites will be unavailable for a
few minutes during the restart.
-
Time Zone: During the install you should have set your time zone. If you need to change it,
you can do that here.
-
Max Upload File Size: For security reasons, webservers limit the maximum file size that can be uploaded.
This helps to limit the impact of denial of service attacks. Rock has set the default value to 10 MB. If you
need more you can update the size here.
-
Run Jobs In IIS: By default, Rock’s job engine runs on the webserver. This setting allows you to disable
this in order to run jobs as a Windows Agent. See the Jobs
section for more information on this topic.
Application Groups
Several features in Rock rely on storing information on people. For instance when you use the photo request feature, Rock needs to
track who has uploaded a photo, who's photo needs to be verified and who has opted-out of getting future requests. Instead of writing
tons of custom code to do this we've chosen to create a re-usable group type called
Application Groups. These groups are listed here for administrator
access.
Background Check Providers
These screens allow you to configure different background check providers. You can read more about Rock's background
check feaures in the
Person & Family Field Guide.
Merge Template Types
Rock allows you to have several different merge template types (think 'HTML', 'Word', etc.) You can manage these provider types
with these screens.
Note Types Settings
Rock allows any entity type (People, Financial Batches, Prayer Requests, etc.) to have notes attached to them. In fact it
even goes further to allow different types of notes on a single entity. These screens allow you to setup this powerful feature.
You can read more about these features in the
Note Types chapter of this manual.
Following Events
This section allows you to define new Following Events.
You can read more about these features in the
Person & Family Field Guide
Following Suggestions
This section allows you to define new Following Suggestions.
You can read more about these features in the
Person & Family Field Guide
Campuses
Many organizations operate out of more than one location. While there are many terms for these "sites" we've chosen
to call them campuses within the application.
Managing Your Campuses
You can manage your campuses from Admin Tools > General Settings
> Campuses. There you will see a list of campuses that you can manage or add to. Selecting a campus will bring up the
campus details screen.
Campus Details Screen
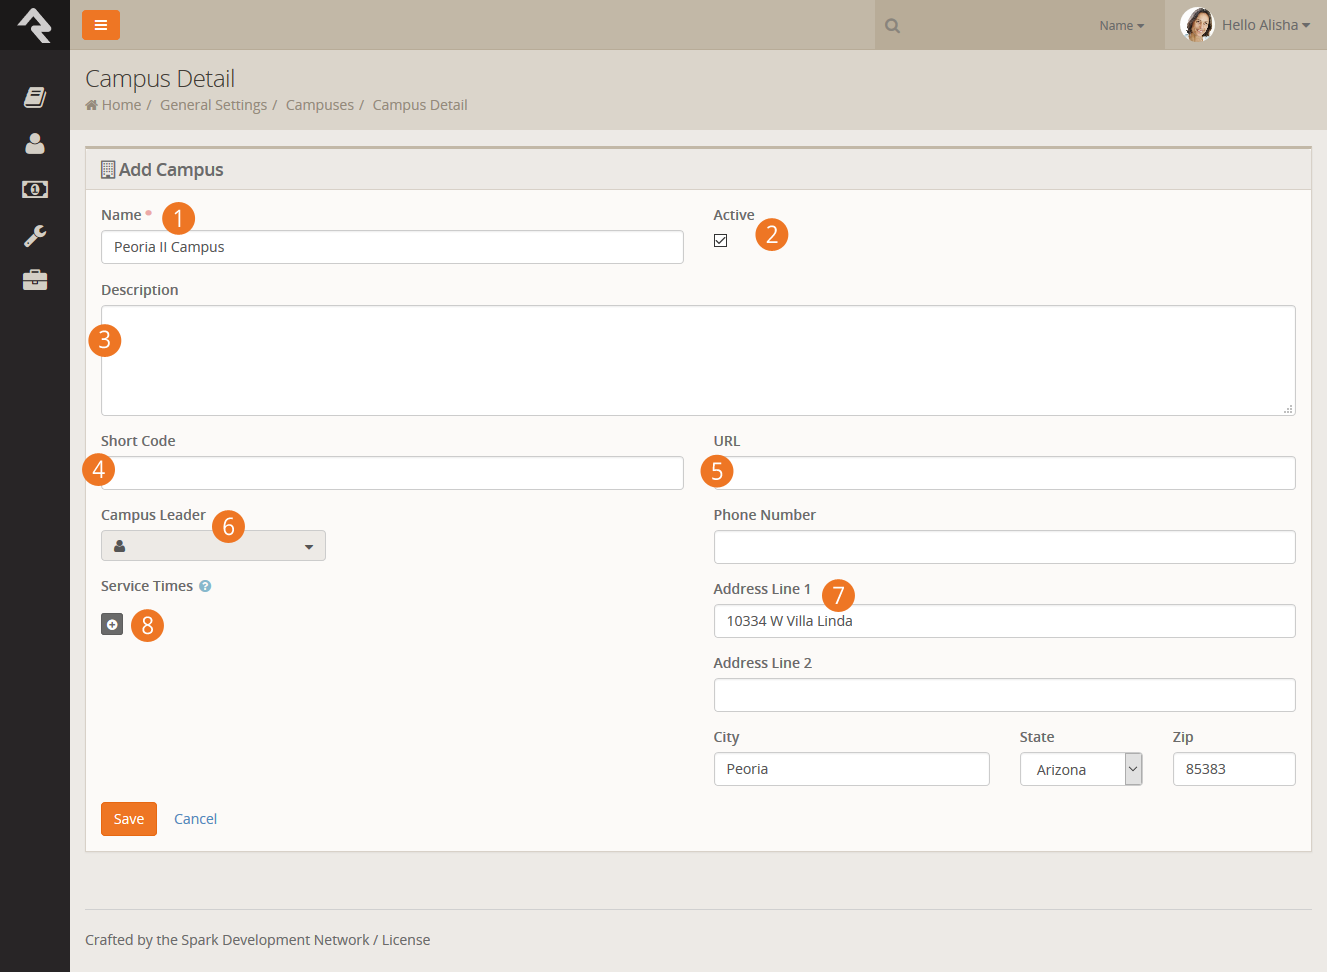
- 1 Name
- The name of the campus.
- 2 Active
- As you bring new campuses online, you may want to add them as inactive until you have time
to configure them and prepare for the announcement.
- 3 Description
- You can use this field to provide a description for your campus. This might be something you display
to your website guests.
- 4 Short Code
- When you grow beyond two or three sites, it's common to develop a shorter naming
convention to help you refer to a campus.
- 5 URL
- The web address for the campus.
- 6 Campus Leader
- The person placed in charge of running the campus.
- 7 Contact Information
- The phone number and address of the campus.
- 8 Service Times
- The servcie times for the campus.
Named Locations:
When you add an address to a campus, a new Named Location
will be created for you. You can view this
new location under Admin Tools > General Settings > Named Locations.
Adding Attributes to Campuses
There are probably other bits of information you'd like to track about your campuses. Adding additional
Attributes to campuses is simple. Just follow these
steps:
- Go to Admin Tools > Security > Entity Attributes.
- Click the to add a new
attribute.
- Select the Entity Type of "Campus" and set up the
attribute information. You do not need to add a value for the
Qualifier Field or
Qualifier Value fields.
- After clicking Save, you can configure
security on who can edit this attribute if you wish.
- You will now be able to set a value for this attribute in the campus details page above.
Jobs
Jobs allow you to run a sequence of code on a defined schedule. A good example of this is the
Rock Cleanup job that
comes configured to run every day at 1:00 am. This job runs through a series of clean-up steps
(like trimming the Audit Log)
to help keep the Rock database clean and tidy.
Below is a list of all of the jobs that come configured with Rock.
| Name |
Description |
Default Schedule |
| Job Pulse |
Runs continuously to help monitor the jobs engine and keep the
website responsive. Do not disable this job if you are running
the job engine inside of IIS (more on this below).
|
Every 30 seconds |
| Process Workflows |
Looks at all active workflows and runs the activities of those
that are active.
|
Every 10 minutes |
| Send Communications |
Sends out queued communcations (email, sms, etc).
|
Every 10 minutes |
| Group Sync |
This job syncs any configured groups. You can read more about this in the
Rock Your Groups Manual
|
None |
| Send Registration Reminders |
Sends out reminders to registrants of upcoming events. You can read more about this in the
Event & Calendar Guide
|
Every hour |
| Calculate Metrics |
This job runs any metrics with a defined schedule. You can read more about this in the
Taking Off With Reporting Manual
|
Every 15 minutes |
| Send Attendance Reminders |
This job is used to send attendance reminders for groups of a specified group type. You can read more about these features in the
Rock Your Groups Manual.
|
Every day at 4:00 pm for the Small Group group type. |
| Location Services Verify |
Attempts to standardize and geocode addresses that have not been verified yet. It also attempts to re-verify
addresses that failed in the past after a given wait period.
|
Every day at 3:00 am |
| Calculate Group Requirements |
This job processes group requirements defined in the system. You can read more about this in the
Rock Your Groups Manual
|
Every day at 3:00 am |
| Calculate Person Duplicates |
This job scours your Rock database on a nightly basis looking for possible duplicates. Those that are found
are listed under Rock's data integrity tools. You can read more about these tools in the
Data Integrity section of this manual.
|
Every day at 3:00 am |
| Rock Cleanup |
Runs a series of cleanup steps to manage the Rock database.
You can change the settings for each step but we recommend keeping
the defaults.
|
Every day at 1:00 am |
| Send Following Event Notification |
This job sends out emails to configured individuals when following events occur.
|
At 7:00 am, Monday through Friday |
| Send Following Suggestion Notification |
Calculates and sends following suggestions to those people who are eligible for following.
|
At 3:00 pm, Monday through Friday |
| Launch Workflow |
Will start a new workflow of the type selected in the configuration.
|
None |
| Run SQL |
This job simply runs a SQL script on a given schedule. This is
helpful if you’d like to automate the changing of data on a
certain schedule.
|
None |
| Send Birthday Email |
Sends an email to people in the database who have a birthday on that day.
|
None |
| Get Scheduled Payments |
This job downloads transactions from the payment gateway for any scheduled transactions. You can read more about this in the
Rock Solid Finances Manual
|
None |
| Group Leader Pending Notifications |
This job sends out emails to group leaders with pending notifications. You can read more about this in the
Rock Your Groups Manual
|
None |
| Send Group Requirements Notification |
Sends out reminders to group leaders when group members do not meet all requirements. You can read more about this in the
Rock Your Groups Manual
|
None |
| Event Payment Reminders |
Sends out payment reminders the registration contacts where a balance is due. See the
Event & Calendar Guide for more information.
|
None |
| Send Group Email |
Sends out an email to the selected group's active members using the template you choose,
with an option to include members of descendant groups.
If a person is a member of multiple groups in the tree they will recieve an email for
each group. This job works well for sending automated group email reminders.
|
None |
Note:
You can code your own jobs if you have access to a developer.
Configuring a Job
You can change the configuration of a current job or add a new job under
Admin Tools > System Tools > Jobs Administration.
There you will see a list of currently configured jobs. You can click a job to
modify the configuration or click the Add
button in the grid footer to create a new job.
Jobs List
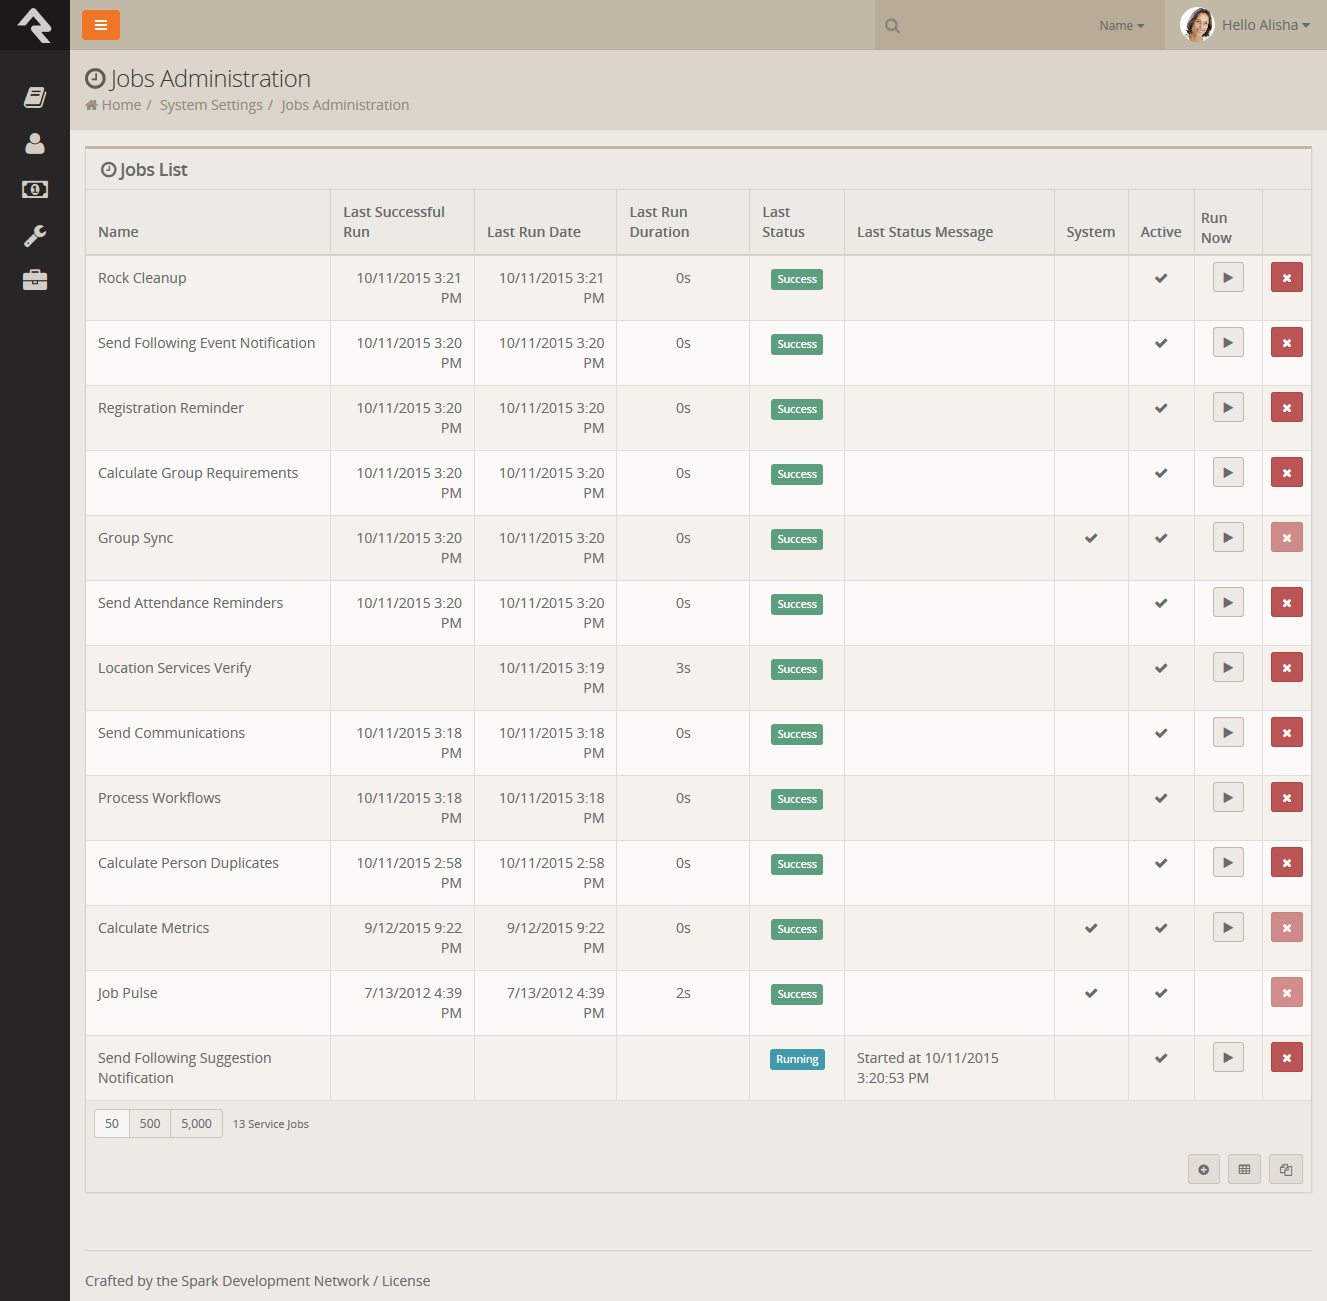
After you select to add or configure a job you’ll see the screen below.
Adding A New Job
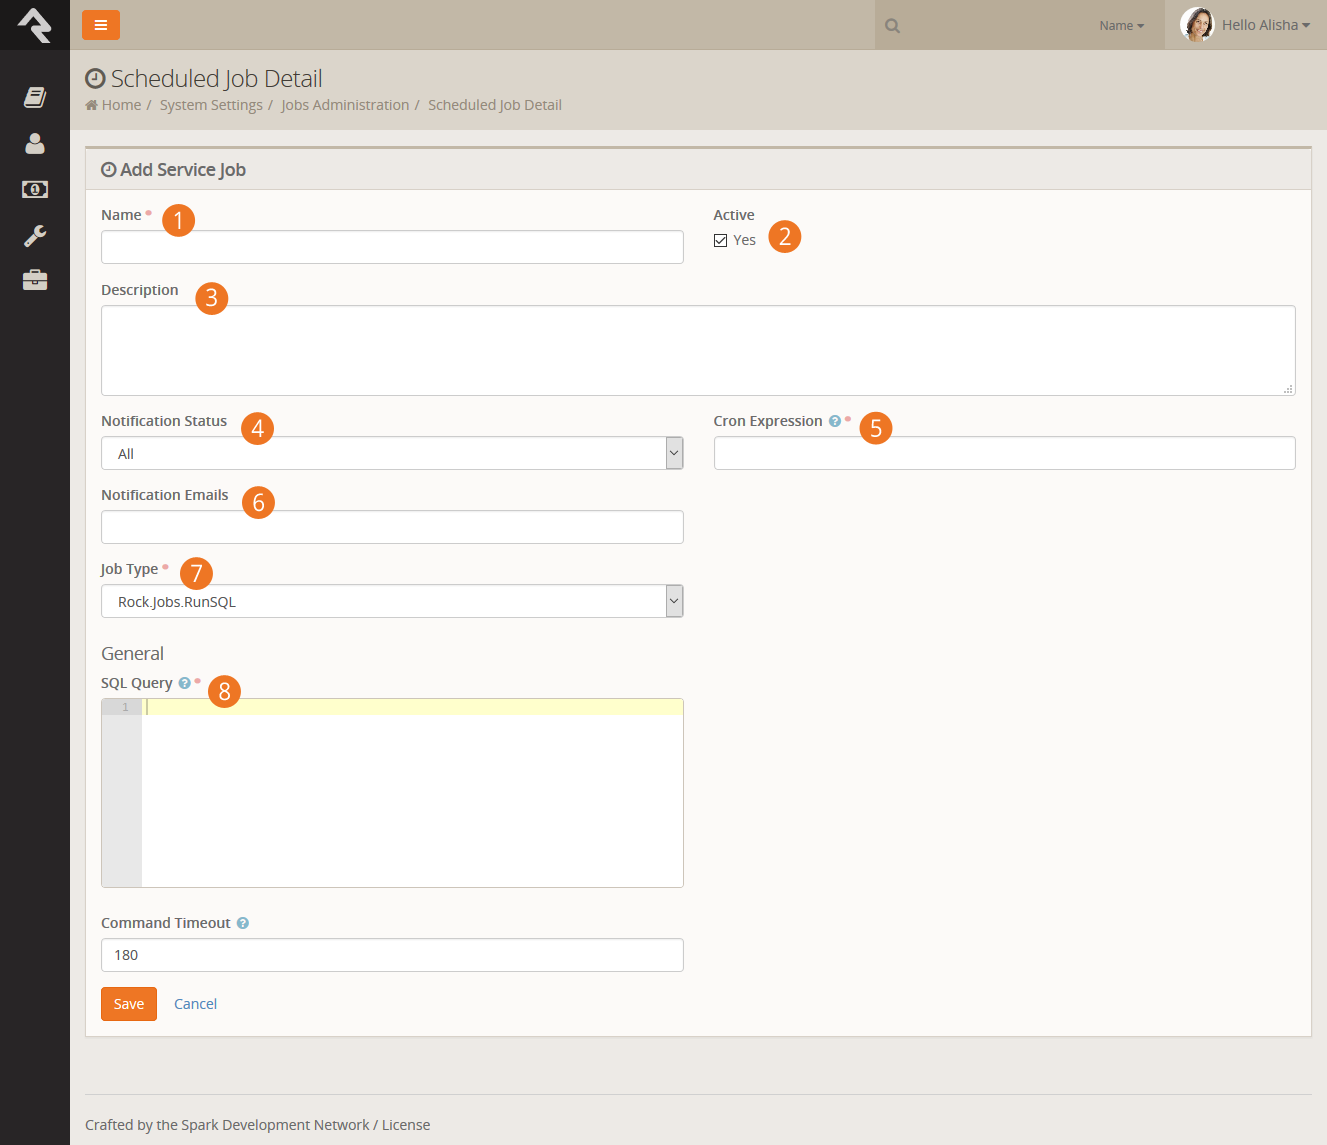
- 1Name
- Provides a concise description of what the job is doing.
- 2Active
- Allows you to mark the job active or inactive.
- 3Description
- Documents in detail what that job is doing and any
background criteria that you may want to know in the future. Use this field
to document all the details about the job.
- 4Notification Status
- Defines when a notification email should be sent.
Options are: Success – when a job finishes successfully; Error – when a
job encounters an error; All – for both Success and Error; None – never
- 5Cron Expression
- Defines when the job is run. Cron expressions
are a concise schedule pattern. They can be difficult to write without help. We
recommend using the CronMaker.com website to assist you in creating these expressions.
- 6Notification Emails
- A comma separated list of emails for the job;
to use when a notification needs to be sent.
- 7Job Type
- Selects the type of job to run.
- 8Job Settings
- Each job type will have a set of configuration items.
In this sample, the RunSQL job defines the SQL statement that you want to run when
the job executes.
Note: No Need to Restart
When you add or modify a job there is no need to restart your website or windows
service. Changes will be automatically updated within a few minutes.
Tip:
There will be times when you will need to stop running a job for a period of time.
Perhaps you have a job that launches a workflow every night to send reminders for
group leaders to take attendance for their groups and they are not meetings for a
few weeks. Instead of deleting the job and re-creating it later, simply inactivate
the job until you’re ready to run it again.
Under the Hood of the Jobs Engine
By default, the jobs engine runs on the webserver under the IIS webservers context.
By default, IIS will shut down if no requests come in for a page. This will mean that your
jobs may not execute late at night if no one is visiting your site. To mitigate this
problem we created a special Job Pulse
job that is set to run every 30 seconds. Its only purpose is to load a special
KeepAlive.aspx page.
Doing so keeps IIS alive at all times.
Large or complex organization may wish to run their jobs in a more robust fashion. For
these situations, Rock can be configured to run the jobs engine as a Windows service.
This requires some special configuration. We have outlined the steps required to
configure this below.
Steps to Setup Rock to Run Jobs as a Windows Service
-
Edit your web.config by setting the appSetting RunJobsInIISContext to false.
-
Install the Rock Jobs Windows Service on a machine with access to the Rock
database. The installer for this can be downloaded from
Admin Tools > Power Tools > External Applications.
-
Changing the service's Log On As to Local System.
-
You will need to create a connection string file in the folder that you installed the Rock Job Service to. This
file should be named 'web.connections.config'. The contents of this file should be that same as the one
inside your website root directory. You may need to adjust the database server name depending on your
environment (for instance if the database is installed on your webserver the server name maybe localhost).
-
Start the Rock Jobs Windows Service.
Error 1001 When Re-installing
If you get an Error 1001 message while re-installing the service be sure to close the Windows Service Manager window and then run the setup again.
Note Types
You've probably seen Rock's notes feature in use on the
Person Profile page and
also with the workflow features. What most people don't know is that notes can do much
more than you think. Rock allows any entity type (People, Financial Batches, Prayer Requests,
etc.) to have notes attached to them. In fact, it even goes further to allow different types
of notes on a single entity.
Adding Notes to a New Entity
Let's say your finance team asks you to be able to enter notes on batches. Your first
response might be that you'll have to
find a developer to add that functionality.
That in itself is a pretty cool option...right? The fact that you have a system that
you can extend to meet any need...cool! But in this case you can play the part of the
hero (that is the name of this guide remember) and configure it yourself.
Any entity detail page is a candidate for adding notes. Looking at the address for the
page will tell you which entity you can attach the note on. If the address has BatchId=X
then the note can be on the batch entity. Let's walk through the steps of adding notes
to the batch detail page
Finance > Batches > Batch Detail.
-
Once you’re on the batch detail page, add a new
Core > Note block
to the main zone (see the Designing and Building Websites Using Rock for details).
-
Edit the block settings of this new block. There are several possible configurations
so look through the list. The key, however, is setting the
Context Entity Type
to be Financial Batch.
-
Reload the page for the block settings to be enabled. You should now see an empty
note block.
-
The last step is to add the note type under
Admin Tools > System Settings > Note Types.
You can add a note type from the bottom of the grid. Be sure to set the entity
to Financial Batch.
After following these steps your batch screen should look something like the one below.
Batches Note Type
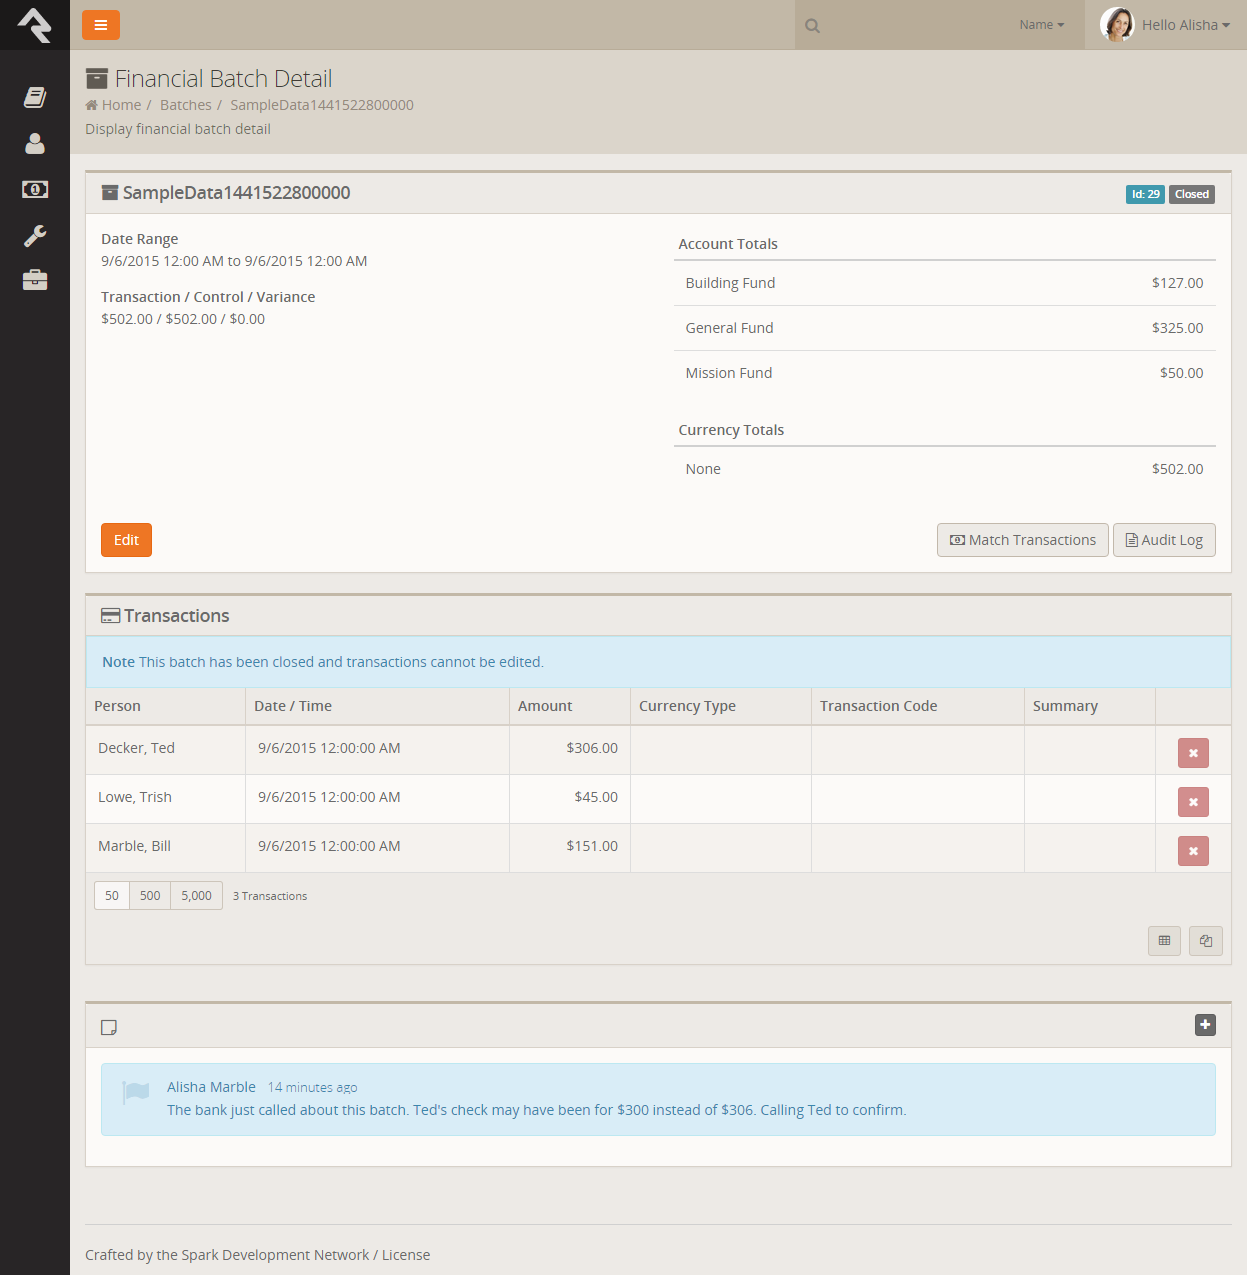
Adding Multiple Note Types to a Single Entity
When you add a note to a person on the Person Profile
page you are adding a generic Person Note
to the person entity. What if you wanted to be able to add a new type of note to a
person? Say for instance your organization has a hospital visitation team and they
want to have their own notes that stand out from the default ones. Developer needed...?
Nope! You got this. Let's walk through the steps of adding this new
Hospital Visitation
note type.
The first step is to add the new note type under
Admin Tools > System Settings > Note Types.
From the bottom of the grid select the Add
button and the new type modal will be displayed.
Adding a Note Type
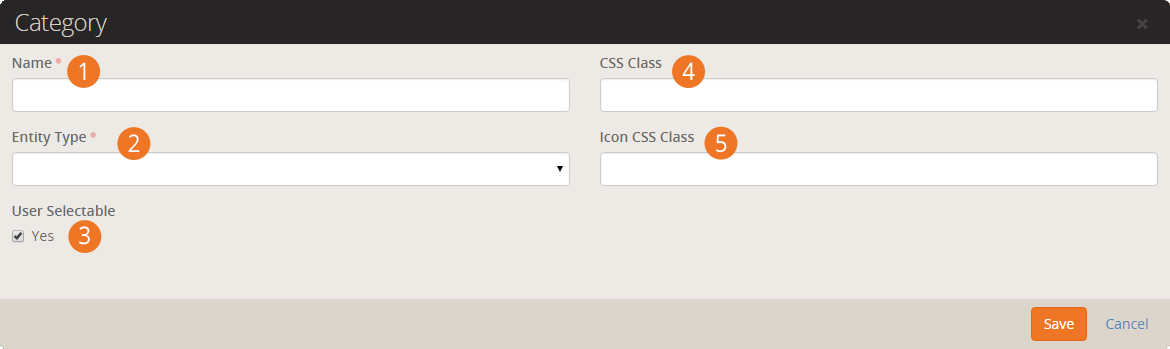
- 1 Name
- The name of the note type that will be used in the various input screens.
- 2 Entity Type
- The type of oject/entity the note is for. In this case the note is for an
individual so we'll select Person.
- 3 User Selectable
- This flag enabled the note type to be selected from the note entry screen. There are
times when you won't want a certain type of note to be selected through the user
interface. Other note types may only be added through workflows or custom code.
- 4 CSS Class
-
This is the CSS class that will be added to the note when displayed on the
screen. This allows you to customize the color and styling of the note. Rock
comes with several general classes built in to assist you. These include:
-
Note-danger (red)
-
Note-success (green)
-
Note-info (blue)
-
Note-warning (yellow)
- 5 Icon CSS Class
- This is the icon to display next to the note.
Once your new note type has been defined it's ready to be used. At this point you may
consider adding security to it to control who has access to view and edit these notes.
External Authentication Services
Rock allows individuals to log in using several different authentication services. The only one active
after an install, however, is the Rock database provider. This provider gives users their own Rock username
and password. For many organizations this will be the default service they’ll use for authenticating a user,
as no additional configuration is required to enable it. Each of the additional services is discussed in more
detail below.
Active Directory
Many organizations already have a Microsoft Active Directory (AD) infrastructure in place for their employees
to log into the network, email and other resources. Rock can use this as an additional authentication source
once configured.
You can setup Rock to use your Active Directory under
Admin Tools > Security > Authentication Services > Active Directory
Active Directory Setup

- 1
- Be sure to activate the security service.
- 2
- 2. Provide the server name of one of your Active Directory Domain Controllers.
- 3
- 3. Configure the AD Domain on the server to authenticate to.
Once the service is configured, you're ready to create logins in Rock. Active Directory logins can't use
the normal Rock registration process. Instead you must add the login manually to the user on the Person
Profile page.
Facebook Authentication
Password fatigue is a common problem with sites that require registration. In fact, a recent study found
that 92% of shoppers abandon a website rather than go through the process of recovering a lost or
forgotten password! However, if the website has a social media login option, they are 65% more
likely to return. The same study showed that a majority of users prefer Facebook as their credential
of choice. Luckily setting up a Rock website to use Facebook authentication is quick and easy. Simply
follow these steps.
- The first step is to visit the Facebook Developer website (https://developers.facebook.com/apps) and
create a new application. When you do this you might consider creating a login for your organization,
rather than linking it to your personal Facebook account.
- At the top of the screen click Add a New App, choose a display name for your app your users will recognise, pick a relevant category, and add an appropiate logo. This logo will be show to your users when they authenticate, so be sure to use an organization logo that they will recognize and trust.
- Then on the left hand side click Settings and
- Select Add Platform, choose Website, and enter in your site URL in the box that appears.
- In the sidebar, Click on Settings and then select the Advanced tab.
- In the Client OAuth Settings section, enter the URL for your site in the "Valid OAuth redirect URIs" field.
You MUST include the port your website runs on (default is 80)
such as http://rocksolidchurch.org:80/ (Note: Only the Web OAuth Login needs to be enabled in this section.)
Click Save Changes when finished.
- Now, the new application's "App ID" and "App Secret" add these values to the Facebook Services
configuration under Admin Tools > Security > Authentication Services > Facebook.
- Finally, be sure to make the app public. First Click App Review in the left menu panel. Then
click the slider to On under Make {{ app name }} Public. (Note that the URLs
behind an SSL are on port 443.)
Facebook is now activated and ready to be used. You can now enable it on each of your login pages by setting the
block settings of the login control to enable the "Facebook" external service provider. Having this block setting
allows you to decide which of your websites allow Facebook to be used (some organizations may prefer not to allow
Facebook to be used to login to their internal Rock site.) Once enabled your login
screen will now have an additional button to allow individuals to login using their Facebook account.
Login Screen
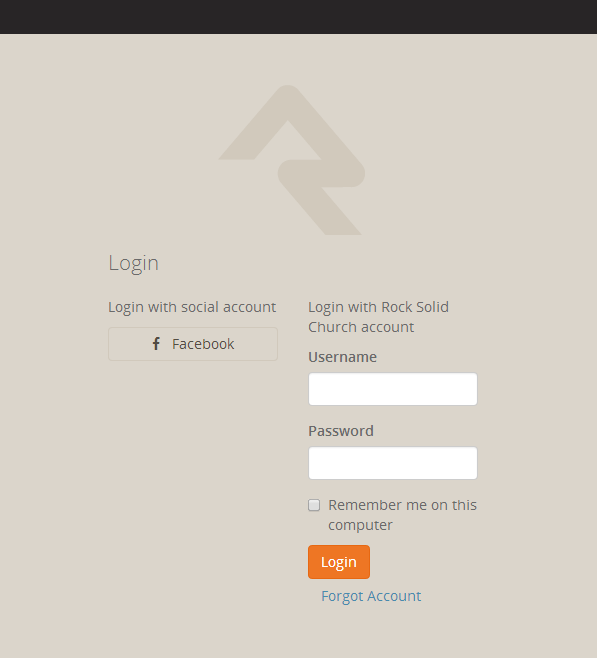
When someone logs in using Facebook they will see a screen similar to the one below that links their Facebook account
to your server.
Facebook Account Link Page
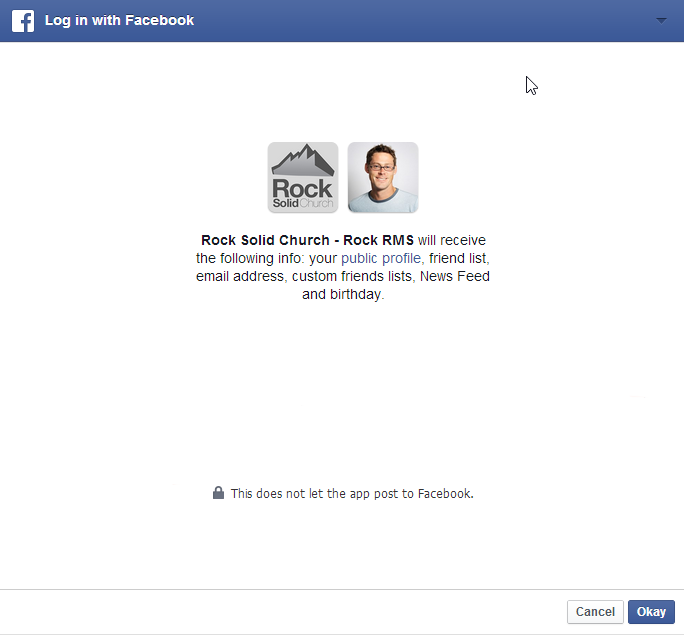
When an individual's Facebook account is used for the first time Rock will apply the following logic to attempt to match
the Facebook account to a Rock record.
- If a person record can be found with the same First Name, Last Name and Email, the login is attached
to this record. As an extra bonus, if no birthdate is in Rock for this person the birthdate from Facebook
will be added to the person’s record in Rock.
- If an exact match could not be made, a new Rock record is created using the information from their
Facebook account. The record status of this new individual is set to "Pending" so they will show up under the "Pending Individuals" report
Tools > Reports > Data Quality > Pending Individuals.
Google Authentication
With the popularity of Gmail, Google authentication is an attractive alternative for many guests. Below are the steps
necessary for Rock to use your guests' Google passwords for authentication.
- Visit console.developers.google.com/start and create a new project for your organization.
If you already have a Google Maps API key, then you will want to use that project.
- On the left hand of the screen expand the APIs and auth menu, click
on the Credentials, and at the top of the screen click on
OAuth consent screen.
- Fill out this screen with your organization’s information. The information given here will be presented to your users when they sign in
for the first time. A preview of the screen your users will see should be on the righthand side of your screen. You’ll want to include
branding that your users will recognize and trust.
- At the top of the screen click on the Credentials tab then click on
the Add Credentials dropdown, select
OAuth 2.0 client ID, and then select
Web Application.
- Under Authorized redirect URLs, you'll need to place the full URL
of all of the login pages you configure to use Google authentication. For example,
http://rock.rocksolidchurch.com/page/3 for the
internal site. When you've finished adding URLs click Create.
- You should be presented with a Client ID and a Client Secret. Note these values and add them to the Google service configuration
under Admin Tools > Security > Authentication Services > Google.
Twitter Authentication
Rounding out the list of popular sites to use for authentication, we also support Twitter. The directions below will get you up and
running quickly.
- Visit apps.twitter.com and create a new app for your organization.
- Give your app a name and a description. This will appear to your users, so make it recognizable. Also put in your organization's
forward facing website URL, and in the callback URL field put the URL for your primary login page. This will be overridden but the callback
URL field needs to have a value for the authentication service to work (for example:
http://rock.rocksolidchurch.com/page/3). Click
Create.
- Navigate to the Keys and Access Tokens tab at the top and note the
Consumer Key and Consumer Secret values. Add these to the Twitter service configuration under
Admin Tools > Security > Authentication Services > Twitter.
- In order for your application to connect Rock user accounts to Twitter accounts, you need to request elevated permission for your application to access
email information associated with Twitter accounts. You can do this via this link
https://support.twitter.com/forms/platform
and select the I need access to special permissions option.
Internationalization & Localization
While true internationalization is beyond the scope of the Rock project, we do want to make Rock friendly
for organizations outside of the United States. Each localization topic is discussed separately below.
Phone Numbers
Post install, Rock is configured to support only US-formatted phone numbers. When only one country is
configured, the phone entry field looks like the example below.
Phone Entry With Single Country Configured
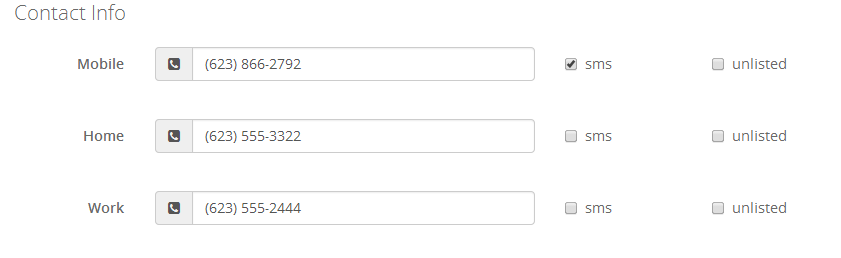
This field can easily be adjusted to support other countries. Simply add country specific formatting fields to the
Admin Tools > General Settings > Defined Types > Phone Country Code defined type.
Each new entry should have the following values.
- Value: This is the country code that is used when dialing the number
- Description: A short description of the phone formatting pattern
- Match Expression: This is a regular expression that is
used to match the value you entered and apply the correct formatting to it. For instance a seven-digit number in the US
would match the formatting rule 555-5555 while a 10 digit number would match to (555) 555-5555.
- Formatting Expression: This string is used to apply the formatting to the matched number. Each grouping of numbers
is represented by a $#.
Phone Configuration
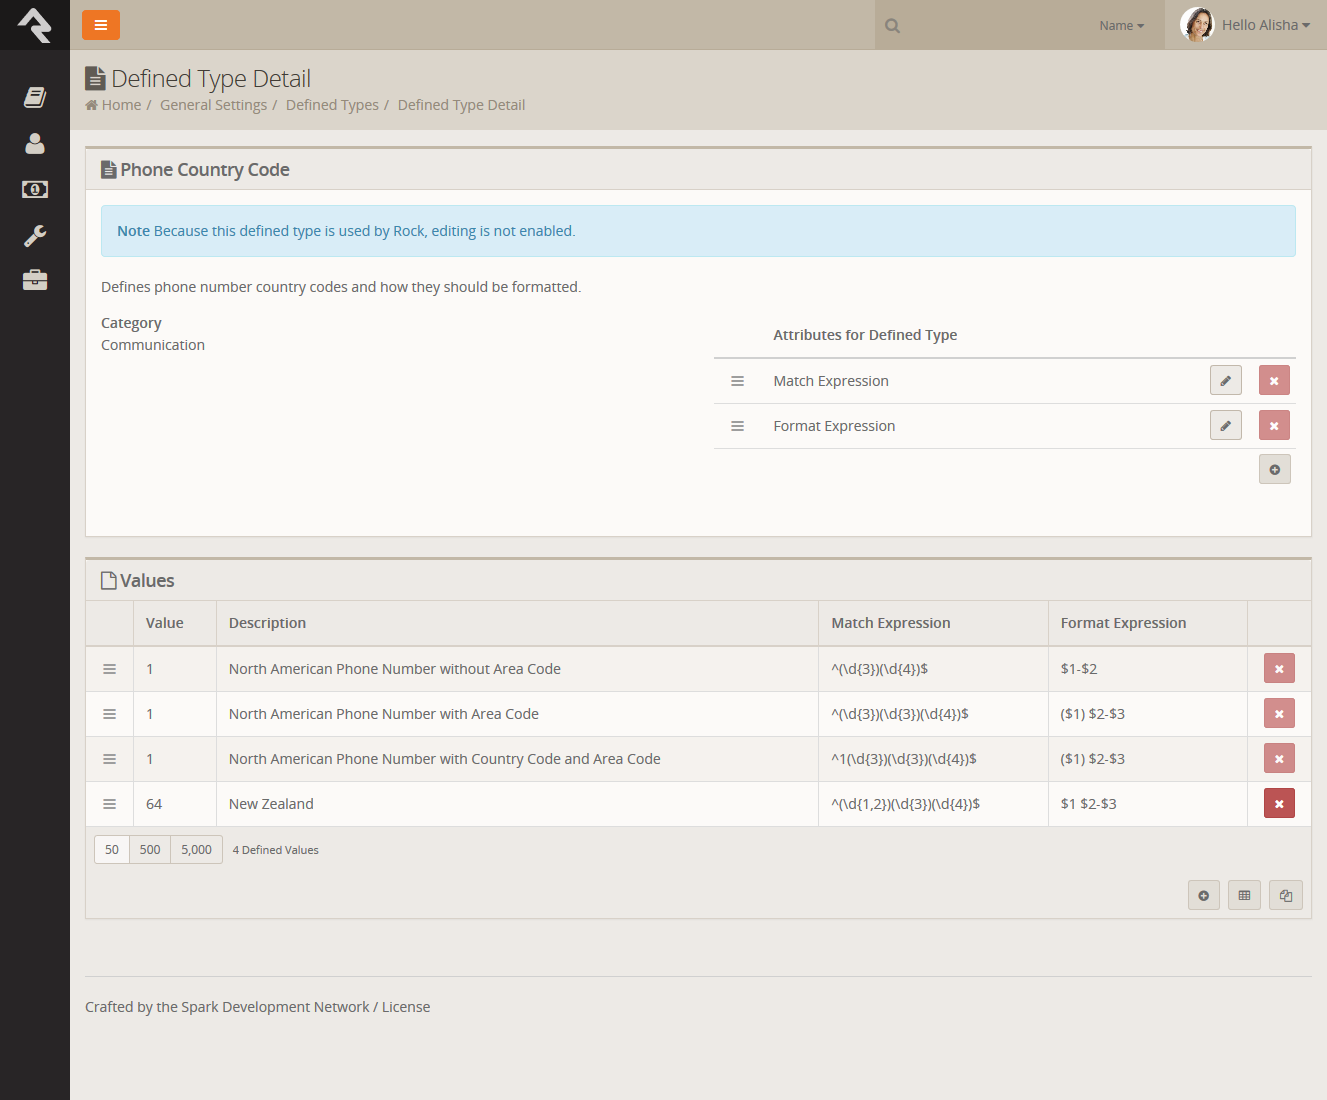
Once you add a second country, the phone number field will change a bit in look. You will notice the addition of a country code
selection at the beginning of the input. The phone country code listed at the top of the defined type list will become the default country code.
Phone Entry With Multiple Countires Configured
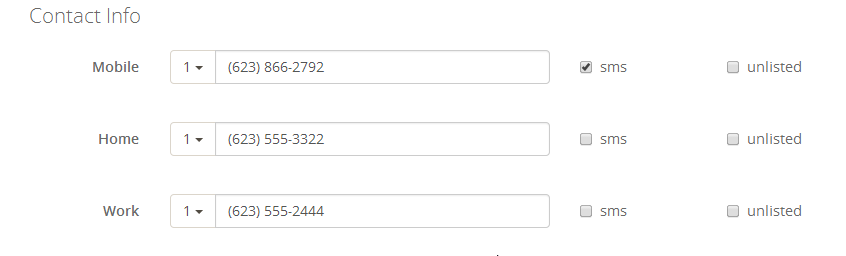
Formatting Phone Numbers on the Person Profile Page
There is a setting on the Bio block used on the Person Profile page that enables the country code to be prepended to all
phone numbers. Enabling this setting may help the formatting for many international organizations.
Dates & Times
We believe the .Net framework that Rock is built on should handle the formatting of dates and times correctly across regions. If you find an area of Rock
that shows a date and/or time in a US format, please let us know by opening a Rock issue.
Before opening a request, be sure to check the server's culture setting. This can be found on the ‘System Information’ dialog access from the Admin Toolbox
at the bottom of each page.
Currency
There really isn't any magic in Rock’s implementation of local currencies. Behind the scenes, currency is stored simply as a number. You can
change the currency symbol displayed within the application under
Admin Tools > General Settings > Global Attributes > Currency Symbol.
It’s Important To Understand...
Changing the currency symbol doesn’t have any other effect than changing the symbol in front of amounts when displayed. Be sure that your payment
gateways are properly configured for the same currency as the symbol you are displaying, otherwise individuals will be incorrectly credited in their account.
Symbol Cheatsheet
Looking for the proper symbol for your region? Try starting with this currency cheatsheet.
International Address Support
By default, Rock is set to accept and display US-formatted addresses. For most organizations operating inside the US, this will be the preferred
configuration. Enabling support for international addresses is simple and remarkably powerful. Let’s take a look.
Enabling International Addresses
The first step is to tell Rock that you would like to use international addresses when editing and viewing addresses. Enabling this is simple.
- Navigate to Admin Tools > General Settings > Global Attributes.
- Select the Attribute Support International Addresses Value and select
the value Yes on Support International Addresses.
Rock will now display the inputs required for storing international addresses. It will also display addresses in an internationally-friendly way.
That was the simple part - now for the power!
Configuring International Addresses
Unfortunately, we live in a world with few standards. Why the world has not accepted the mile is beyond us (5,280 feet in a mile makes
perfect sense. Brilliant really...) Perhaps nowhere is this more evident than with addresses. Some countries have 'states' others 'provinces' some
'zips' others 'postal codes'. Some put the zip first; others put it last.
Rock allows for a good deal of configuration on how these international addresses are entered and displayed. With a few exceptions, the configurations for
each country will need to be adjusted as they change on a seemingly daily basis. To complete the configuration, follow these steps.
-
Be sure that the countries you need are in the country list
Admin Tools > General Settings > Defined Types > Countries. Also ensure that the correct abbreviation is in the
Value field and the proper terms for City, State and Postal Code are correct. Also adjust the
Address Format as needed to fit the requirements of the country. This format is what will be used to
display addresses inside of Rock for the given country.
Country Configuration
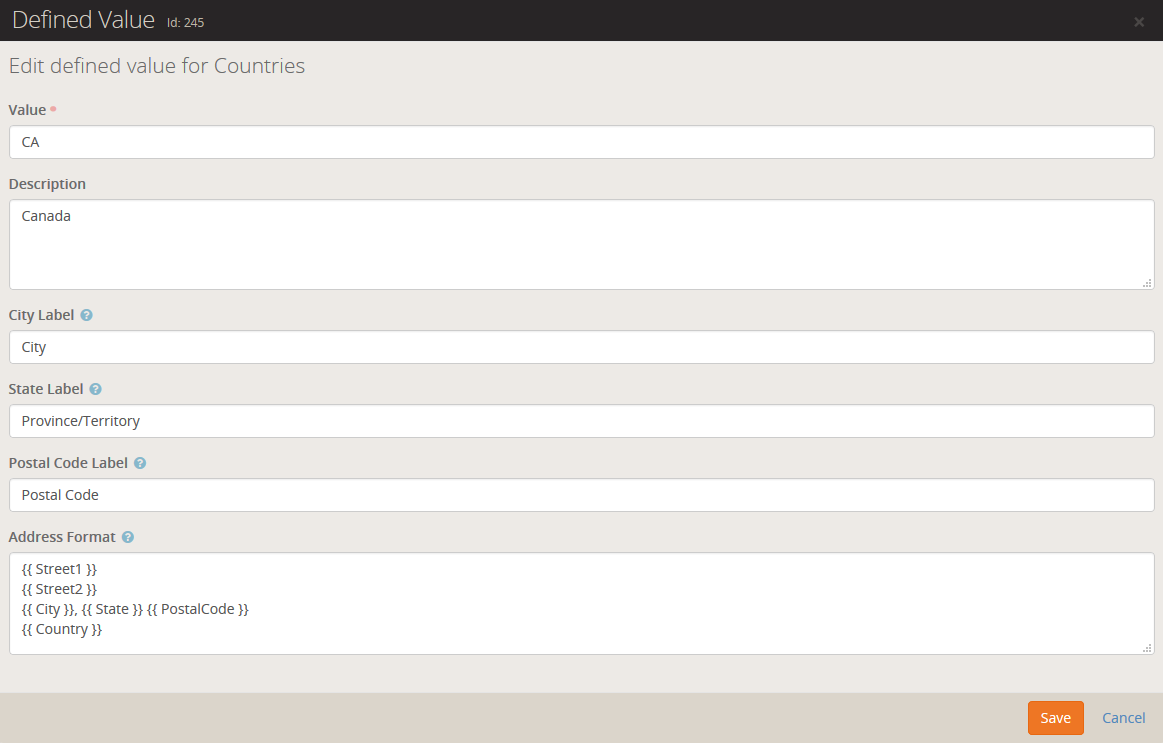
-
Next, enter the Address States for the countries that will be commonly used. You’ll find these under
Admin Tools > General Settings > Defined Types > Address States. When entering new states, be sure
to match them to the country using the country dropdown.
When entering states you will enter the state abbreviation (e.g. 'AZ') in the
Value field and the full name (e.g. 'Arizona' in the
Description. Both values are required.
Rock will now display the inputs required for storing international addresses. It will also display addresses in an internationally-friendly way.
Country Preference
When showing a list of countries, Rock will put the country of the organization both at the top of the list and also in alphabetical order. This allows the
most commonly-selected country to be an easy selection for your users.
School Grades
Rock provides a customizable system for determining the grade / year an individual is in their education. You can read more about
how this grade system works in the
Person & Family Field Guide.
Strategies for Full Localization
Full localization, including the support of multiple languages, is outside of the scope of the Rock project. However, it is possible for someone
to fork Rock's source and localize the code and database contents. If you are interested in starting an internationalized port let us know and we'd
be happy to help share your work.
What To Do When Things Go Wrong
In life there will always be problems. The key is how you go about solving them. Below are a few tips to help you successfully
navigate issues as they arise.
Your best resource in dealing with problems is knowledge. The more you know about how Rock works, the better off you'll be. We
strongly recommend reading each manual that comes with Rock. You even might make it a habit to re-read manuals more than once. With
each reading, your understanding of the material will grow. You may find that new ideas come to you as you cover the material
on multiple reads.
What To Do When Rock Won't Load
You make a configuration change and next thing you know Rock's not loading any longer. What should you do?! First, relax. A calm
mind will lead to a quicker resolution while stress might only dig you in deeper. Here are some things you should try first.
Check For Exceptions In The Database
First check the exceptions log in the database. This is made a bit tricky because you can't use Rock's built-in
screens to check the logs. Instead, you'll have to use SQL Server Manager or a similar tool to view the errors.
Once you connect to your database, look into the ExceptionLog
table. You can also try running the SQL statement below to view the error.
SELECT TOP 100 *
  FROM [ExceptionLog]
  ORDER BY [CreatedDateTime] DESC
Check For Exceptions In The File System Log
When things are so bad that Rock can't even write to the database, we'll write the exception to a
Comma Delimited File on the web server's file system. The file is located at ~/App_Data/Logs/RockExceptions.csv.
Getting 500 Errors To Display
When all you get back from Rock is a server 500 error, you can modify your web.config to return a more
detailed error message.
Be Very Careful
Incorrectly editing your web.config file can cause serious problems. Be sure to make a copy of the
original file before editing. Also be sure to change these settings back when you are done.
Two changes will need to be made before a detailed error will be displayed.
- Immediately after the line
<system.web> add a new line with this text <customErrors mode="Off"/>
- Next you will need to comment out the custom error configuration. To do this, simply edit the existing comment from this:
<!-- Add a custom handler for 404 errors to load Http404Error page.
The Http404Error page will check to see if the site has a configured 404 page, and if so, it will then redirect to the custom page.-->
<httpErrors errorMode="Custom" existingResponse="Replace">
   <remove statusCode="404" subStatusCode="-1" />
   <error statusCode="404" path="/Http404Error.aspx" responseMode="ExecuteURL" />
</httpErrors>
to this:
<!-- Add a custom handler for 404 errors to load Http404Error page.
The Http404Error page will check to see if the site has a configured 404 page, and if so, it will then redirect to the custom page.
<httpErrors errorMode="Custom" existingResponse="Replace">
   <remove statusCode="404" subStatusCode="-1" />
   <error statusCode="404" path="/Http404Error.aspx" responseMode="ExecuteURL" />
</httpErrors>-->
What To Do Next
At this point, you should now have more information about what's going on behind the scenes. Hopefully
you can to fix it from here. If not, you might try:
-
Posting into the Rock Q&A. Be sure to include any error
message you're getting.
-
Seek help from a Rock consultant. You might ask in the Q&A section for a recommendation. We hope to build
a rating system for external resources soon.
Scaling Rock
Large organizations may be interested in scaling Rock using multiple servers. This
not only provides extra capacity but provides fail-over in case a server goes down.
Before you jump to adding a new server, there are a couple of things you should know
about.
Caching
Rock uses a very sophisticated and fast caching sub-system. The cache greatly reduces
the need to read from the database. Tuning this cache is so important to us that we
even show the Cache Hit Ratio in the bottom admin bar. The good news is Rock's cache
is VERY fast as it uses the server's memory. Unfortunately, it makes running on
multiple servers somewhat difficult. How? Let's walk through an example.
Say you're running two Rock servers A and B. While connected to server A you make
some security edits. These edits are updated in the database and in server A's cache.
Unfortunately, the original security settings are also in server B's cache and he has
no idea they've been updated. So what's an admin to do? Well, we have you covered!
Redis to the rescue! Redis is a very fast NOSQL database that many large websites use
to increase performance. Redis has two features that make it a great solution. The
first is the NOSQL database. Many people use the Redis database for caching. The
second feature is a messaging system that allows you to publish and receive small
messages. Think of it as a chat room of sorts. Because Rock's in-memory cache is so
fast, the architects decided not to use the Redis database. Instead, when enabled,
Rock servers can use Redis to share when they update or flush their cache. If you
think back to the chat room analogy, think of the servers as connecting to the
chat room to send messages to each other whenever they update their cache. Pretty
simple right?
Let's walk through how you can setup multiple Rock servers.
-
Install a Redis server on your network. Because Rock doesn’t use it for
storing cache, it doesn't need to be a beefy sever, but it should be
reliable and always on. See the Redis
for more information on the various server options available. Since Redis
is open source, many free options are available. If you’re mainly a Windows
shop you should consider using the Microsoft Redis server available at:
https://github.com/MSOpenTech/redis/releases.
It is recommended that you use the 3.x version of this server.
-
Install your Rock websites. Be sure that the same versions of Rock are
installed on each server and that they use the same web.config. Each
install of Rock has its own encryption keys located in the web.config.
These keys must be the same on each server.
-
OK, we said the web.config files should match… except for one small
setting. Be sure that only one of your servers has the
RunJobsInIISContext
setting set to true. Running the Rock jobs on two servers at once can lead to some
interesting (read: bad) situations.
-
To enable the Redis caching notifications you'll need to set the
EnableRedisCacheCluster
setting to true in the web.config. You'll also need to set the
RedisConnectionString
to point to your Redis server. An example of this connection
string would be
redis.rocksolidchurchdemo.com:6379.
Pro Tip
At some point you might want to know which of your servers are connected to the Redis 'chat room' for caching messages. If you open up a Redis cli terminal window and subscribe to
the chat room using 'subscribe rock-cache-instructions' in one window and publish the command 'PING' in another cli window (using publish rock-cache-instructions PING) each Rock instance
will PONG back with their hostname and application. This includes the Windows Service if you have it running.
Rock Jobs Engine
By default, the Rock Job engine runs inside of the IIS context. For scaling
purposes, you may wish to run it as a Windows service on a different server.
See the Jobs
chapter for more information on configuring the job engine to run as a Windows
service.
Under the Hood
While Rock comes preconfigured to run opimally on most systems, here's a few things you should know.
Inital Slow Response Times
Here's the scoop on slow initial Rock load times. Rock uses a database access technology call Entity Framework (EF). On first load (the very first page
that's started when the application loads) it can take a few seconds for EF to check the database to see if any changes are required. Subsequent pages will load
much faster. You will notice that once a page loads the second load of that page is super-fast. That’s Rock’s caching engine kicking it. So that's all fine and good
until…
IIS's AppPools (think of it as the engine that powers Rock) need to be refreshed on occasion. By default this happens every 29 hours
( you should reset yours to always occur at a specific time, like 1am). When the AppPool recycles the whole EF start up happens again. For more
information on configuring the AppPool see this blog post.
We'd recommend that you use an HTTP status tool like Pingdom to constantly poll your site. Not only will this notify
you went it's down, but it will also be the first to load your page after a AppPool recycle.
Once Rock is started there is an internal keep alive process to ensure your site doesn't go into a sleep like mode. Once the initial page is
loaded this process will ensure Rock stays awake and responsive.